DJI Phantom 3

How To Screenshot On Windows

Embark on a Quest with How To Screenshot On Windows

Step into a world where the focus is keenly set on How To Screenshot On Windows. Within the confines of this article, a tapestry of references to How To Screenshot On Windows awaits your exploration. If your pursuit involves unraveling the depths of How To Screenshot On Windows, you've arrived at the perfect destination.

Our narrative unfolds with a wealth of insights surrounding How To Screenshot On Windows. This is not just a standard article; it's a curated journey into the facets and intricacies of How To Screenshot On Windows. Whether you're thirsting for comprehensive knowledge or just a glimpse into the universe of How To Screenshot On Windows, this promises to be an enriching experience.

The spotlight is firmly on How To Screenshot On Windows, and as you navigate through the text on these digital pages, you'll discover an extensive array of information centered around How To Screenshot On Windows. This is more than mere information; it's an invitation to immerse yourself in the enthralling world of How To Screenshot On Windows.

So, if you're eager to satisfy your curiosity about How To Screenshot On Windows, your journey commences here. Let's embark together on a captivating odyssey through the myriad dimensions of How To Screenshot On Windows.

Showing posts sorted by date for query How To Screenshot On Windows. Sort by relevance Show all posts

You Don't Have To Live With These Default Windows 10 Settings


Do i have to live you dont have to live you don t have to live like a refugee lyrics you don t have to live like this obama you don t have to train today shirt you don t have to hide you don t know me song
You Don't Have to Live With These Default Windows 10 Settings


You Don't Have to Live With These Default Windows 10 Settings

Windows 10 has been out of the spotlight since Microsoft launched Windows 11, its latest operating system, in October 2021. Windows 11 reached broad deployment earlier this year after a staggered rollout spanning half a year, meaning it's now ready for all compatible computers. (Here's how to download it if you're ready.) However, there are plenty of people who are unable to or uninterested in upgrading. And like any OS, Windows 10 has a few default settings that are less than ideal. 

Some are just annoying (you don't really need Cortana "getting to know you"), while others will actually slow down your device, show you tons of notifications and ads and collect more of your information than you might be comfortable with. As long as Windows 10 is still what's powering your computer, it's worth it to optimize your settings to make sure your PC is running the best it can.

You'll want to spend just a few minutes looking into these settings and potentially turning them off, for the sake of privacy, speed and convenience. Here are seven default settings that you can disable in Windows 10. (You can also check out some top Windows 10 tips and tricks and how to troubleshoot common Windows 10 problems.) 

File-sharing updates

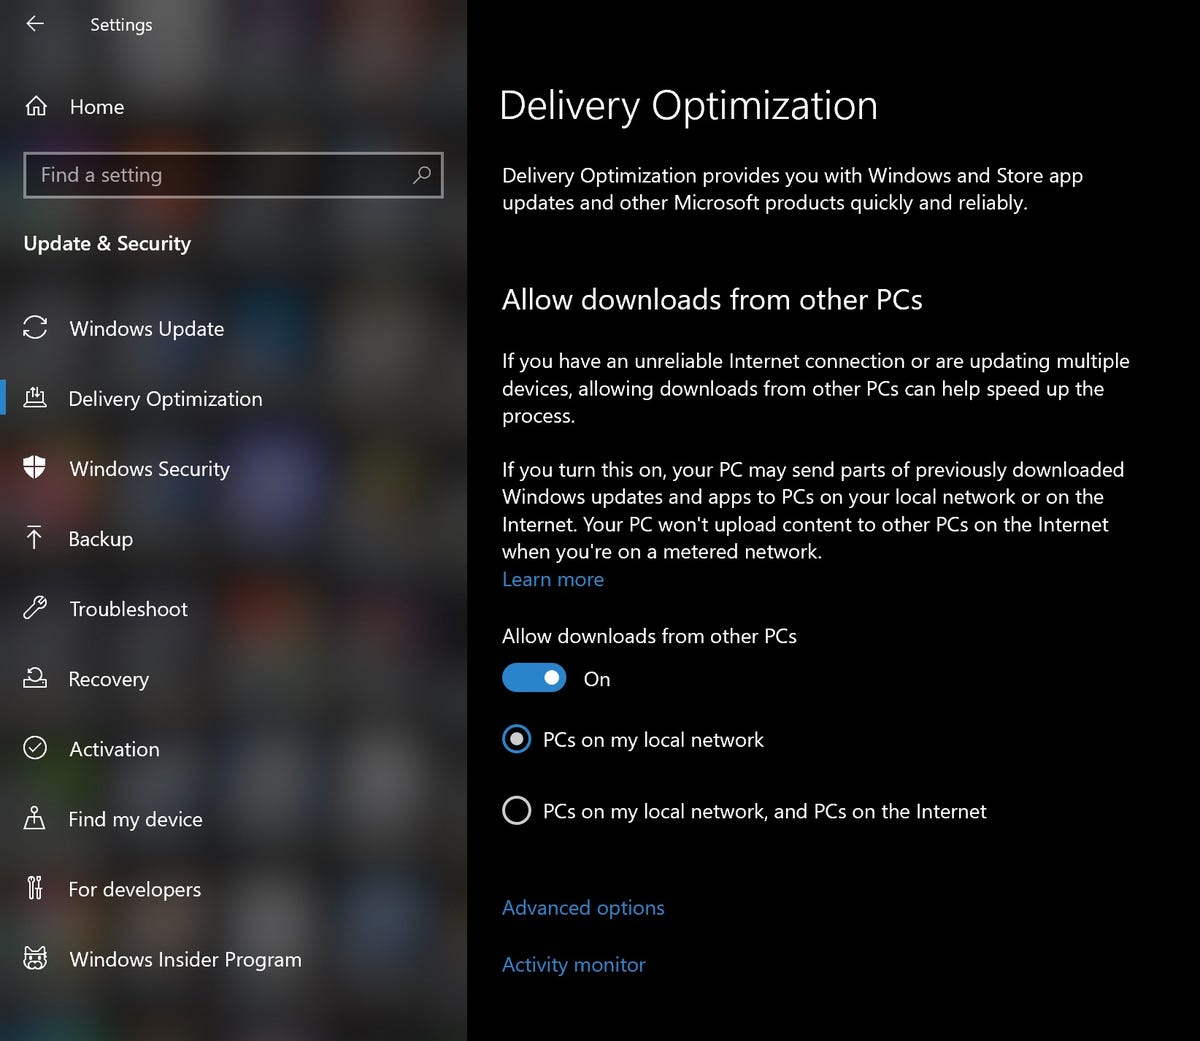
A feature Windows 10 added is an optimized update delivery system that lets you download updates from other Windows 10 computers over the Internet (not just from Microsoft's servers). The catch is that your computer is also used as an update-sharing hub for other Windows 10 users.

This feature is turned on by default, but you can turn it off by going to Settings > Update & security > Advanced options > Delivery optimization and toggling off Allow downloads from other PCs

win-10-delivery-optimization
Screenshot by Alison DeNisco Rayome/CNET

Annoying notifications

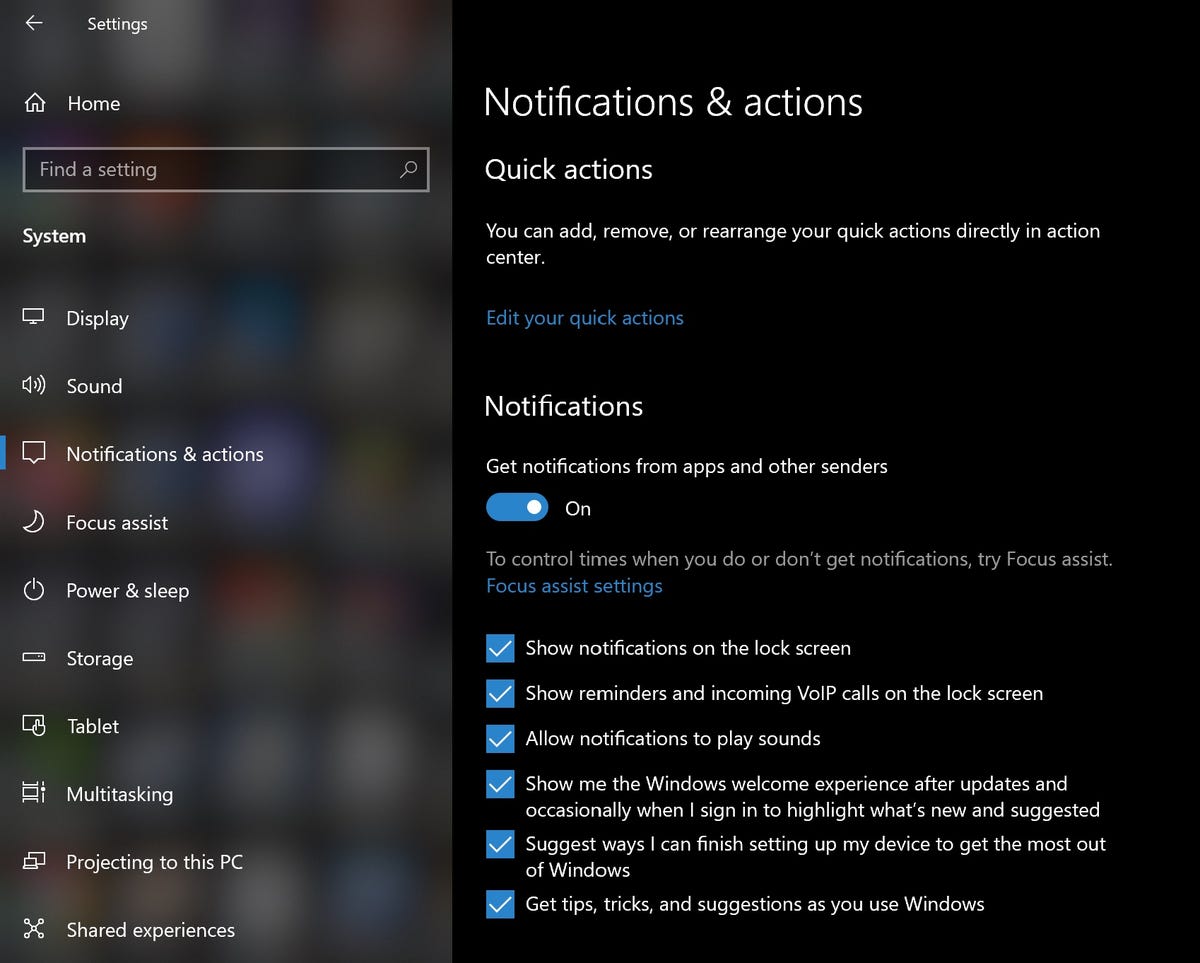
The Windows 10 Action Center is a handy central hub for all of your notifications -- apps, reminders, recently installed programs. But notification overload is definitely a thing, especially when you add unnecessary notifications (such as Windows tips) into the mix.

To get your notifications under control, go to Settings > System > Notifications &actions

Turn off things like "Get tips, tricks and suggestions when you use Windows" or "Show me the Windows welcome experience after updates and occasionally when I sign in to highlight what's new and suggested" as well as any unwanted notifications from individual apps.

win-10-notifications
Screenshot by Alison DeNisco Rayome/CNET

Start menu ads

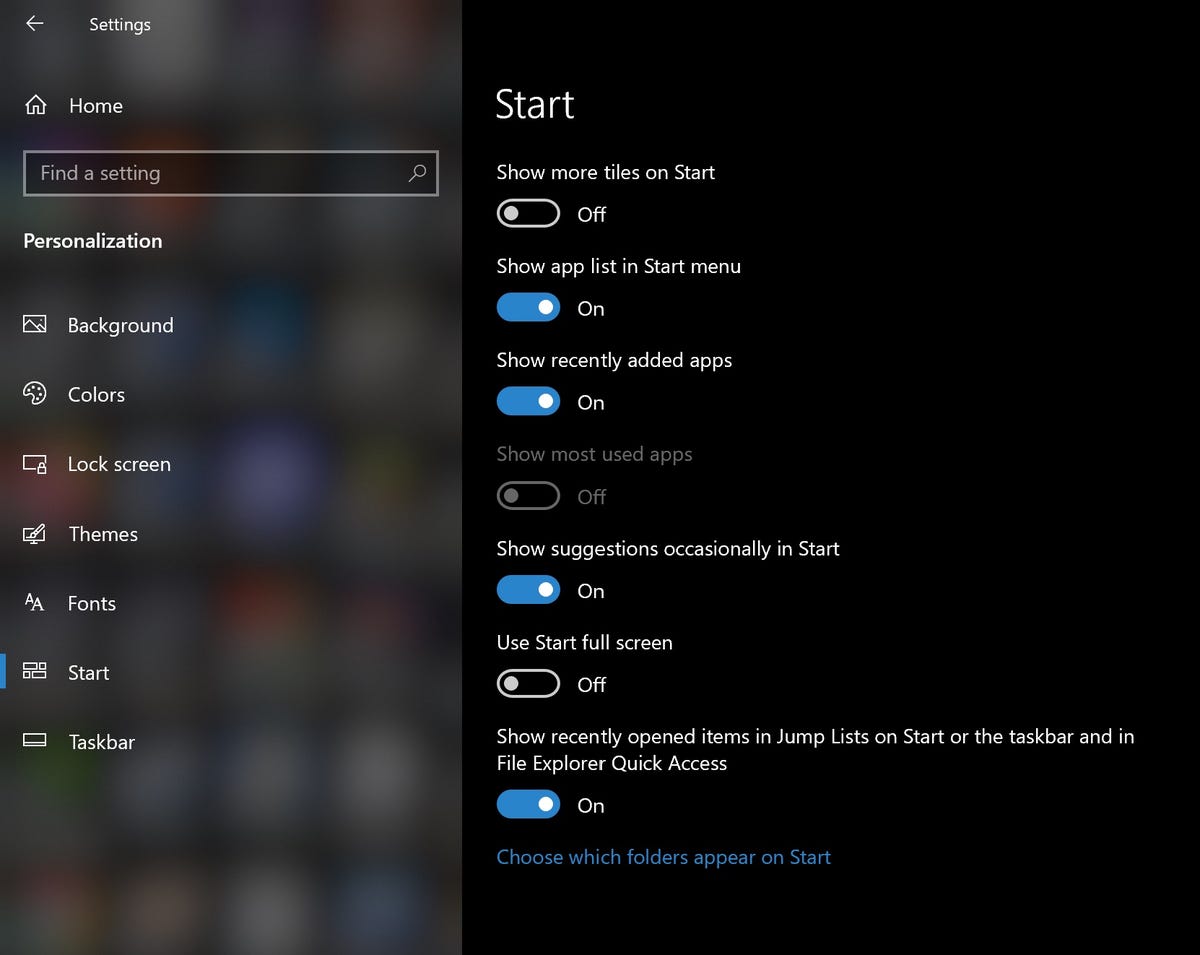
Microsoft pushes its Windows Store apps -- so much so that you may be seeing apps you never downloaded in your Start menu. These suggested apps are basically ads. 

Turn off these pesky ads by going to Settings > Personalization > Start > Show suggestions occasionally in Start. For more information, check out our Windows 10 Start menu guide.

win-10-start-suggestions
Screenshot by Alison DeNisco Rayome/CNET

Targeted ads from third-party apps

Microsoft is definitely keeping tabs on your preferences and browsing habits in Windows 10. You even have a unique advertising ID (tied to your Microsoft account), which the company uses to show you targeted ads. Oh, and Microsoft also shares this advertising ID profile with third-party apps from the Windows Store, unless you turn this information sharing off.

You can turn off sharing this type of info by going to Settings > Privacy > General and toggling off Let apps use advertising ID to make ads more interesting to you based on your app activity (Turning this off will reset your ID).

win-10-app-tracking
Screenshot by Alison DeNisco Rayome/CNET

Cortana 'getting to know you'

Cortana, your adaptive personal assistant in Windows 10, gets, well, pretty personal with the information it collects about you, such as speech and handwriting patterns and typing history, which you may consider to be just a little creepy.

You can stop Cortana from "getting to know you," and clear that information from your device, by going to Settings > Privacy > Inking & typing and toggling the option off. 

win-10-inking-and-typing
Screenshot by Alison DeNisco Rayome/CNET

Apps running in the background

In Windows 10, by default, many apps run in the background (even if you don't have them open). These apps can receive information, send notifications, download and install updates and otherwise use up your bandwidth and your battery. If you're using a mobile device and/or a metered connection, you may want to turn this feature off.

To do so, go to Settings > Privacy > Background apps and either toggle off Let apps run in the background or toggle off each app individually.

win-10-background-apps
Screenshot by Alison DeNisco Rayome/CNET

All the syncing

Windows 10 is all about syncing. Everything (system settings, themes, passwords, search history) syncs across all your signed-in devices by default. But not all of us want our search history to sync between our phones and our computers, so here's how to turn syncing off.

To turn off settings syncing (including themes and passwords), go to Settings > Accounts > Sync your settings. You can turn off all settings syncing, or you can selectively turn off specific settings.

For more, check out the best Windows 11 features and how to use them and everything to know about upgrading from Windows 10 to Windows 11


Source

https://nichols.my.id/how-to-fix-a-bad-zipper.html

.

Samsung's Galaxy Z Fold 4 Is Too Expensive And That's The Point


Samsung s galaxy z fold 4 is too expensive and that s the deal my dear lyrics samsung s galaxy z fold 4 is too expensive and that s the ball game samsung s galaxy z fold 4 is too expensive and that s mine now crossword clue samsung s galaxy z fold 4 is too expensive and that s how i saved the world samsung s galaxy z fold 4 is too expensive and good samsung s galaxy z fold 4 is what percent samsung s galaxy tab s6
Samsung's Galaxy Z Fold 4 Is Too Expensive and That's the Point


Samsung's Galaxy Z Fold 4 Is Too Expensive and That's the Point

Among the devices revealed at its Unpacked event last week, Samsung showed off its new flagship Galaxy Z Fold 4 foldable phone, which packs improvements like better multitasking software, a slimmer design and a more durable body. One thing Samsung didn't change is the sky-high $1,800 price tag -- which few consumers can likely afford. But that exclusivity is exactly why the Fold 4 exists. 

It may seem perplexing to keep the Z Fold 4 at about twice the price of other premium phones when Samsung wants foldables to become more mainstream, as CEO TM Roh said during Unpacked. I argued that price cuts would be the best way Samsung could combat Apple this holiday season. Since Samsung is holding steady with the Z Fold 4's price, it's clear the company is content to keep it a niche device that's out of reach for all but the most deep-pocketed consumers.

The Z Fold 4 sits atop a strata in which it has no real rivals. It's essentially a Ferrari amid Mercedes and BMWs. Creating that level of exclusivity is entirely the point, giving Samsung an exciting and aspirational product that generates buzz and interest in the entire lineup. Chipping a few hundreds dollars off its price won't make a difference, said IDC Research Director Nabila Popal.

Keeping the Z Fold 4 at $1,800 is "the right move, in my opinion, even if it won't be affordable to the masses," Popal said.

This dynamic, which runs counter to the idea that a lower priced foldable may spur interest in the category, is one of the predicaments this whole area faces. Foldables occupy an exciting niche of the phone business, which has seen an endless parade of drab metal and glass slabs come through for more than a decade. But the high price tag keeps them from really breaking out. 

The only answer is to slowly build up the market and interest through a combination of exciting, but less attainable, options like the Z Fold 4, and the comparatively affordable $1,000 Z Flip 4.

Samsung is hoping the Z Fold 4's dynamic design -- which is still impressive in person -- gives the company a pop ahead of Apple's own event next month and generates excitement about foldables in general. 

Samsung is relying on the Z Flip series to sell the vibe of foldables, transitional phones that alter their shape. And Samsung has work to do, because they're still scarce in the wild, with research firm IDC estimating that a bit over 7 million foldables shipped in 2021 compared with 1.3 billion smartphones sold last year.

From a market perspective, the small volume the Z Fold 4 could get may help Samsung gain back some of the global share of high-end phones, as Apple sells seven of every 10 $800-and-up premium phones globally. 

Samsung Galaxy Z Fold 4
Screenshot by CNET

No price cuts while parts are expensive

Though price cuts would help Samsung make its foldable phones more mainstream, the company may have little choice but to keep its prices static. Unlike truly mainstream products, like Samsung's Galaxy S series, which have flat displays and components used in many other smartphones, the small volume of foldables sold every year have specialty parts.

"That means the very specialized components required ... are still only produced in small quantities and therefore are likely still very expensive," Technalysis Research analyst Bob O'Donnell said.

That leads to a chicken-and-egg problem that impacts every specialty device: Parts can't get cheaper until they're made at scale, and there's no point in making them at scale while consumers buy too few of the pricey devices using those parts. That's the reason so few phone-makers are making foldables, including Apple, O'Donnell said.

"We can't really ignore the fact that the supply chain is not really ready for an Apple-level product, and that's part of the reason Apple hasn't [made a foldable] either," O'Donnell said.

Samsung is splitting the difference with the Z Flip 4, a clamshell foldable that has half the footprint of a "flat" smartphone when it's closed, yet unfolds to show an inner screen as large as any regular phone's display. Samsung sees the Z Flip 4 as an "entry device" that turns bold buyers into foldable lifers, an on-ramp for consumers to eventually upgrade to the bigger, pricier Z Fold line. 

Samsung says the Z Flip is the better-selling series, accounting for 70% of the company's foldables shipped, but both devices serve different demographics. The Z Flip is stylish but ultimately just a shrinkable version of a typical 'flat' smartphone, not a junior edition of the productivity-enhancing Z Fold devices that unfold into tablet-size screens.

More foldables are being sold every year, and IDC predicts shipments will grow to 25 million foldables in 2025. Whether that's enough volume to enable cheaper foldables is tough to forecast. Samsung has at least gotten creative with offering foldables with more value. 

Facebook network on the Samsung Galaxy Z Fold 4

Facebook on the Samsung Galaxy Z Fold 4.

Screenshot by CNET

Cheaper foldables through trade-ins and carrier deals

The industry is working to make foldables a thing. You can get a Galaxy Z Fold 4 for less than $1,800 through Samsung's generous trade-in values and various carrier deals. Samsung retains its elite price tag, carriers get more customers signed on to their services, and customers  get their hands on the next evolution in phones.

Samsung's trade-in deals knock $1,000 off the list price of a Z Fold 4 if you send in your older Z Fold 3, Z Fold 2 or this year's Galaxy S22 Ultra. But trade-in values are still pretty generous for the original Z Fold or other flagship Samsung phones from the last few years. Apple's priciest phones also get decent trade-in value, but you'll get barely anything for phones from Google, Motorola, LG or OnePlus.

Carriers can also save you money on the Z Fold 4, with Verizon, AT&T and T-Mobile offering varying trade-in deals to lower the price by up to $1,000. Verizon also offers $800 off a second Z Fold 4 after buying a first, should your household need two foldables.

The other option is to wait for Black Friday or the holiday season, when Samsung may introduce new deals to discount its foldables. 

Just don't hold your breath for Samsung to discount its most premium mobile device. Unlike the Z Flip 3, which got a $150 price cut once its successor was revealed this week, the Z Fold 3 has the same $1,800 price on Samsung's website that it had when it launched a year ago. With high parts prices, years of R&D to recoup, and a lack of competition, there's not much pressure for Samsung to lower its prices.

Samsung is "leading in this space at the moment and can afford to charge a premium before other Android players ramp up in this space, and perhaps even Apple in a couple of years," Popal said.


Source

https://nichols.my.id/how-to-repair-efi-boot-windows-10.html

.

Download The Latest Windows ISO: How To Create A Windows 11 Install USB Drive


Create windows install iso create iso software free download latest windows 7 iso download latest windows iso file download latest windows 11 iso download the latest windows update download the latest version of google chrome
Download the latest Windows ISO: How to create a Windows 11 install USB drive


Download the latest Windows ISO: How to create a Windows 11 install USB drive

Windows 11  will start rolling out to eligible devices today, but not everyone will get it right away. The free update brings plenty of new features, complete with a new start menu, widgets and a refreshed interface. Even the Microsoft Store is getting a big update (though don't expect to see Android apps right away).

Launches are bound to run into issues and bugs. Sometimes, those issues may force you to reinstall Windows 11. An easy way of doing that is by using a USB installation drive that has a copy of Windows 11 on it. With the update safely stored on a flash drive, you can reinstall it at any time, should any issues get bad enough that your only option is to reinstall the update. 

You can also use a USB drive to make it easier to install Windows 11 on multiple computers, or to quickly set up a virtual machine to make testing possible without risking your personal data. 

Microsoft has updated its Media Creation Tool to include Windows 11. You can download the ISO image straight from the source and flash to a USB drive yourself. 

To create a Windows 11 installation drive, you'll need an empty 8GB USB drive, a Windows PC and up to a few hours of your time. You can download the system image using a Linux computer or Mac, but we're going to focus on using a PC for this guide. Below are the steps you'll need to follow.

Download the latest Windows 11 ISO from Microsoft

To download the Windows 11 ISO image you'll need to create a USB bootable drive. First, visit the Download Windows 11 page. You'll see a few other options for installation, but you're looking for Download Windows 11 Disk Image (ISO).

Scroll down the page until you see a dropdown labeled Select Download. Click the dropdown and then select Windows 11, then click Download. Next you'll be asked to select a language, then click Confirm again, followed by clicking on the 64-bit Download button to finally begin downloading the ISO. It's a fairly large file at 5.1GB, so depending on your internet connection, it may take some time for the download to finish. 

Once the download finishes, your work isn't completely done. You need to burn that ISO image onto a USB drive. And to do that, you'll need some extra software. Don't worry, though, it's an easy process. 

With the ISO finished, this is how Rufus should look before you flash Windows 11 to your USB drive. 

Screenshot by Jason Cipriani/CNET

How to flash Windows 11 to your USB drive

To turn a standard USB drive into an installation drive, you'll need to use a program called Rufus. It's the same app that Microsoft itself uses in its guide for creating a Windows 10 bootable drive. Visit the company's website to download and install Rufus, which should only take a few seconds. It's a small program. 

Plug in your USB drive and open Rufus. Select your USB drive using the Device dropdown. Remember, anything on your thumb drive will be erased during this process -- so make sure it's empty or you have everything you need off of it. 

Under Boot Selection select Disk or ISO image and then click on the text that reads SELECT and pick the ISO file you created in the previous step. 

There's a section in Rufus labeled Image option with several different settings -- leave everything as the default. The same can be said for format options unless you want to change the name of the USB drive to something like "Windows 11 install" or along those lines. 

Click Start when you're sure all of the options are set. You'll again have to wait while the program does its job, but it should be a much quicker process than downloading and creating the ISO. It took just over 15 minutes on a Surface Pro X for me. 

Windows 11 update on a laptop

You can now install Windows 11 with ease. 

Sarah Tew/CNET

What to do with a Windows 11 installation drive

Once Rufus finishes, you can remove the USB drive from your PC and either keep it somewhere safe in case you need to reinstall Windows 11 on your PC, or you can plug it into another PC and use it to install Windows 11 by opening the drive and double-clicking the setup.exe file. A few seconds later, a Windows 11 installation screen will appear, walking you through the rest of the process. 

Alternatively, you can try and use the USB drive as a bootable installation drive. However, this is where things get even more complicated, due to Windows 11 requiring Secure Boot, and the USB drive we just created not being compatible with that feature. I suggest waiting for Microsoft to release an official tool, but if you insist, I found a guide that walks you through the extra steps of making a bootable USB drive that's compatible with secure boot on Tom's Hardware, starting at step 11. 

Curious what all the fuss is about Windows 11? We have your back. There's a big interface redesign making its debut that includes a centered Start menu, but don't worry, you can move it back to the left corner if you want. And, finally, if you've ever had the desire to use Android apps on your PC, well, Microsoft is making that possible.


Source

https://recipesblogg.kian.my.id/

.

How To Force Quit Apps On A Chromebook


How to force quit apps on a Chromebook


How to force quit apps on a Chromebook

When things go sideways with Windows, there's Ctrl-Alt-Delete to get you to the Task Manager where you can investigate what's causing the problem and end any unresponsive apps. When something goes wrong on a Mac, there's Command-Option-Escape to call up the Force Quit Applications window. But when an app freezes or starts acting sluggish on a Chromebook, where do you turn? Is there a keyboard shortcut that can put an end to your troubles?

I have good news for Chromebook users. There is such a keyboard shortcut, and it's quite simple. When something is amiss on your Chromebook and you need to force quit an app, hit Shift-Escape. This keyboard shortcut calls up Chrome's Task Manager. Since Chrome apps are the only kinds of apps that a Chromebook runs, Chrome's Task Manager is the only task manager you need on a Chromebook. Just click on the app that's giving you problems and hit the End Process button.

Screenshot by Matt Elliott/CNET

At the top of the Task Manager, you'll see Chrome listed. You can't select it and force quit it because Chrome OS isn't anything more than the Chrome browser with a bit of window dressing, which means that quitting Chrome would amount to shutting down your Chromebook. If you are experiencing an issue that force quitting an app can't solve, then shut down your Chromebook by clicking the system tray in the bottom-right corner of your display and then clicking the power button. Or if you're really stuck, hold down the power button for 3 seconds to power down your system.

For more tips, learn how to print from a Chromebook, run Windows programs on a Chromebook and the best way to use Dropbox on a Chromebook.


Source

Tags:

How To Factory Reset A MacBook, Windows Laptop Or Chromebook To Sell Or Give Away


How to Factory Reset a MacBook, Windows Laptop or Chromebook to Sell or Give Away


How to Factory Reset a MacBook, Windows Laptop or Chromebook to Sell or Give Away

One side effect of spending more time at home during the pandemic is the realization that I have a lot of old tech lying around. A lot. Then, when I made a KonMari attempt at decluttering said tech, I unearthed several things I forgot I had -- including an old laptop I stopped using years ago because it was too slow for my high-end computing needs. 

While this laptop no longer sparked joy for me, it turned out to be a perfect fit for my mom. It just needed to be cleaned up first, and I'm not just talking about removing dust and mystery goo with a few swipes of a disinfectant wipe, though you'll want to do that, too. The type of cleaning I'm talking about is restoring the laptop to like-new condition inside and out. Cleaning the outside is the easy part. Wiping the computer of all your apps, files, folders and other personal information isn't necessarily as straightforward. Of course, how much data scrubbing you need to do will likely depend on the recipient. 

The big picture steps you take to refresh a laptop are the same regardless of whether it's a Windows laptop. Apple MacBook or Chromebook -- save your old data, remove all personal information, then go for a factory reset. It's the actual step-by-step procedure that differs depending on the type of laptop you're dealing with. Below, you'll find everything you need to know and do before giving your laptop a second life. And with supply chain issues, shipping problems and chip shortages making new devices harder to get, passing along a new-to-you laptop can be a welcome holiday gift. 

Last thing first

I typically save the laptop's physical cleaning until last (why clean your fingerprints off twice?), but you may want to start there -- especially if it's been gathering dust in the back of a closet/under a bed/in the garage for the past several years. The basic equipment required for a good laptop cleaning is a can of compressed air and some disinfectant or alcohol wipes. For a slightly deeper clean, you may also want to grab a screwdriver and remove the bottom cover of your laptop (if possible) so you can carefully blow out any dust that's accumulated on the fans and vents. 

After the laptop is clean, you can also wipe down the power adapter and any related accessories. It's also a good idea to ensure the power adapter is still in good, working condition. If you're still not quite sure where to start with the cleaning, check out our complete guide to getting your laptop looking its best.


Gifting a used MacBook

macbook-air-2018-analisis-3
Óscar Gutiérrez/CNET

Before you even think about doing a factory reset on your MacBook, you need to save any data you want to keep. You may have already done this at some point if you migrated data from this old MacBook to a new one using using Apple's Migration Assistant. If that's not the case, it's time to hook up an external drive and use MacOS' built-in Time Machine tool to create a backup. If you have an iCloud account, you can back up your data there as well. 

Sign out of everything

You'll also want to log out of all accounts before wiping your MacBook's drive. Start with iCloud, Find My Mac and iMessage. Then look for individual software accounts you may need to deregister. If you use a browser other than Safari, such as Chrome or Firefox, you should sign out of those as well. Basically, if it's got personal account information, you'll want to sign out. (Here's how to find account settings in MacOS.)

Two other things you should do before a factory reset: Unpair any Bluetooth devices -- particularly if the MacBook is being gifted to someone in your household -- and reset the NVRAM. The latter is memory that holds onto settings that the MacBook needs before loading MacOS. On startup, press and hold Option-Command-P-R to reset the NVRAM.

Perform a factory reset

If you've done everything above, you're ready to return your MacBook to its out-of-the-box state. On an Intel-based Mac, reboot the system and press and hold Command-R to enter Recovery Mode. (Accessing Recovery Mode on MacBooks running on the company's Apple Silicon chips is different, however.) 

Read more: Before selling your MacBook, you need to factory reset it

Once in Recovery Mode, you'll see a window of MacOS utilities. Use the Disk Utility to erase your drive. When that's complete, you'll be able to reinstall MacOS. After it's done reinstalling, you'll reach the Setup Assistant. From there you can stop and shut it down or set it up for the recipient. 


Gifting a used Windows laptop

reset-windows-10-laptop.png
Screenshot by Josh Goldman/CNET

As with gifting a MacBook, start by backing up any important folders and files on your old laptop to cloud storage or an external drive. If you're doing the latter, go to Settings > Update & Security > Backup > Add a drive and select the external drive. Then click on Backup Now. 

Sign out of all your apps

A lot of paid software requires you to sign in with an account, a product key or both. Before you wipe your laptop's storage, sign out of any accounts and deregister software licenses (if possible). If you need those product keys to re-register software on a new laptop, be sure to save that information. If you use a browser other than Edge, such as Chrome or Firefox, sign out of those as well. Basically, if it's got personal account information, sign out.

Reset the laptop

Ready to clean the drive and reinstall Windows? Go to Settings > Update and security > Recovery. At the top of the window, you'll see Reset this PC. Click on Get Started and select Remove Everything from the box that appears. From there, you can select to reinstall Windows from the local drive or download from the cloud. After that, Windows cleans the drive of all software, settings and data. When it's done, the laptop will start in its setup assistant mode. You can then stop and shut it down for a fresh-out-of-the-box experience or do some setup, which is nice touch, especially if it's going to a family member so they can use it right away.

Unlink from your Microsoft account

If you used a Microsoft account to sign in to the laptop, the last thing you'll want to do is remove the laptop from that account. Sign in to your account from another computer and click on the Devices tab at the top of the page. Find the laptop that you're gifting on the list of devices, and at the bottom of the listing, you'll see the option to remove the device. Click it and you're done. 


Gifting a used Chromebook

Asus Chromebook CX9400
Sarah Tew/CNET

Chromebooks are the easiest to refresh for gifting. That's mainly because of their cloud-based design. Google also makes it extremely easy to wipe your data and securely clean the internal storage as well as remove the Chromebook from your Google account. 

Check the AUE first

Before you even consider gifting an old Chromebook, check its auto-update expiration. Google only guarantees Chrome OS and browser feature support on non-Google hardware for so long. Every device has a date on which it stops receiving updates, aka its AUE date. Current models receive updates for eight years; older models could potentially be a year or two away from reaching their AUE. 

Google maintains an AUE list, so finding the date your Chromebook will stop receiving updates is as easy as locating your model on that list. The AUE can also be found in your Chromebook's settings. Here's how to find the AUE from Google and in your Chromebook.

Give it a Powerwash

Powerwash is Google's built-in factory reset tool for Chromebooks. Once you've backed up folders or files stored on the Chromebook's internal drive, running Powerwash will securely scrub the system and reboot. When it restarts, it'll be just like the day you unboxed it. 

The actual Powerwash typically takes less than a minute to complete. A simple search for "powerwash" in your Chromebook's settings will bring you right to the feature, but here's everything you need to know about the procedure. 

Remove the Chromebook from your Google account

Although you've removed your account from the Chromebook, you haven't removed the Chromebook from your account. Start by signing into your Google account and head to the Security settings. If you use the Chrome browser, you can also click on your account avatar and select Manage your Google Account from the drop-down menu. 

In the Security section, scroll down until you see a box labeled Your devices, which lists all the devices attached to your account. At the bottom of the box, click on Manage devices and find the Chromebook you're gifting and select Sign Out

Give the Chromebook a good external cleaning, gather up any accessories and it's ready to hand off to your giftee.

Read more: How to regift a game console

How Factory Reset Your Devices

Make sure to wipe personal data before selling, trading in or regifting your gear.


Source

Tags:

How To Use An External Drive With A Chromebook


How to use an external drive with a Chromebook


How to use an external drive with a Chromebook

Chromebooks are built with cloud storage in mind and offer a pittance of local storage -- usually only 32GB or 64GB. So, instead of storing a bunch of Word docs and Excel files on a Chromebook, for example, you are meant to use Google Drive or Dropbox. Instead of a large music library stored locally in iTunes, you are meant to use Google Play or Spotify. Same deal with photos -- instead of storing photos locally, Google Photos, Flickr or another cloud service.

Chromebooks feature USB ports and SD card slots, however, which let you connect to external storage devices for those times when you need to access a file that you have saved not to the cloud but an external hard drive, thumb drive or SD card. When you connect an external drive or SD card to your Chromebook, however, nothing happens. You won't see a helpful prompt or a new desktop icon that, A. lets you know the system has recognized whatever it is that you connected to it, and B. provides a quick way to view its contents.

Using an external storage device with a Chromebook takes a little more work on your part. I'll show you how to view and download files on an external drive and which types of files types and file systems Chrome OS can recognize.

Supported file systems

Chrome OS supports a wide range of file systems for external drives. It can read and write to the NTFS file system that Windows PCs use, read (but not write to) the HFS+ file system that Macs use, and cross-platform FAT16, FAT32 and exFAT file systems. It also supports the MTP file system used by digital music players and ISO9660 and UDF used by CDs and DVDs.

Supported file types

According to Google, these are the types of files Chrome OS supports:

  • Microsoft Office files: .doc, .docx, .xls, .xlsx, .ppt (read-only), .pptx (read-only).
  • Media: .3gp, .avi, .mov, .mp4, .m4v, .m4a, .mp3, .mkv, .ogv, .ogm, .ogg, .oga, .webm, .wav
  • Images: .bmp, .gif, .jpg, .jpeg, .png, .webp
  • Compressed files: .zip, .rar
  • Other: .txt, .pdf (read-only)

How to read files

When you connect an external storage device to a Chromebook, you'll need to do a little legwork to access its contents. Click the Launcher button in the lower-left corner of your Chromebook's display and then click the Files app. If you don't see it listed, it means you haven't used it recently and will need to click All Apps and find the Files app listed among all of your Chromebook's apps.

Screenshot by Matt Elliott/CNET

With the Files window opened, in the left panel you should see your external drive listed directly below the Downloads folder. Just as you can in Windows Explorer on a PC or Finder on a Mac, you can view the drive's folders and files here. Just double click a file to open it.

Screenshot by Matt Elliott/CNET

How to transfer files

If you want to move a file from an external drive to your Chromebook, you have two options: drag and drop or copy and paste.

The Downloads folder is where all of your Chromebook's local files are stored. You can copy a file from the drive to your Chromebook by dragging it from the external drive and dropping it on the Downloads folder listed in the left panel. You can select multiple files by clicking the tiny, circular thumbnail to the left of the file name; the thumbnail turns into a blue checkmark icon to indicate it's been selected.

The other option is to copy a file by right-clicking and choosing Copy or using keyboard shortcut Ctrl-C, opening the Downloads folder, and then pasting by using the right-click menu or Ctrl-V.

You can also choose to cut instead of copy, of course, if you want to move the file instead of just copying it. You can also move in the reverse direction and move files from your Downloads folder to your external drive (or Google Drive) to free up drive space on your Chromebook.

Last step: Eject

Like Windows and MacOS, ChromeOS will scold you if you remove a drive before ejecting it. To eject a drive, click the little eject button to the right of it in the left panel of the the Files window.


Source

Tags:

How To Change Your Windows 11 Wallpaper In 5 Easy Steps


How to Change Your Windows 11 Wallpaper in 5 Easy Steps


How to Change Your Windows 11 Wallpaper in 5 Easy Steps

Microsoft's Windows 11 operating system came with a ton of new features like Android apps on your Windows PC, natively supporting Microsoft Teams and a cleaner, more Mac-like design. But Windows 11 also gives you options for new wallpaper

how-to-tech-tips-logo-badge.png

If you're not a fan of Microsoft's new default wallpaper -- a blooming, abstract flower shape that pays homage to Windows 10's royal blue colors -- you can change it up. Windows 11 has other default images, or you can change your wallpaper to a photo you've saved or uploaded to your PC.

Read more: Windows 11 is Familiar but Fresh

We'll show you how to switch your wallpaper to a background you're fond of with just a few steps. You can also create virtual desktops and a breakdown of our favorite features. This story was recently updated. 

microsoft-windows-11-announcements-june-24-2021-cnet-024.png

The default Windows 11 wallpaper features an abstract blue swirl design.

Microsoft/Screenshot by Sarah Tew/CNET

Once you have access to Windows 11, here's how to change your wallpaper: 

1. Click the on-screen Windows button or press the Windows button on your keyboard.

2. Click Settings.

3. Go to Personalization.

4. Choose Background.

5. Select an already available image or click Browse to search for an image you've saved to your PC.

Changes to the default wallpaper only scratch the surface of the design and feature changes found on the Windows 11 desktop. For example, you'll also find ways to customize your Windows 11 desktop with widgets, virtual desktops and Snap Group layouts. 

For more, check out the big changes between Windows 10 and Windows 11 and where you can find the new Start menu.


Source

Tags:

Update Your Chrome: Google Releases Important Security Fix


Update your Chrome: Google releases important security fix


Update your Chrome: Google releases important security fix

If you see a notification to update your Chrome this week, don't ignore it. On Thursday, Google said it's now rolling out securityupdates for the browser to patch a vulnerability that's still being exploited in the wild. As first reported by CNET sister publication ZDNet, the zero-day vulnerability and patch are for Chrome version 88.0.4324.150 for Mac, Windows and Linux system users. 

The details about the vulnerability, called CVE-2021-21148, are currently being kept under wraps "until a majority of users are updated with a fix," according to a post on Google's security update blog on Thursday. The discretion is typical of companies facing security risks that are still widely active, but Google did note that the bug was being used in attacks before it was reported to engineers by user Mattias Buelens on Jan. 24.

"Google is aware of reports that an exploit for CVE-2021-21148 exists in the wild," the company said in a blog post. "We would also like to thank all security researchers that worked with us during the development cycle to prevent security bugs from ever reaching the stable channel."

Just two days after Buelens brought the bug to Google's attention, Google's Threat Analysis Group issued a warning to cybersecurity researchers that North Korean hackers were targeting researchers working on sensitive topics, in part by luring the researchers onto blog sites that exploited a browser vulnerability. 

Google said browser updates will continue rolling out over the coming days and weeks. 

How to update Chrome

If you're using Chrome, it's a good idea to check which version you're using and see whether you're fully updated. If you're using the Brave browser or another browser built on Google's Chromium engine, you should consider updating those as well. 

Updating Chrome is a supersimple process. Here's how you do it. 

Open Chrome, and check the top-right corner of the browser window for a green Update button, beside your three-dot More menu. 

screen-shot-2021-02-05-at-3-53-32-pm.png
Screenshot by Rae Hodge/CNET

Once you click Update, you'll be greeted by a prompt to confirm your choice. Click Relaunch and Google does the rest. Remember that this will close and restart your browser, so make sure you've saved anything you're working on before proceeding. 

screen-shot-2021-02-05-at-3-54-13-pm.png
Screenshot by Rae Hodge/CNET

Many Chrome users already have their browsers set to update by default, so you may not need to take any action. To check whether your browser has already updated itself, simply open Chrome, go to the top-right corner and click the three-dot More menu. 

If you see an option that says Update Google Chrome, then you're not running the latest version. If you are running the latest version, that option won't be in the list. You can also manually check for updates by opening Chrome, then going to the top-left of your browser, clicking File, then clicking Preferences

From there, select Safety Check from the list of options on the left side of the browser. 

screen-shot-2021-02-05-at-4-01-37-pm.png
Screenshot by Rae Hodge/CNET

You'll be taken to a screen that will offer to run a check for any updates or risks in your current version of Chrome. Click the Check Now button and the automated process will take over. You'll still need to restart Chrome afterward, though, so be sure to save any open work. 

Don't forget to check the browsers on your phone and tablet. Check out Google's four-step instructions for Android users, and those for iPhone and iPad. 

What version of Chrome am I using? 

Wondering whether this affects your browser? It takes only two clicks to find out whether you're running Chrome's 88.0.4324.150, the latest version and the one impacted by the vulnerability and update. Here's how. 

Open Chrome and go to the top-left corner of your window.

screen-shot-2021-02-05-at-4-18-55-pm.png
Screenshot by Rae Hodge/CNET

Once you've clicked preferences, you'll be presented with not only your current Chrome version information, but other system and security options to explore.


Source

Tags:

Search This Blog

Menu Halaman Statis

close