Step into a world where the focus is keenly set on How To Get Free Robux. Within the confines of this article, a tapestry of references to How To Get Free Robux awaits your exploration. If your pursuit involves unraveling the depths of How To Get Free Robux, you've arrived at the perfect destination.
Our narrative unfolds with a wealth of insights surrounding How To Get Free Robux. This is not just a standard article; it's a curated journey into the facets and intricacies of How To Get Free Robux. Whether you're thirsting for comprehensive knowledge or just a glimpse into the universe of How To Get Free Robux, this promises to be an enriching experience.
The spotlight is firmly on How To Get Free Robux, and as you navigate through the text on these digital pages, you'll discover an extensive array of information centered around How To Get Free Robux. This is more than mere information; it's an invitation to immerse yourself in the enthralling world of How To Get Free Robux.
So, if you're eager to satisfy your curiosity about How To Get Free Robux, your journey commences here. Let's embark together on a captivating odyssey through the myriad dimensions of How To Get Free Robux.
Virtual private networks have become a cornerstone privacy tool in the fight against pervasive data tracking, whether you're using a device with MacOS or Windows. While there are a growing number of VPNs to choose from, even the best still struggle to secure a key weakness in your privacy protection: your IPv6 address.
IPv6 is the successor to the traditional IPv4 -- what you would normally consider your IP address -- but IPv6 can also reveal potentially personally identifiable information about your location. That's why our top VPN recommendations all include some form of IPv6 leak protection. Sometimes, however, if your other software or your own device's configurations conflict with your VPN, you may not be able to get the full benefit of that IPv6 protection.
Because disabling IPv6 on a Windows takes just a few clicks, finding tutorials for the process is just a quick internet search away. While it takes less than 5 minutes to disable an IPv6 on a MacOS device, the process takes a few more steps. And the method you use will depend on your device's configuration.
Here are the two most common methods for disabling IPv6 on a MacOS, right along with the steps you can take to re-enable it if you change your mind.
Read more: All the VPN terms you need to know
How to Disable IPv6 in MacOS in System Preferences
1. From your Apple menu, open System Preferences.
2. Click the Network icon that's shaped like a globe. A new window will open. On the left side of the window, you'll see a list of the networks you've previously connected to, including the one you're currently connected to which will have a green dot on its left. Click it to highlight the network.
3. Click the Advanced button at the bottom of the window. A new window will open with several tabs near the top. Among those, select TCP/IP.
4. In the TCP/IP tab, you'll see two drop-down menus. Click the dropdown menu beside Configure IPv6, and select Off.
5. In the bottom right corner of the window, click OK. Once the TCP/IP window closes, and you're back at the Network window, click Apply in the bottom right corner and then close the window.
If your version of MacOS doesn't have an option labeled Off in the drop-down menu beside Configure IPv6, you can manually disable IPv6 through your MacOS Terminal.
Read more: You Need to Be Using a VPN on Your Phone. Here's How to Set it Up in Under 10 Minutes
How to Disable IPv6 on MacOS in Terminal
These steps will lead through disabling IPv6, but you'll also find steps to re-enable it in case you change your mind.
1. Open a Finder window and click Applications.
2. Scroll down to a folder labeled Utilities. Click to open it, then select Terminal.
3. Once you've opened Terminal, a small black window will open. Type the following command into the window and Terminal will show you a list of all your current network types:
sudo networksetup -listallnetworkservices
You may or may not be prompted by Terminal to enter a password. That'll be the one you have to type every time you wake up your Mac. Once you enter it, your list of network types will appear.
4. Find the type of network you're currently using. It's likely you're using either Wi-Fi or Ethernet right now to read this. We're going to tell the computer to disable IPv6 on this particular type of network, however that network is labeled in your list.
If you're connected via Wi-Fi, type the following: sudo networksetup -setv6off Wi-Fi
5. You won't see any confirmation that you've turned IPv6 off but Terminal may again ask you for your password. Once you've entered your password correctly, IPv6 will be disabled. You can close Terminal and you're done.
If you change your mind for any reason and need to re-enable IPv6 on your MacOS, you can go through the same process with a small change to the command. Just open Terminal and type the following command: sudo networksetup -setv6automatic Wi-Fi.
For more tools to enhance your privacy when working with Apple devices, check out our list of the best Mac VPNs for 2022.
How to see my memories on snapchat how to check memories on snapchat how to look at snapchat memories how to use snapchat on xbox how to use vlookup how to use chopsticks how to use microsoft teams how to get help in windows how to take a screenshot how to get free robux
How to use Snapchat Memories
How to use Snapchat Memories
Snapchat wants you to hold on to your photos and videos for a little while longer.
The new Memories feature is a searchable and shareable archive of snaps that you can access within the app. Memories backs up snaps to Snapchat's servers and automatically pulls together saved snaps into categories based on location. But you can also search on a keyword, such as food.
How do I get Memories?
Snapchat's new Memories feature has tabs along the top to divide up snaps and stories.
Screenshot by Lexy Savvides/CNET
The first step is to update the Snapchat app for iOS or Android. The Memories feature is rolling out progressively to users over the next month. When the new feature is available for your account, you'll receive a snap from Team Snapchat.
Snapchat's main camera interface now has an extra icon underneath the camera button. Swipe it up to access Memories.
Memories has a series of tabs that let you switch between viewing snaps, stories and the contents of your camera roll.
Making Memories
To make a new memory, create a snap as usual with all the filters and stickers you desire. Then, tap the Save icon like you normally would to download the snap to your camera roll or gallery. Rather than saving to the roll, however, the snap will save to the Memories section.
To create a story from snaps within the Memories section, press and hold on an individual snap, then tap "My Snap" at the top of the screen. From here, tap "Create story from this snap" and select any additional snaps you want to include. Now you can save or send this snap to friends or to the My Story section as you would normally.
Note that if you post a snap to a story that was taken earlier than the past 24 hours, it will have a frame around it with the timestamp.
If you want to import snaps from your camera roll or gallery, go to Snapchat's settings and find Memories. Select "Import Snaps from Camera Roll."
Note that this will only surface actual Snapchats you have previously saved to your phone -- not photos taken with the regular camera app.
For My Eyes Only
Don't want those eggplant photos visible in your Memories section when you pass your phone around? Add them to a section called My Eyes Only.
Press and hold on the snap, tap My Snap, and select "Move to My Eyes Only." Snapchat will prompt you for a passcode or passphrase. Once you've set this up, a new tab will appear within Memories that contains these less-than-salubrious snaps for your private viewing pleasure.
So what's backed up?
Any snap you save in your Memories section is saved to Snapchat's servers, so if you log in on another device these snaps are available.
It's important to note that even though you have access to your camera roll or gallery within Memories, these photos and videos are not being backed up on Snapchat's servers.
What if I don't want to use Memories?
Within the Snapchat settings, navigate to the Memories section and find the Saving section. Tap "Save To..." and select "Camera Roll Only." This section also lets you automatically save stories to Memories or set to My Eyes Only by default.
Chromebooks are built with cloud storage in mind and offer a pittance of local storage -- usually only 32GB or 64GB. So, instead of storing a bunch of Word docs and Excel files on a Chromebook, for example, you are meant to use Google Drive or Dropbox. Instead of a large music library stored locally in iTunes, you are meant to use Google Play or Spotify. Same deal with photos -- instead of storing photos locally, Google Photos, Flickr or another cloud service.
Chromebooks feature USB ports and SD card slots, however, which let you connect to external storage devices for those times when you need to access a file that you have saved not to the cloud but an external hard drive, thumb drive or SD card. When you connect an external drive or SD card to your Chromebook, however, nothing happens. You won't see a helpful prompt or a new desktop icon that, A. lets you know the system has recognized whatever it is that you connected to it, and B. provides a quick way to view its contents.
Using an external storage device with a Chromebook takes a little more work on your part. I'll show you how to view and download files on an external drive and which types of files types and file systems Chrome OS can recognize.
Supported file systems
Chrome OS supports a wide range of file systems for external drives. It can read and write to the NTFS file system that Windows PCs use, read (but not write to) the HFS+ file system that Macs use, and cross-platform FAT16, FAT32 and exFAT file systems. It also supports the MTP file system used by digital music players and ISO9660 and UDF used by CDs and DVDs.
Supported file types
According to Google, these are the types of files Chrome OS supports:
When you connect an external storage device to a Chromebook, you'll need to do a little legwork to access its contents. Click the Launcher button in the lower-left corner of your Chromebook's display and then click the Files app. If you don't see it listed, it means you haven't used it recently and will need to click All Apps and find the Files app listed among all of your Chromebook's apps.
Screenshot by Matt Elliott/CNET
With the Files window opened, in the left panel you should see your external drive listed directly below the Downloads folder. Just as you can in Windows Explorer on a PC or Finder on a Mac, you can view the drive's folders and files here. Just double click a file to open it.
Screenshot by Matt Elliott/CNET
How to transfer files
If you want to move a file from an external drive to your Chromebook, you have two options: drag and drop or copy and paste.
The Downloads folder is where all of your Chromebook's local files are stored. You can copy a file from the drive to your Chromebook by dragging it from the external drive and dropping it on the Downloads folder listed in the left panel. You can select multiple files by clicking the tiny, circular thumbnail to the left of the file name; the thumbnail turns into a blue checkmark icon to indicate it's been selected.
The other option is to copy a file by right-clicking and choosing Copy or using keyboard shortcut Ctrl-C, opening the Downloads folder, and then pasting by using the right-click menu or Ctrl-V.
You can also choose to cut instead of copy, of course, if you want to move the file instead of just copying it. You can also move in the reverse direction and move files from your Downloads folder to your external drive (or Google Drive) to free up drive space on your Chromebook.
Last step: Eject
Like Windows and MacOS, ChromeOS will scold you if you remove a drive before ejecting it. To eject a drive, click the little eject button to the right of it in the left panel of the the Files window.
How to give yourself a hickey how to give yourself op in minehut how to give yourself a sharpness 1000 sword how to give yourself items in ark how to give a cat a pill how to give feedback how to give people robux in a group how to give points in microsoft family how to get help in windows how to screenshot on windows 10 how to screenshot on pc how to add signature in outlook
How to Give Your Yoga Mat the Scrub-Down It Desperately Needs
How to Give Your Yoga Mat the Scrub-Down It Desperately Needs
This story is part of Home Tips, CNET's collection of practical advice for getting the most out of your home, inside and out.
My yoga mat goes through a lot each week. Between taking it to boxing training sessions each day for core workouts to using it for morning yoga, my mat gets dragged around to some not-so-clean surfaces -- not to mention how it inevitably gets covered in my sweat, too.
Because yoga mats are often used for intense, sweaty workouts, it's easy for them to harbor germs and bacteria. So whether you're sharing mats at a yoga class or using your own, it's worth taking the time to clean your mat often to banish bacteria and prevent it from falling apart.
Here are several tips and tricks on how to best clean your yoga mat. (For more cleaning tips, here's our guide on how to clean your mattress, how to kill mold in your washer and how to declutter your closet.)
How to clean your yoga mat
For everyday cleaning
For just the regular daily cleaning you'll want to do after a class or practice, I recommend using a homemade cleaning solution. You can simply mix white vinegar or witch hazel with water at a 1-to-4 ratio in a spray bottle and shake slightly to combine. (You can add a few drops of tea tree oil or another essential oil if you want a scent.) Then spray down your mat and gently wipe the solution all around the surface. Let your mat fully dry before rolling it up.
For deep cleaning
Believe it or not, one of the best methods to deep-clean your yoga mat is to give it a bath. Fill up a sink or bathtub with enough temperate water to fully submerge the mat. You can add a tablespoon of dish soap or detergent for each gallon of water. Allow it to soak for about 10 minutes, then gently wipe the front and back down with a cloth. Rinse your mat off with clean water before drying off the mat. I recommend wiping the mat off with a dry cloth before hanging the mat somewhere to hang-dry fully.
I like to leave my mat to dry overnight to be completely moisture-free before I roll it back up.
Depending on how much you use it, you'll need to deep clean your yoga mat every few weeks or monthly.
Amanda Capritto/CNET
Can you wash a yoga mat in the washing machine?
While I recommend the above cleaning methods, some yoga mats are machine washable. If you really want to machine-wash your mat, do so on a cold gentle cycle. Check the mat's care instructions before trying this method, though, because some yoga mats will fall apart in the wash. But never put your yoga mat in the dryer: Always leave it to air-dry.
How often should you clean your yoga mat?
With frequent usage, your yoga mat can quickly accumulate sweat, lint, skin oils, dirt and other grime. And over time, they can begin to smell if you're not careful. Depending on how much you use it, you should deep clean it around once a month. It's also just good practice to give it a wipe down with disinfecting wipes or a gentle cleaning solution after every use.
It's important to note that yoga mats are supposed to feel tacky, or slightly sticking. Mats are made that way intentionally to help you hold more difficult yoga poses. While cleaning, be careful to not use harsh chemicals or scrub so hard that you eliminate the sticky finish so you keep your mat grippy and extend its longevity.
Looking to get into yoga? Try out these yoga poses for better sleep and read about the benefits associated with hot yoga.
More cleaning recommendations
The information contained in this article is for educational and informational purposes only and is not intended as health or medical advice. Always consult a physician or other qualified health provider regarding any questions you may have about a medical condition or health objectives.
How to Factory Reset a MacBook, Windows Laptop or Chromebook to Sell or Give Away
How to Factory Reset a MacBook, Windows Laptop or Chromebook to Sell or Give Away
One side effect of spending more time at home during the pandemic is the realization that I have a lot of old tech lying around. A lot. Then, when I made a KonMari attempt at decluttering said tech, I unearthed several things I forgot I had -- including an old laptop I stopped using years ago because it was too slow for my high-end computing needs.
While this laptop no longer sparked joy for me, it turned out to be a perfect fit for my mom. It just needed to be cleaned up first, and I'm not just talking about removing dust and mystery goo with a few swipes of a disinfectant wipe, though you'll want to do that, too. The type of cleaning I'm talking about is restoring the laptop to like-new condition inside and out. Cleaning the outside is the easy part. Wiping the computer of all your apps, files, folders and other personal information isn't necessarily as straightforward. Of course, how much data scrubbing you need to do will likely depend on the recipient.
The big picture steps you take to refresh a laptop are the same regardless of whether it's a Windows laptop. Apple MacBook or Chromebook -- save your old data, remove all personal information, then go for a factory reset. It's the actual step-by-step procedure that differs depending on the type of laptop you're dealing with. Below, you'll find everything you need to know and do before giving your laptop a second life. And with supply chain issues, shipping problems and chip shortages making new devices harder to get, passing along a new-to-you laptop can be a welcome holiday gift.
Last thing first
I typically save the laptop's physical cleaning until last (why clean your fingerprints off twice?), but you may want to start there -- especially if it's been gathering dust in the back of a closet/under a bed/in the garage for the past several years. The basic equipment required for a good laptop cleaning is a can of compressed air and some disinfectant or alcohol wipes. For a slightly deeper clean, you may also want to grab a screwdriver and remove the bottom cover of your laptop (if possible) so you can carefully blow out any dust that's accumulated on the fans and vents.
After the laptop is clean, you can also wipe down the power adapter and any related accessories. It's also a good idea to ensure the power adapter is still in good, working condition. If you're still not quite sure where to start with the cleaning, check out our complete guide to getting your laptop looking its best.
Gifting a used MacBook
Óscar Gutiérrez/CNET
Before you even think about doing a factory reset on your MacBook, you need to save any data you want to keep. You may have already done this at some point if you migrated data from this old MacBook to a new one using using Apple's Migration Assistant. If that's not the case, it's time to hook up an external drive and use MacOS' built-in Time Machine tool to create a backup. If you have an iCloud account, you can back up your data there as well.
Sign out of everything
You'll also want to log out of all accounts before wiping your MacBook's drive. Start with iCloud, Find My Mac and iMessage. Then look for individual software accounts you may need to deregister. If you use a browser other than Safari, such as Chrome or Firefox, you should sign out of those as well. Basically, if it's got personal account information, you'll want to sign out. (Here's how to find account settings in MacOS.)
Two other things you should do before a factory reset: Unpair any Bluetooth devices -- particularly if the MacBook is being gifted to someone in your household -- and reset the NVRAM. The latter is memory that holds onto settings that the MacBook needs before loading MacOS. On startup, press and hold Option-Command-P-R to reset the NVRAM.
Perform a factory reset
If you've done everything above, you're ready to return your MacBook to its out-of-the-box state. On an Intel-based Mac, reboot the system and press and hold Command-R to enter Recovery Mode. (Accessing Recovery Mode on MacBooks running on the company's Apple Silicon chips is different, however.)
Read more:Before selling your MacBook, you need to factory reset it
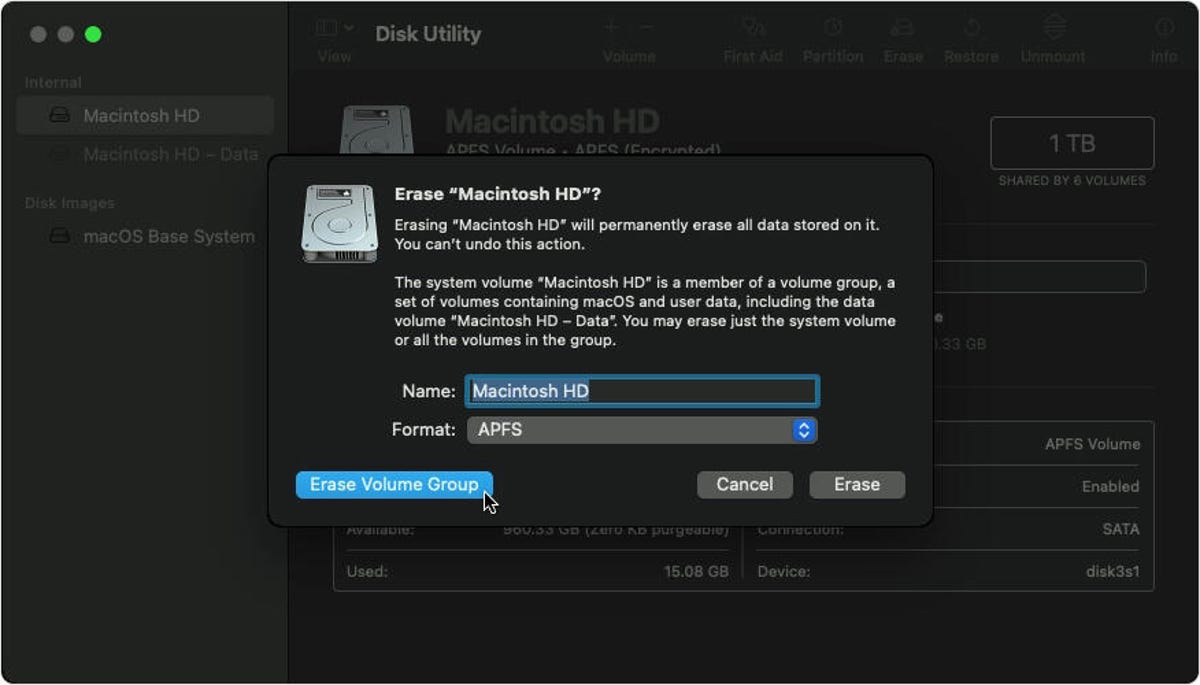
Once in Recovery Mode, you'll see a window of MacOS utilities. Use the Disk Utility to erase your drive. When that's complete, you'll be able to reinstall MacOS. After it's done reinstalling, you'll reach the Setup Assistant. From there you can stop and shut it down or set it up for the recipient.
Gifting a used Windows laptop
Screenshot by Josh Goldman/CNET
As with gifting a MacBook, start by backing up any important folders and files on your old laptop to cloud storage or an external drive. If you're doing the latter, go to Settings > Update & Security > Backup > Add a drive and select the external drive. Then click on Backup Now.
Sign out of all your apps
A lot of paid software requires you to sign in with an account, a product key or both. Before you wipe your laptop's storage, sign out of any accounts and deregister software licenses (if possible). If you need those product keys to re-register software on a new laptop, be sure to save that information. If you use a browser other than Edge, such as Chrome or Firefox, sign out of those as well. Basically, if it's got personal account information, sign out.
Reset the laptop
Ready to clean the drive and reinstall Windows? Go to Settings > Update and security > Recovery. At the top of the window, you'll see Reset this PC. Click on Get Started and select Remove Everything from the box that appears. From there, you can select to reinstall Windows from the local drive or download from the cloud. After that, Windows cleans the drive of all software, settings and data. When it's done, the laptop will start in its setup assistant mode. You can then stop and shut it down for a fresh-out-of-the-box experience or do some setup, which is nice touch, especially if it's going to a family member so they can use it right away.
Unlink from your Microsoft account
If you used a Microsoft account to sign in to the laptop, the last thing you'll want to do is remove the laptop from that account. Sign in to your account from another computer and click on the Devices tab at the top of the page. Find the laptop that you're gifting on the list of devices, and at the bottom of the listing, you'll see the option to remove the device. Click it and you're done.
Gifting a used Chromebook
Sarah Tew/CNET
Chromebooks are the easiest to refresh for gifting. That's mainly because of their cloud-based design. Google also makes it extremely easy to wipe your data and securely clean the internal storage as well as remove the Chromebook from your Google account.
Check the AUE first
Before you even consider gifting an old Chromebook, check its auto-update expiration. Google only guarantees Chrome OS and browser feature support on non-Google hardware for so long. Every device has a date on which it stops receiving updates, aka its AUE date. Current models receive updates for eight years; older models could potentially be a year or two away from reaching their AUE.
Google maintains an AUE list, so finding the date your Chromebook will stop receiving updates is as easy as locating your model on that list. The AUE can also be found in your Chromebook's settings. Here's how to find the AUE from Google and in your Chromebook.
Give it a Powerwash
Powerwash is Google's built-in factory reset tool for Chromebooks. Once you've backed up folders or files stored on the Chromebook's internal drive, running Powerwash will securely scrub the system and reboot. When it restarts, it'll be just like the day you unboxed it.
The actual Powerwash typically takes less than a minute to complete. A simple search for "powerwash" in your Chromebook's settings will bring you right to the feature, but here's everything you need to know about the procedure.
Remove the Chromebook from your Google account
Although you've removed your account from the Chromebook, you haven't removed the Chromebook from your account. Start by signing into your Google account and head to the Security settings. If you use the Chrome browser, you can also click on your account avatar and select Manage your Google Account from the drop-down menu.
In the Security section, scroll down until you see a box labeled Your devices, which lists all the devices attached to your account. At the bottom of the box, click on Manage devices and find the Chromebook you're gifting and select Sign Out.
Give the Chromebook a good external cleaning, gather up any accessories and it's ready to hand off to your giftee.
Read more: How to regift a game console
How Factory Reset Your Devices
Make sure to wipe personal data before selling, trading in or regifting your gear.
How to fix 5 common causes for your heart how to fix 5 common causes for high blood how to fix 5 common causes for diarrhea how to fix 5 common causes for rectal bleeding how to fix 502 bad gateway how to fix 5000 ms on discord how to fix a zipper printer is offline how to fix how to fix a broken zipper how to lower blood pressure how to get free robux
How to Fix 5 Common Causes for Your Home Internet Outages
How to Fix 5 Common Causes for Your Home Internet Outages
This story is part of Home Tips, CNET's collection of practical advice for getting the most out of your home, inside and out.
Is there ever a convenient time for your Wi-Fi to go out? Of course not. Whatever you're using the internet for at the time (streaming TV, gaming online, working from home or some combination of it all) comes to an abrupt and frustrating halt. An internet outage could knock your Wi-Fi security cameras, smart light switches and other connected devices offline even when you're away.
While there's not much you can do about an internet outage when you're away from home, troubleshooting and resolving the occasional service disruption can be fairly quick and simple. Here are the most common reasons why your internet might go out and how to fix the problem, if possible. Spoiler alert: It's not always the fault of your internet service provider.
Common causes of home internet outages
1. Modem/router malfunctions
2. Inadequate speeds or equipment
3. Hacking or network issues
4. Bad weather
5. ISP service outages and network congestion
Narrowing down the exact issue can take a bit of investigating and troubleshooting. Start by verifying the connection issue isn't specific to a single website, server or device.
If you've lost your Netflix connection halfway through a show, check to see if other streaming services are still accessible and working. If so, the problem likely lies with Netflix and not your internet connection. If you're having an issue connecting to other streaming services, it could be that the smart TV or streaming device is to blame. Try streaming on another device, if possible, to verify that an internet outage is the culprit.
Ry Crist/CNET
Modem and router issues
When your home internet connection goes out, it's most likely due to a hiccup with your modem and/or router. The solution is often simple: Restart your equipment by unplugging it, waiting 10 seconds or so, plugging it back in and allowing it to reboot. More often than not, this will resolve your outage.
When restarting your router, I'd recommend cutting power by unplugging it instead of pressing or holding any buttons on the device itself. Doing so can prompt the device to do a hard reset, returning it to factory settings and erasing your Wi-Fi network settings. Granted, the reset will likely re-establish your internet connection, but you'll also have the extra task of setting up your Wi-Fi again.
Also, keep in mind that your device may have a battery backup. If the lights on your modem or router don't go out when you unplug it from the power source, check to see if there are batteries installed somewhere and temporarily remove them when restarting your device.
Sarah Tew/CNET
Inadequate speeds or equipment
Maybe your internet isn't necessarily "out," it just can't keep up with what you're trying to do or where you're doing it.
Constant buffering, excessive lagging, Wi-Fi "dead zones," and other connectivity issues could result from insufficient speed, bandwidth or Wi-Fi coverage to handle all your devices. There are two ways to remedy the situation: Scale back your internet expectations and use or make some upgrades.
Consider the internet speeds you need and determine if your current plan can deliver those speeds. If your plan lacks the speeds you need, upgrading to a faster plan (assuming one is available) will be your best option. Many cable and fiber internet providers offer speeds up to 1 gigabit per second (Gbps) or higher, which is plenty of speed for the average home.
On the other hand, if you feel your current plan should meet your needs, it's possible your equipment is to blame. Conduct a few speed tests around your home to gauge what speeds you are getting and where the Wi-Fi signal might not be as strong. Sometimes simply relocating your router to a more efficient spot will improve connection quality and eliminate or at least mitigate any dead zones.
Otherwise, you may want to invest in a better router or Wi-Fi extenders to boost the Wi-Fi signal throughout your home. If you rent equipment from a provider, call to ask about getting a better device.
Try adjusting your router settings
Your router should allow you to steer connected devices to a specific pod or extender, if you have them, and between 2.4GHz and 5GHz bands. You'll get a stronger signal on the 5GHz band, but only if your device is within range (the 5GHz range is shorter than 2.4GHz) and if there aren't too many other devices connected to 5GHz. So, if your connection quality is weak on a particular device, try switching bands on the device or moving some of the other devices off the band you're using.
Use a wired connection
Connecting directly to your modem, router or pods/extenders using an Ethernet cable will be your best bet for establishing and maintaining a strong connection. If possible, use a wired connection for the most bandwidth-hogging devices, like smart TVs and gaming consoles. Not only will this often provide a better, faster connection, but it will also take some of the strain off your Wi-Fi network.
James Martin/CNET
Hacking or malware
A less likely but still possible cause of an internet outage is a compromised network. If hackers gain access to your Wi-Fi network, they could completely restrict your internet access to any or all devices.
If you suspect someone has gained unauthorized access to your network, immediately go to your router settings and recreate your Wi-Fi network with (preferably) a different network name and (definitely) a different password -- one with some complexity or randomness that will make it difficult for a hacker to figure out.
Along with creating a strong password, be sure to keep all firmware on your router and any connected devices up to date to help prevent hacking attempts. Installing antivirus software will also help keep your devices protected. Many ISPs offer virus and malware protection at no extra cost.
Getty Images
Bad weather
Yes, Mother Nature can mess with your internet connection. Some internet connection types are more prone to internet outages than others during bouts of bad weather, but hard rain, a violent thunderstorm or even heavy cloud coverage could interfere with your signal.
Satellite internet is the most vulnerable to internet outages caused by weather, but a power outage can knock any connection type offline. Having a modem and router with a battery backup may help keep you connected during power outages, though they will be useless if the power outage is preventing internet service from reaching your modem in the first place.
If you have satellite internet, a rain guard, snow shield or dish heater can help prevent outages due to bad weather in the immediate area of your home. Signal interference can happen anywhere along the path between the satellite and your dish, however, and heavy cloud coverage or rain could have an impact on your connection even if it's miles away. There's not much you can do about an internet outage in that case, unfortunately; you'll just have to wait for the signal to return.
DownDetector/Screenshot by CNET
ISP outages and network congestion
Despite the negative impression many people have about their internet providers, widespread ISP outages are uncommon and outages at a single residence are virtually unheard of (unless, of course, you forgot to pay the bill). Still, it's possible that the provider is having issues.
If your internet is completely out and you've already tried restarting the router, check your provider's social media pages, official website or sources like downdector.com for updates and outage reports. You can also call customer service, but be prepared for a long wait on hold.
Other than confirming your ISP is having problems, there's nothing you can do in such situations other than wait for service to return. Outages are bad publicity, so rest assured your ISP is doing everything in its power to restore service as quickly as possible.
Outages are rare but network congestion could be a much more frequent problem and, while it won't always knock your connection out completely, it can certainly cause slowed speeds. Cable, DSL and satellite internet are vulnerable to network congestion, as is 5G home internet. T-Mobile acknowledges network congestion can lead to slowed speeds, stating that "during congestion, Home Internet customers may notice speeds lower than customers using other T-Mobile services due to data prioritization."
Network congestion means the speeds coming to your home are slowed, so there isn't much you can do about that other than wait for the congestion to clear. You can, however, make the most of the speeds you are getting by placing your router in an optimal location, adjusting your Wi-Fi settings or using an Ethernet connection, as mentioned above.
What to do when your internet goes out
Aside from the tips listed above, there are a couple ways you may be able to get back online.
First is by using your mobile connection. Your phone will likely automatically switch to cellular service if your Wi-Fi goes out, so you'll be able to use your phone just like you would if you were away from home. Keep in mind, however, that doing so will use up your mobile data.
Additionally, some phones, carriers and plans allow you to create a Wi-Fi hotspot. It probably won't power your home the same as your router, but it will enable you to connect a few devices until your home network comes back.
Second, and perhaps only applicable for longer outages or urgent internet needs such as submitting a school assignment on time, would be to find a public Wi-Fi hotspot. Your local public library, coffee shop or restaurant, among many other public places, may offer free Wi-Fi.
Be mindful that using a public Wi-Fi connection is not as secure as your home network, so consider using a VPN or avoid any activity that involves sensitive data (passwords, banking info, doing your taxes, etc.) while on a public network.
Internet outage FAQs
Why does my internet keep going out?
There could be a number of factors that affect your internet connection. First, and most likely, is problems with your equipment. Restarting your modem/router should resolve the issue.
Other reasons why your internet may keep going out include inadequate speeds, network congestion and inclement weather. It's possible that your provider is experiencing a service outage, but for frequent connection disruptions, I would look to the previously mentioned causes, starting with your router.
Can I get a partial refund for ISP outages?
Many providers do offer compensation for prolonged or frequent outages. Spectrum, for example, will provide "proportionate credit for those qualifying outages that last for 4 or more consecutive hours." Call to report the outage as soon as possible and monitor how long it lasts before requesting a refund.
Will a power outage knock out my internet service?
Not always, but probably. When the power goes out, it won't necessarily keep internet service from reaching your home, but it can certainly limit your ability to use the internet. Unless your modem and router have a battery backup, a power outage will disable those devices, rendering you unable to connect to the internet.
Buy latest iphone buy latest trelegy inhalers buy latest lehenga online how to buy theta coin how to buy the best mattress how to buy bitcoin how to buy stocks in canada how to buy robux how to buy bitcoin canada how to draw how to clear cache how to make slime
How to buy the latest Amazon devices: The $1,000 Astro, Ring's flying drone camera, more
How to buy the latest Amazon devices: The $1,000 Astro, Ring's flying drone camera, more
Amazon's latest device lineup is a mix of new learning devices for kids, smart home upgrades and everyday tech. The Echo Show 15 has a screen that's bigger than ever (you can mount it on your wall) and the Ring Always Home flying drone camera gives a new take on home security cameras. But the showstopper that took our breath away was the all: Amazon's $1,000 Alexa-powered Astro robot.
Amazon's Astro takes a new spin (on wheels) in Alexa voice commands and hoping to show really need robots in our homes. Astro can monitor your Ring home security system, deliver items from one room to the next and video chat -- all while your pets. But there are already a few privacy concerns. Questions also stem from criticism of Ring's policies and police partnership and privacy issues. But there's already talk that Amazon is looking into an Astro 2, despite these raised eyebrows.
We'll tell you how and when to get your hands on Amazon's new devices and give details on the latest futuristic features. This story has been recently updated.
Amazon/Screenshot by James Martin/CNET
Astro brings AI to your home, but puts bots to the test. Amazon's new robot is designed to follow voice commands and keep an eye on your home with its periscope camera. Astro can show a live view via the mobile app, so you can check on your home when you're away. Astro works with Alexa Together and Ring Protect Pro (and comes with a six-month free trial of the latter). Anticipating privacy criticism, Amazon offers privacy features with Astro that include:
No-go zones
Do not disturb features
Alexa's standard privacy features
You can sign up to request an invite today. Astro will ship later this year.
Read more: Amazon's Astro: New details on price, privacy, battery, specs and more
Amazon/Screenshot by James Martin/CNET
Amazon partnered with the Honeywell Home thermostat team to create an Energy Star-certified smart thermostat that competes with Nest. Most customers may be able to get the thermostat for free after utility rebates. It's an Alexa-enabled thermostat that supports routines and automatically adjusts temperatures. It's available for preorder now and will ship starting Nov. 4.
Here are a few of the top features you can look forward to:
Control your thermostat using the Alexa app or voice commands
An energy dashboard to breakdown your usage on your Echo device or the Alexa app
Thermostat Hunches, which automatically adjusts the temperature
Amazon/Screenshot by James Martin/CNET
Amazon's new Echo Show is bigger than ever. It comes with a 15.6-inch display and in a single color: black. You can mount it on the wall or place it on a stand. The newest model also has facial recognition for personalized alerts and more when the hub recognizes your face, tightening the competition with Apple. It also comes with personalized to-do lists, like Google's Hub Max. But the Echo Show 15 comes with a few highly anticipated features.
Custom sounds that allow Alexa to listen to specific noises in your home (available in 2022)
Visual ID to give you more customized calendars and reminders
Customizable Alexa widgets
Echo will also get a few new features, including Hey Disney to give your device new voices with character-inspired games, books, skills and more. Alexa Together will also be available for loved ones with the Alexa Care Hub. You can sign up to receive an email when the Echo Show 15 is available for preorder.
Amazon/Screenshot by James Martin/CNET
The Amazon Glow is a brand-new kid-friendly smart device (yes, it's different from the Echo Glow night light). It takes after Osmo and other interactive learning gadgets. Kids can use the video screen to chat with long-distance family and friends. It includes a silicone mat to read, play and draw with loved ones. You'll also get a one-year subscription to Amazon Kids Plus for access to digital books, games and more. The Amazon Glow comes with a two-year, worry-free guarantee if you happen to break it. You can request an invite to the Glow program today.
Games and activities from Mattel, Disney, Nickelodeon and Sesame Street
Preapproved contacts using the Amazon Glow app
Camera with privacy shutter
Amazon/Screenshot by James Martin/CNET
The Halo View is a new addition to Amazon's Halo family. The latest Amazon fitness tracker has a few new features, including an AMOLED color display screen. Halo View users can also look forward to Halo Fitness and Nutrition services that will help with exercise and healthy eating. It benefits the Halo user in several ways, including the movement, emotional tone and the camera's body analyses. And it still works with the original Halo band. But these new additions might be worth upgrading from Amazon's Halo.