Step into a world where the focus is keenly set on How To Print Screen. Within the confines of this article, a tapestry of references to How To Print Screen awaits your exploration. If your pursuit involves unraveling the depths of How To Print Screen, you've arrived at the perfect destination.
Our narrative unfolds with a wealth of insights surrounding How To Print Screen. This is not just a standard article; it's a curated journey into the facets and intricacies of How To Print Screen. Whether you're thirsting for comprehensive knowledge or just a glimpse into the universe of How To Print Screen, this promises to be an enriching experience.
The spotlight is firmly on How To Print Screen, and as you navigate through the text on these digital pages, you'll discover an extensive array of information centered around How To Print Screen. This is more than mere information; it's an invitation to immerse yourself in the enthralling world of How To Print Screen.
So, if you're eager to satisfy your curiosity about How To Print Screen, your journey commences here. Let's embark together on a captivating odyssey through the myriad dimensions of How To Print Screen.
How to see memories in snapchat how to use snapchat how to use snapchat on pc how to use vlookup how to use index match how to take a screenshot how to make slime how to print screen how to delete a page in word
How to use Snapchat Memories
How to use Snapchat Memories
Snapchat wants you to hold on to your photos and videos for a little while longer.
The new Memories feature is a searchable and shareable archive of snaps that you can access within the app. Memories backs up snaps to Snapchat's servers and automatically pulls together saved snaps into categories based on location. But you can also search on a keyword, such as food.
How do I get Memories?
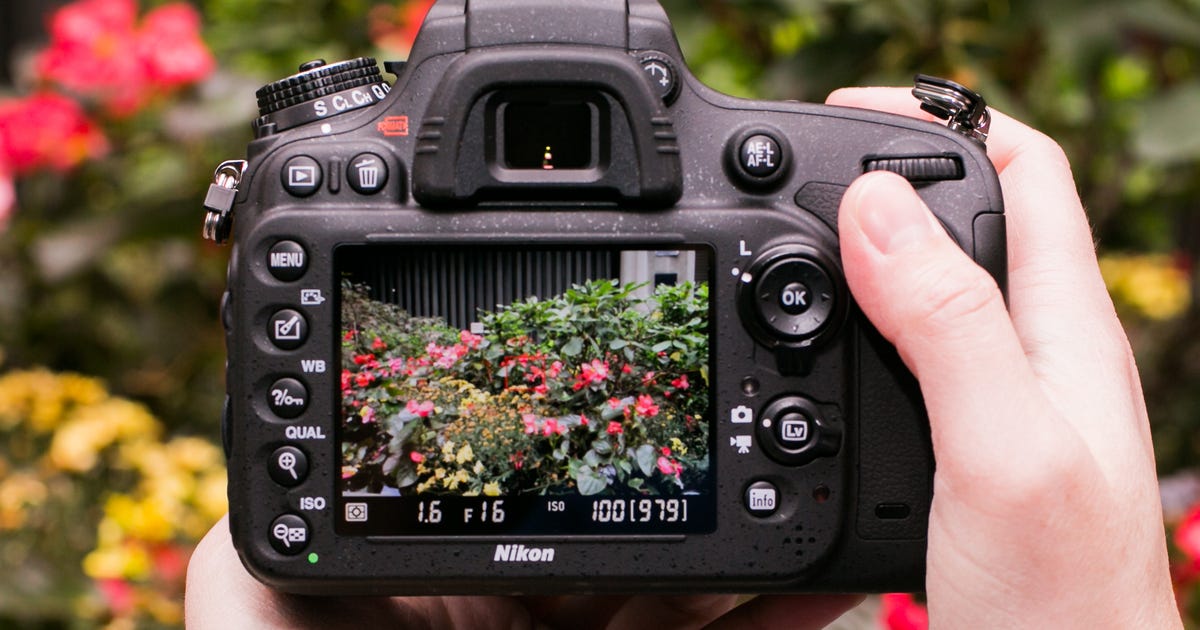
Snapchat's new Memories feature has tabs along the top to divide up snaps and stories.
Screenshot by Lexy Savvides/CNET
The first step is to update the Snapchat app for iOS or Android. The Memories feature is rolling out progressively to users over the next month. When the new feature is available for your account, you'll receive a snap from Team Snapchat.
Snapchat's main camera interface now has an extra icon underneath the camera button. Swipe it up to access Memories.
Memories has a series of tabs that let you switch between viewing snaps, stories and the contents of your camera roll.
Making Memories
To make a new memory, create a snap as usual with all the filters and stickers you desire. Then, tap the Save icon like you normally would to download the snap to your camera roll or gallery. Rather than saving to the roll, however, the snap will save to the Memories section.
To create a story from snaps within the Memories section, press and hold on an individual snap, then tap "My Snap" at the top of the screen. From here, tap "Create story from this snap" and select any additional snaps you want to include. Now you can save or send this snap to friends or to the My Story section as you would normally.
Note that if you post a snap to a story that was taken earlier than the past 24 hours, it will have a frame around it with the timestamp.
If you want to import snaps from your camera roll or gallery, go to Snapchat's settings and find Memories. Select "Import Snaps from Camera Roll."
Note that this will only surface actual Snapchats you have previously saved to your phone -- not photos taken with the regular camera app.
For My Eyes Only
Don't want those eggplant photos visible in your Memories section when you pass your phone around? Add them to a section called My Eyes Only.
Press and hold on the snap, tap My Snap, and select "Move to My Eyes Only." Snapchat will prompt you for a passcode or passphrase. Once you've set this up, a new tab will appear within Memories that contains these less-than-salubrious snaps for your private viewing pleasure.
So what's backed up?
Any snap you save in your Memories section is saved to Snapchat's servers, so if you log in on another device these snaps are available.
It's important to note that even though you have access to your camera roll or gallery within Memories, these photos and videos are not being backed up on Snapchat's servers.
What if I don't want to use Memories?
Within the Snapchat settings, navigate to the Memories section and find the Saving section. Tap "Save To..." and select "Camera Roll Only." This section also lets you automatically save stories to Memories or set to My Eyes Only by default.
How to process and edit in iphone 12 decision in process after with editor process editor process editor visual studio how to process and edit in iphone 12 how to process emotions and feelings android process media has stopped how to fix elderberry how to harvest and process how to write a process and procedure document how to process grief how to process emotions how to process trauma how to process food in genshin impact how to process a chicken how to get on dark web how to screenshot on windows 10 how to make slime how to print screen
How to process and edit raw files from your camera
How to process and edit raw files from your camera
Shooting in raw is one of the best ways to have total control over your images in post-processing.
A raw file is the image as seen by the camera's sensor. Think of it like unprocessed film. Rather than letting the camera process the image for you, turning it into a JPEG image, shooting in raw allows you to process the image to your liking.
Applying adjustments to a raw image is a non-destructive method of editing your photos, unlike editing a JPEG.
Want the best of both worlds? Some digital cameras will let you shoot in raw + JPEG mode, capturing the raw image while simultaneously processing a JPEG image for easy use.
What you need
A digital SLR or camera that can shoot raw
Image processing software such as Adobe Lightroom, Photoshop or the software that came with your camera
Remember that not all raw files are created equal, as different manufacturers will more than likely use their own proprietary file formats. For example, Nikon uses the .NEF extension, Canon uses .CR2 and Sony uses .ARW. Pentax generally uses the more open DNG format.
If you don't have access to raw editing software, there are also a few web-based tools that can help, such as WebRaw and Pics.io.
For this tutorial we will be using Adobe Camera Raw and Photoshop CC, but the principles should be very similar for whichever editing program you use.
Basic adjustments
When you open up the raw image in Photoshop, Adobe Camera Raw will automatically start. The window will look something like this:
Screenshot by Lexy Savvides/CNET
From here, you can adjust values such as the exposure and temperature. Move the exposure slider to simulate the effect of adjusting your exposure in-camera. The results will be automatically reflected in the image.
Notice that as you adjust most of these settings, the histogram will also change.
Recovering detail
One of the most important reasons for shooting in raw is to be able to recover image detail in case something goes wrong. Blown out your exposure so there are white patches of highlights everywhere? You probably will be able to bring some of this detail back thanks to the raw file.
In the example below, you can see from the histogram that there are clipped highlights in the sky. If you need help reading your histogram, this article explains more.
Screenshot by Lexy Savvides/CNET
The highlights slider is the key here; moving it further to the left will bring back detail that was lost from the blown out highlights. Extra image detail can be recovered by adjusting the exposure slider as well.
The same process can be used to bring back shadow detail in underexposed areas.
This image has a lot of detail in the underexposed shadow areas that can be brought back with a bit of tweaking. Lexy Savvides/CNET
To recover shadow detail, use the same technique as for recovering highlights. Simply move the slider until you see detail appearing again.
Screenshot by Lexy Savvides/CNET
White balance
Rather than setting a white balance value in the camera, when you shoot raw you can use any white balance setting and then adjust it in post-processing. From the Camera Raw interface, choose an option from the drop-down menu that best suits your needs.
There is another tool available in Camera Raw that provides white balance adjustment -- the white balance dropper. At the top of the window, simply select the white balance tool, and click on the part of the image that should be white. Then, Camera Raw will automatically adjust the colour temperature to make that component a true white. This is exactly the same as taking a manual white balance reading in-camera.
Making images pop
The examples above have mostly been working with images with quite obvious faults. Sometimes, there may be nothing wrong with your image at all but it looks a bit dull. Here is how to make an image pop with a few simple tweaks to the raw file.
Below is an image taken on the camera's metered exposure. It looks OK, but could use a bit of work to make it look even better.
Screenshot by Lexy Savvides/CNET
First, let's brighten things up a bit by increasing the exposure. I have also brought up the contrast a bit.
Screenshot by Lexy Savvides/CNET
The image still looks a bit cool, so I'm going to change the white balance option to warm things up a bit. For outdoor situations, the cloudy white balance preset adds a more warmth to the scene. You could also achieve a similar effect by moving the temperature adjustment slider. I have also taken this opportunity to pull up the white value, and recover some of the lost highlights in the wall by bringing down the highlight slider.
Finally, to really make things look defined, boost the clarity slider a little bit to the right. The clarity tool looks for edges and defines midtone contrast. Use it sparingly for the best results.
Screenshot by Lexy Savvides/CNET
Here is a comparison of the before and after image to give you an idea of how you can make an image pop using raw adjustments:
Lexy Savvides/CNET
Once you have applied some basic adjustments, click Open Image to enter into Photoshop and continue editing as you need.
This is a basic walkthrough of editing raw images -- stay tuned for a more in-depth look at raw adjustments soon.
Windows 10: Still seeing a printing error? Here's how to fix it
Windows 10: Still seeing a printing error? Here's how to fix it
If you're a Windows 10 user who has been facing an annoying error when trying to print items from certain apps. Microsoft has a workaround as it works on a resolution, which should be ready in the next week, the company wrote on a support page.
After installing a March update, KB5000802, you might see an APC_INDEX_MISMATCH error with a blue screen when you try to print to certain printers from certain apps. The problem affects a subset of Type 3 printer drivers. To find out if your printer is impacted, follow these steps, according to Microsoft. You can also check out CNET's collection of tips for troubleshooting common Windows 10 problems.
1. Press the Windows key+r or select Start and type run and select it.
2. Type printmanagement.msc and press enter or select the OK button.
3. If Print Management opens, continue to step 4. If you receive the error, Windows can not find 'printmanagement.msc'. then select Start and type manage optional features and select it. Select Add a Feature and type print, select the check box next to Print Management Console and select install. You will now need to start at step 1 again.
4. Expand Print Servers, expand your computer's name, and select Printers.
5. You can now see the Driver Type for each of your installed printer drivers.
Read more: How to download Windows 10 for free
If you are getting this error, here's how to fix it for now:
1. Go to Start > Settings, and search for Printers & scanners.
2. Check that you have the driver that has the issue installed (for example, KX driver for Universal printing).
3. Go to Start, and search for Command Prompt. Select Run as administrator.
4. To check driver setting availability, next to Windows\system>, write the run DLL command: rundll32 printui.dll,PrintUIEntry /Xg /n "KX driver for Universal printing" (you'll need to replace KX driver for Universal printing with your driver name). Press enter. This will open the printer user interface dialog box.
5. Check the Attributes field. If it does not say Direct, you'll have to fix it by closing out of the dialogue box, and running another command. Next to Windows\system>, type rundll32 printui.dll,PrintUIEntry /Xs /n "KX driver for Universal printing" attributes +direct (again, you'll need to replace that with the name of your driver). Press enter.
6. Run the first command again by hitting the up arrow, and pressing enter. In the dialog box that pops up, you should see Direct under Attributes.
This should mitigate the issue for 32 bit apps on a 64 bit OS. If you have a different setup, you'll have to follow different instructions, which you can find (along with those above) in a video walkthrough from Microsoft.
For more, check out all the new features coming in the Windows 10 spring 2021 update, and tips to help you become a Windows pro.
Error when printing windows 10 printer error printing windows 10 fix windows 10 printing error problems printing not working windows 10 windows 10 cannot see printers how to see about in windows 10 windows 10 windows 10 product key
Windows 10: Still seeing a printing error? Here's how to fix it
Windows 10: Still seeing a printing error? Here's how to fix it
If you're a Windows 10 user who has been facing an annoying error when trying to print items from certain apps. Microsoft has a workaround as it works on a resolution, which should be ready in the next week, the company wrote on a support page.
After installing a March update, KB5000802, you might see an APC_INDEX_MISMATCH error with a blue screen when you try to print to certain printers from certain apps. The problem affects a subset of Type 3 printer drivers. To find out if your printer is impacted, follow these steps, according to Microsoft. You can also check out CNET's collection of tips for troubleshooting common Windows 10 problems.
1. Press the Windows key+r or select Start and type run and select it.
2. Type printmanagement.msc and press enter or select the OK button.
3. If Print Management opens, continue to step 4. If you receive the error, Windows can not find 'printmanagement.msc'. then select Start and type manage optional features and select it. Select Add a Feature and type print, select the check box next to Print Management Console and select install. You will now need to start at step 1 again.
4. Expand Print Servers, expand your computer's name, and select Printers.
5. You can now see the Driver Type for each of your installed printer drivers.
Read more: How to download Windows 10 for free
If you are getting this error, here's how to fix it for now:
1. Go to Start > Settings, and search for Printers & scanners.
2. Check that you have the driver that has the issue installed (for example, KX driver for Universal printing).
3. Go to Start, and search for Command Prompt. Select Run as administrator.
4. To check driver setting availability, next to Windows\system>, write the run DLL command: rundll32 printui.dll,PrintUIEntry /Xg /n "KX driver for Universal printing" (you'll need to replace KX driver for Universal printing with your driver name). Press enter. This will open the printer user interface dialog box.
5. Check the Attributes field. If it does not say Direct, you'll have to fix it by closing out of the dialogue box, and running another command. Next to Windows\system>, type rundll32 printui.dll,PrintUIEntry /Xs /n "KX driver for Universal printing" attributes +direct (again, you'll need to replace that with the name of your driver). Press enter.
6. Run the first command again by hitting the up arrow, and pressing enter. In the dialog box that pops up, you should see Direct under Attributes.
This should mitigate the issue for 32 bit apps on a 64 bit OS. If you have a different setup, you'll have to follow different instructions, which you can find (along with those above) in a video walkthrough from Microsoft.
For more, check out all the new features coming in the Windows 10 spring 2021 update, and tips to help you become a Windows pro.
How to Factory Reset a MacBook, Windows Laptop or Chromebook to Sell or Give Away
How to Factory Reset a MacBook, Windows Laptop or Chromebook to Sell or Give Away
One side effect of spending more time at home during the pandemic is the realization that I have a lot of old tech lying around. A lot. Then, when I made a KonMari attempt at decluttering said tech, I unearthed several things I forgot I had -- including an old laptop I stopped using years ago because it was too slow for my high-end computing needs.
While this laptop no longer sparked joy for me, it turned out to be a perfect fit for my mom. It just needed to be cleaned up first, and I'm not just talking about removing dust and mystery goo with a few swipes of a disinfectant wipe, though you'll want to do that, too. The type of cleaning I'm talking about is restoring the laptop to like-new condition inside and out. Cleaning the outside is the easy part. Wiping the computer of all your apps, files, folders and other personal information isn't necessarily as straightforward. Of course, how much data scrubbing you need to do will likely depend on the recipient.
The big picture steps you take to refresh a laptop are the same regardless of whether it's a Windows laptop. Apple MacBook or Chromebook -- save your old data, remove all personal information, then go for a factory reset. It's the actual step-by-step procedure that differs depending on the type of laptop you're dealing with. Below, you'll find everything you need to know and do before giving your laptop a second life. And with supply chain issues, shipping problems and chip shortages making new devices harder to get, passing along a new-to-you laptop can be a welcome holiday gift.
Last thing first
I typically save the laptop's physical cleaning until last (why clean your fingerprints off twice?), but you may want to start there -- especially if it's been gathering dust in the back of a closet/under a bed/in the garage for the past several years. The basic equipment required for a good laptop cleaning is a can of compressed air and some disinfectant or alcohol wipes. For a slightly deeper clean, you may also want to grab a screwdriver and remove the bottom cover of your laptop (if possible) so you can carefully blow out any dust that's accumulated on the fans and vents.
After the laptop is clean, you can also wipe down the power adapter and any related accessories. It's also a good idea to ensure the power adapter is still in good, working condition. If you're still not quite sure where to start with the cleaning, check out our complete guide to getting your laptop looking its best.
Gifting a used MacBook
Óscar Gutiérrez/CNET
Before you even think about doing a factory reset on your MacBook, you need to save any data you want to keep. You may have already done this at some point if you migrated data from this old MacBook to a new one using using Apple's Migration Assistant. If that's not the case, it's time to hook up an external drive and use MacOS' built-in Time Machine tool to create a backup. If you have an iCloud account, you can back up your data there as well.
Sign out of everything
You'll also want to log out of all accounts before wiping your MacBook's drive. Start with iCloud, Find My Mac and iMessage. Then look for individual software accounts you may need to deregister. If you use a browser other than Safari, such as Chrome or Firefox, you should sign out of those as well. Basically, if it's got personal account information, you'll want to sign out. (Here's how to find account settings in MacOS.)
Two other things you should do before a factory reset: Unpair any Bluetooth devices -- particularly if the MacBook is being gifted to someone in your household -- and reset the NVRAM. The latter is memory that holds onto settings that the MacBook needs before loading MacOS. On startup, press and hold Option-Command-P-R to reset the NVRAM.
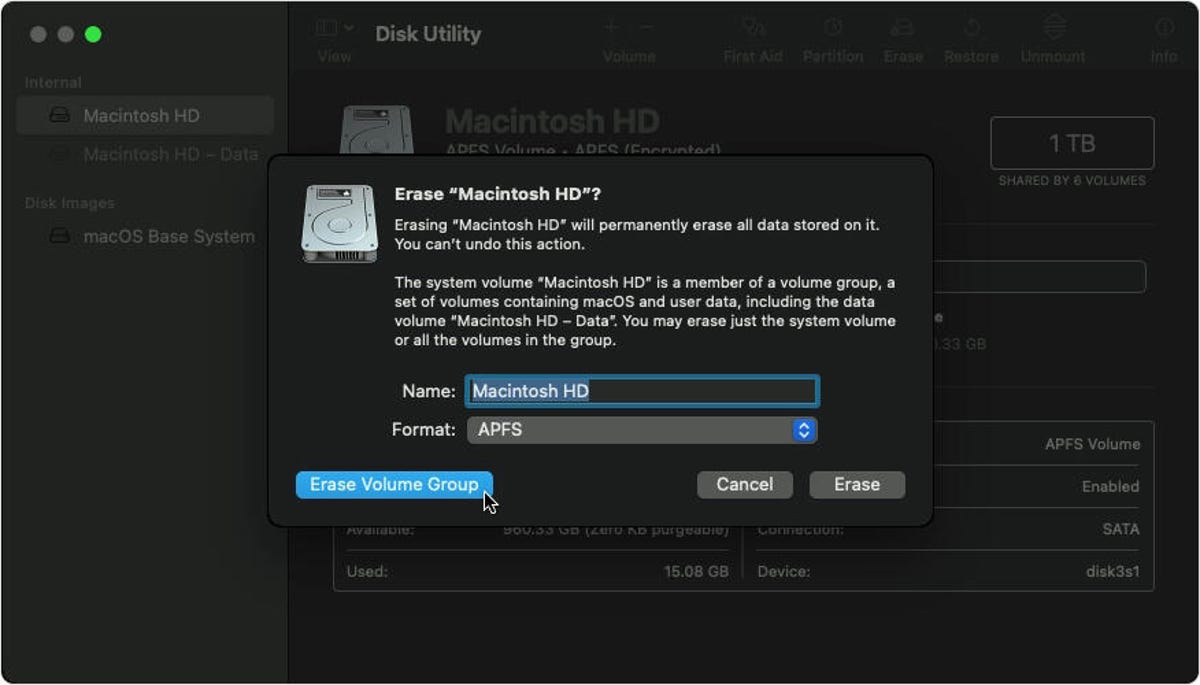
Perform a factory reset
If you've done everything above, you're ready to return your MacBook to its out-of-the-box state. On an Intel-based Mac, reboot the system and press and hold Command-R to enter Recovery Mode. (Accessing Recovery Mode on MacBooks running on the company's Apple Silicon chips is different, however.)
Read more:Before selling your MacBook, you need to factory reset it
Once in Recovery Mode, you'll see a window of MacOS utilities. Use the Disk Utility to erase your drive. When that's complete, you'll be able to reinstall MacOS. After it's done reinstalling, you'll reach the Setup Assistant. From there you can stop and shut it down or set it up for the recipient.
Gifting a used Windows laptop
Screenshot by Josh Goldman/CNET
As with gifting a MacBook, start by backing up any important folders and files on your old laptop to cloud storage or an external drive. If you're doing the latter, go to Settings > Update & Security > Backup > Add a drive and select the external drive. Then click on Backup Now.
Sign out of all your apps
A lot of paid software requires you to sign in with an account, a product key or both. Before you wipe your laptop's storage, sign out of any accounts and deregister software licenses (if possible). If you need those product keys to re-register software on a new laptop, be sure to save that information. If you use a browser other than Edge, such as Chrome or Firefox, sign out of those as well. Basically, if it's got personal account information, sign out.
Reset the laptop
Ready to clean the drive and reinstall Windows? Go to Settings > Update and security > Recovery. At the top of the window, you'll see Reset this PC. Click on Get Started and select Remove Everything from the box that appears. From there, you can select to reinstall Windows from the local drive or download from the cloud. After that, Windows cleans the drive of all software, settings and data. When it's done, the laptop will start in its setup assistant mode. You can then stop and shut it down for a fresh-out-of-the-box experience or do some setup, which is nice touch, especially if it's going to a family member so they can use it right away.
Unlink from your Microsoft account
If you used a Microsoft account to sign in to the laptop, the last thing you'll want to do is remove the laptop from that account. Sign in to your account from another computer and click on the Devices tab at the top of the page. Find the laptop that you're gifting on the list of devices, and at the bottom of the listing, you'll see the option to remove the device. Click it and you're done.
Gifting a used Chromebook
Sarah Tew/CNET
Chromebooks are the easiest to refresh for gifting. That's mainly because of their cloud-based design. Google also makes it extremely easy to wipe your data and securely clean the internal storage as well as remove the Chromebook from your Google account.
Check the AUE first
Before you even consider gifting an old Chromebook, check its auto-update expiration. Google only guarantees Chrome OS and browser feature support on non-Google hardware for so long. Every device has a date on which it stops receiving updates, aka its AUE date. Current models receive updates for eight years; older models could potentially be a year or two away from reaching their AUE.
Google maintains an AUE list, so finding the date your Chromebook will stop receiving updates is as easy as locating your model on that list. The AUE can also be found in your Chromebook's settings. Here's how to find the AUE from Google and in your Chromebook.
Give it a Powerwash
Powerwash is Google's built-in factory reset tool for Chromebooks. Once you've backed up folders or files stored on the Chromebook's internal drive, running Powerwash will securely scrub the system and reboot. When it restarts, it'll be just like the day you unboxed it.
The actual Powerwash typically takes less than a minute to complete. A simple search for "powerwash" in your Chromebook's settings will bring you right to the feature, but here's everything you need to know about the procedure.
Remove the Chromebook from your Google account
Although you've removed your account from the Chromebook, you haven't removed the Chromebook from your account. Start by signing into your Google account and head to the Security settings. If you use the Chrome browser, you can also click on your account avatar and select Manage your Google Account from the drop-down menu.
In the Security section, scroll down until you see a box labeled Your devices, which lists all the devices attached to your account. At the bottom of the box, click on Manage devices and find the Chromebook you're gifting and select Sign Out.
Give the Chromebook a good external cleaning, gather up any accessories and it's ready to hand off to your giftee.
Read more: How to regift a game console
How Factory Reset Your Devices
Make sure to wipe personal data before selling, trading in or regifting your gear.
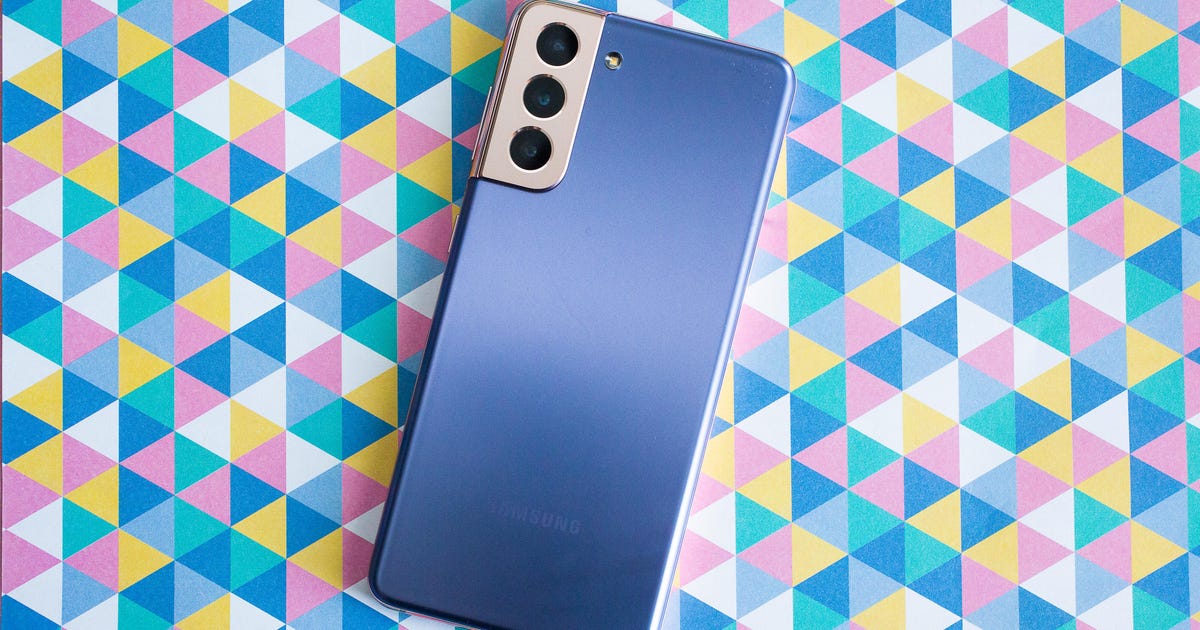
Get the Galaxy S21 for free at AT&T this Cyber Monday -- if you commit to an unlimited plan
Get the Galaxy S21 for free at AT&T this Cyber Monday -- if you commit to an unlimited plan
This story is part of Gift Guide, our year-round collection of the best gift ideas.
AT&T is giving away Samsung's Galaxy S21 this Cyber Monday as long as you meet the carrier's conditions. The Galaxy S21 is Samsung's flagship smartphone from 2021 that comes with 6.2-inch screen and a triple-lens camera.
To take advantage of the deal, you'll need to buy the Galaxy S21 through AT&T's monthly installment payment plan instead of buying the device outright. You'll also have to pay taxes on the full retail amount up front and pay the $30 activation or upgrade fee. The deal is only available for those who activate or continue paying for AT&T's unlimited wireless service plan.
If you meet those requirements, you'll get up to $800 in bill credits toward your Samsung Galaxy S21. It's important to note that these credits only start after three bills, but AT&T says you'll receive catch-up credits later. If you cancel your service, the credits will stop and you'll be responsible for the remaining balance.
The deal is only valid on Nov. 29. Although there are several conditions in the fine print, it's still a good deal for those who are planning to stick with AT&T for the longterm or are considering switching to its service. Many deals like this usually require you to trade in your old device to get such a big discount, so this deal is notable for that reason as well.
The Galaxy S21 is almost a year old, which means it's likely almost time for the Galaxy S22. But the Galaxy S21 is still an excellent choice for those who want a compact, well-designed Android phone with a solid camera, smooth screen and decent battery life.
Motorola moto x pure edition battery motorola moto x pure manual motorola moto x pure 4g reviews motorola moto x pure edition motorola moto x xt1060 google bypass motorola moto x motorola moto e motorola moto e6 motorola moto g play
Motorola Moto X Pure Edition (unlocked) review: Customization champ, but middle-of-the-pack phablet overall
Motorola Moto X Pure Edition (unlocked) review: Customization champ, but middle-of-the-pack phablet overall
I like the Moto X Pure Edition (or Style as its globally known), but I was honestly ready to love it. For one thing, it's an unlocked phone available directly from Motorola at a reasonable price, and it's designed to work on all of the major US wireless carriers (AT&T, T-Mobile, Verizon and Sprint) -- that's a big step up from most unlocked phones that only work on the first two in that list. Likewise, the international Moto X Style should work on all the carriers in whichever territory it's sold -- and many countries will also get the stepdown Moto X Play phone, which is not currently slated for a US release.
In addition, this 5.7-inch follow-up to 2014's Motorola Moto X also promises the same customization options, like choosing between different trim colors and the material of the backing, that made me buy that model as my personal device. And in this sea of lookalike phones, this is a distinct advantage that the Moto X Pure Edition has over its rivals.
But instead, I was disappointed. Its larger design (up from 5.2 inches) feels far too cumbersome for smaller hands like mine. Battery life was unexceptional, its camera wasn't massively impressive and aside from a few minor tweaks, Motorola's Moto services don't feature anything substantially new.
When you compare it to a top-tier large-screen device like the Samsung Galaxy Note 5 , its drawbacks become even more obvious. And if you consider the current diverse landscape of unlocked handsets with the OnePlus 2 and ZTE Axon Pro , Motorola's phone doesn't quite come out on top. Though the Moto X was one of our favorite budget flagships last year, the same can't be said for the Moto X Pure Edition.
Availability
In the US, the handset starts at $400 unlocked ($100 less than last year's starting price). The price will increase, however, depending on storage capacity and certain design options.
In the UK the Style, as it's known, starts at £399 for 32GB of storage, with 64GB setting you back £434.
In Australia the Style is exclusive to Vodafone and only available on contract. It's available on both the AU$80 and AU$100 plans, for AU$3 of monthly handset repayments. That's a total cost over 24 months of AU$1,992 and AU$2,472 respectively.
Design and build
5.7-inch display with 2,560x1,440-pixel (2K) resolution
6.1 by 3 by 0.4 inches (154 by 76 by 11.1mm)
6.3 ounces (179 grams)
Compared to the 2014 Moto X , Motorola increased the Moto X Pure Edition's display by half an inch, bumping up the device's overall footprint. Though it isn't as big as the Google Nexus 6 (which was manufactured by Motorola before Google sold it off to Lenovo), the size jump still makes it notably bigger than the previous 5.2-inch Moto X . That means -- for some -- it won't fit in your front pockets easily and you can't maneuver it with one hand comfortably. I passed it around for several opinions, and even tall people with large hands noted problems reaching for the notifications shade with their thumbs.
We got our hands on a black variant with a walnut wood backing and silver trim.
Josh Miller/CNET
But putting aside the size, it's still an attractive, quality built handset. Its curved backing conforms to your palm and the screen's glass panel smoothly curves down the side edges. The control buttons are narrow, and the ridges on the power/sleep button makes it easier to identify by touch. And Motorola's metal M-dimple on the back of the previous generation has now shrunken in size and sits in an elegant metal strip that runs between it and the camera lens.
Keep in mind that unlike its cheaper Moto G counterpart that came out this year, the phone is not submersible underwater. It is water repellent though, so you won't have to worry about a few water droplets here and there.
The Moto X Pure Edition also has dual front speakers -- as in both speakers will output audio for music and movies (though only the bottom grille will output phone calls on speaker), resulting in a louder and fuller experience. This is different from last year's, which only used one stereo speaker for media, and the other served as the in-ear speaker for calls.
Most importantly, Motorola continues its legacy to enable users to customize the look of the device. You can start with either a black or white base color, choose the accent colors (as in, the color of the speaker grilles on the front and the metal strip on the back), and the color of the back, which also comes in different materials: plastic, wood, bamboo and leather.
Some may argue that the ability to customize the handsets is trivial. But when the mobile market is saturated with so many phones that look the same, having a say over how yours looks (without the use of a case), is one of the few ways to have it stand out and make it truly yours. That matters to people, and it's a need that Motorola has tapped into well.
Other different design options for the Moto X Pure Edition.
Motorola
As for device's display, it's bigger as I mentioned before. It also has a sharp 1,440p resolution and it's maximum brightness level is bright enough to view comfortably outdoors in sunlight. Likewise, the minimum brightness level is also extremely dim, which is useful for avoiding eye-strain when viewing your handset in the dark.
The screen has a wide viewing angle and is responsive to the touch. I had no problems reading text and playing games, and streaming YouTube videos and watching the HD movie "Gravity" looked smooth and crisp. There's also a new setting under Display where you can choose between two color modes: normal or vibrant. Under normal mode, colors are already bright and vivid. But with the latter, hues are more saturated and richer.
Software and features
Google Android 5.1.1 Lollipop OS
Minimal Motorola software
Useful gesture controls
Despite its name, the Moto X Pure Edition isn't exactly the "purest" Android device, at least not compared to the Google's own Nexus family (understandably) and Play Edition handsets (though the latter has ceased all production since January). Don't be too disappointed, though -- if you want an untouched Android experience, Motorola's Moto line comes pretty close.
First, because you can get it unlocked, you won't get any carrier bloatware and branding. Instead, you'll get the usual set of Google apps such as the Chrome Web browser, Gmail, YouTube and more. Second, while you won't have a manufacturer user interface overlaid on top of the phone in the same way TouchWiz and Sense skins Samsung and HTC devices, respectively, Motorola still included some useful features under its Moto app.
These features are accessible under a single Moto app, which has Moto Assist, Actions, Voice and Display. Assist adjusts your Moto X Pure Edition settings depending on where you are or what you're doing. If you've scheduled a meeting into Google Calendar, for example, the device can switch to vibrate right and reply to any missed calls with a predetermined message.
Motorola's suite of software features (left), including Moto Voice commands (right).
Lynn La/CNET
Actions is all about gesture controls: Twist your wrist with the phone in your hand to launch the camera or chop your hand in the air to turn on and off the flash to use as a flashlight.
Motorola's voice input, called Voice, works similarly to Google Now, so if you've used that feature before, you have a good idea of what to do here. It works with both built-in and third-party apps and you can set an alarm, navigate to a destination with Maps, look up a song title that's playing at the moment, begin a Twitter post and more.
Display shows any missed notifications you have, even while the device is sleeping, with a wave gesture. The current time and any missed notifications will pop up in white. You can preview a missed notification by longpressing its app icon, or press-and-swipe to launch it directly from the screen.
Because it offers a nearly vanilla Android experience, you won't get any carrier bloatware.
Josh Miller/CNET
Two other apps, Moto Connect and Migrate, round up the last of the handset's Motorola software. Connect manages all peripheral Motorola gadgets you may have like the Moto 360 smartwatch or a pair of its wireless headphones. Migrate helps you port over your contacts, apps and other files from a previous phone onto your new Moto X Pure Edition.
For the most part, Motorola's software works well. I am a fan of Moto Display, which doesn't sound like much, but it saves you from having to press the power button throughout the day to see any missed notifications. And while it isn't a new feature, flicking the device to fire up the camera is convenient and saves a lot of time.
The handset is, however, loaded with your standard line of Google apps.
Josh Miller/CNET
I did run into some issues, however. For one thing, you'll need the latest version of the Moto app to update your status on Facebook hands-free through Moto Voice. Otherwise, the handset will reply that it can't connect to "the cloud" after you dictate a post. And while you can dictate Facebook posts and text messages, you can't do the same on Twitter. Voice just activates a small Twitter window so you can begin posting, but you'll need to type out the actual message.
It's also unclear what requires you to say your PIN when you use Voice commands while the phone is locked. For example, posting to Facebook prompts a PIN confirmation, but sending a text doesn't. The chopping gesture to activate the flash also doesn't feel natural or work as smoothly, and half the time I'm afraid I'll end up chucking my device across the room.
But perhaps the most disappointing thing is that compared to its predecessor, the Moto X Pure Edition doesn't offer anything substantial in terms of new software. A small amount of tweaks have been made, but overall, nothing substantial has been added. In some ways that's understandable since Motorola is purposely staying as close to the pure Android experience as one can get. But it's still a bit of a letdown to know that your new handset carries the same bag of tricks as it did last year.
Cameras and video
21-megapixel rear-facing camera
5-megapixel front-facing camera
Can record 4K (rear) and 1,080p (front) video
Night mode shooting and wide-angle front-facing camera has its own flash
The native camera app isn't loaded with tons of editing features, but both cameras do have HDR (high dynamic range) shooting, a touch-focus module where you can adjust the exposure as well, a digital zoom, a timer and geotagging. They also have a flash (yes, even the front-facing camera so you can brighten up your selfies) and a new shooting mode called "night mode" for low-light environments. Photos can be taken in either the wide 16:9 aspect ratio or the more squarish 4:3.
As for video, both front and rear cameras can record 1,080p HD footage and slow-mo videos in 720p (a change from the predecessor's better 1,080p slow-mo capabilities). While shooting video, you can also take pictures and pause recording.
The rear camera in particular can also take panoramic photos and scan QR codes and bar codes to look up via Google or copy onto the clipboard. And on top of already shooting 1,080p video, it can also record ultra-HD 4K video, which -- at 3,840x2,160p -- offers four times the resolution of 1,080p. That's state of the art -- albeit of dubious value, however.
Say cheese! The front-facing camera comes with its own flash.Josh Miller/CNETIn this well-lit indoor photo, objects are still clear and easy to make out, and lighting is evenly exposed.Lynn La/CNET
As for picture quality, photos looked decent, and the camera does well for everyday informal shots. Though they didn't manage to blow me away, it's still adequate enough to post online or print out a small photo.
Pictures taken outdoors or in amply-lit indoor environments looked great: colors were accurate, objects were clear with defined outlines and you can still see a lot of details retained at full resolution. There were a few times when the phone took a couple of tries to focus on an object up close, but eventually it'd lock on and snap a clear picture. Photos taken in low-light environments didn't fare as well, which is a common occurrence in smartphone photography. Though night mode improved exposure somewhat, I still saw a noticeable amount of digital noise, graininess and muted colors.
Because the front-facing camera has a wide-angle lens, my photos captured more content and space into the frame. As such, however, do expect to get some elongated angles near the corners of your pictures. For more information on camera quality, click the photos below to view them at their full resolution.
Video quality was solid. Nearby and distant audio was picked up well without any noticeable noise distortion, and both moving and still objects looked smooth and sharp. There was no discernible lag between my moving of the camera and what I saw in the viewfinder, and the camera was able to swiftly shift focus and exposure as I moved it around.
Night mode brightened up this dimly lit bar a tad -- but the photo is still not so great.
Lynn La/CNET
In our standard studio shot, these items look clear and defined, and the flash didn't leave any harsh reflections against the background.
Lynn La/CNET
This photo taken on a sunny day shows true-to-life colors and images that are sharp and in focus.
Lynn La/CNET
Though the stems and leaves on the right are clear, the right pomegranate gets blurry around the edges.
Lynn La/CNET
With its wide-angle front-facing camera, you can capture more content with your selfies (or groupies if you have friends).
Lynn La/CNET
Hardware performance
1.8GHz 6-core Qualcomm Snapdragon 808
600MHz Adreno 418 graphics processing unit
16GB, 32GB or 64GB of internal storage with up to 128GB of expandable memory
3GB of RAM
3,000mAh nonremovable battery
Though the Moto X Pure Edition's processor has a lower clock speed than its predecessor (from 2.5 to 1.8GHz), its Snapdragon 808 processor still operates swiftly and smoothly. For one thing, the CPU is no slacker (it's the same one featured in the LG G4 ) and the RAM has been bumped up to 3GB. In general, I didn't notice any stuttering issues or lag while executing a number of everyday tasks like calling up the app drawer, opening the camera and switching between apps. Images for graphics-intensive games like Riptide GP 2 and Kill Shot were rendered fast and smooth, and the overall gaming experience was solid. It took about 37 seconds to power off and restart the device and 1.38 seconds to launch the camera.
Also, unlike the previous two versions of the Moto X, Motorola added a MicroSD card slot that can hold up to 128GB of extra memory -- giving you more breathing room for your photos and files.
But while the handset provides plenty of power to satisfy your daily smartphone needs, its benchmark scores falls behind its competitors. That's not surprising since the Galaxy Note 5 belongs to a more premium caliber, and both the OnePlus 2 and the ZTE Axon Pro sport the 8-core Snapdragon 810 processor. In that sense, the Moto X Pure Edition performed well for itself, but aside from having the second-highest single-core Geekbench 3 result among the latter two, it altogether fell a bit short of the other devices.
Benchmark test comparison
Motorola Moto X Pure Edition19,7251,2713,528Samsung Galaxy Note 524,5891,4884,939OnePlus 222,6451,1424,461ZTE Axon Pro25,7428683,958
3DMark Ice Storm (unlimited)
Geekbench 3 (single-core)
Geekbench 3 (multi-core)
Note: Longer bars indicate better performance
Call quality and data speeds
GSM/GPRS/EDGE: (850/900/1800/1900 MHz)
CDMA: (800/850/1900MHz)
UMTS/HSPA+: (850/900/1700(AWS)/1900/2100MHz)
LTE B1/2/3/4/5/7/8/12/13/17/25/26/38/41
Wi-Fi 802.11 a/g/b/n/ac + MIMO
Wi-Fi 802.11 a/g/b/n/ac + MIMO
For US customers, Motorola's handset is unique because it works for carriers that operate on either GSM or CDMA technology. Meaning, for example, the phone can make calls and surf the Internet on AT&T and T-Mobile's network (which uses the GSM standard) and do the same on Verizon and Sprint (which uses CDMA). This isn't a huge deal if you don't plan on leaving your carrier, but for those switching from a GSM to CDMA carrier or vice versa, or already have two devices on these different platforms, know that you can use the same Moto X no matter what network you go with.
Motorola Moto X Pure Edition average data speeds
4G LTE download rate
11.7Mbps
4G LTE upload rate
15.82Mbps
CNET mobile site load
4 seconds
CNET desktop site load
4 seconds
Temple Run 2 app download (44.52MB)
34 seconds
"Gravity" movie download (1.7GB)
24 minutes and 31 seconds
As for call quality, I tested the unlocked handset using AT&T's cellular network. Call quality was great. Volume range was appropriate (with the maximum volume being satisfyingly loud), my calling partner was clear and easy to understand and I didn't pick up any extraneous buzzing or static. Audio speaker was also reliable. As I mentioned before, speaker calls only comes out from the bottom grille, but that's still enough to hear my partner well, even when I was outdoors nearby noisy traffic. Likewise, I was told that I sounded good too, and when I stepped outdoors, my partner did not pick up any background sounds from the surrounding environment.
The phone's fast-charging Turbo Charger.
Josh Miller/CNET
Data speeds on AT&T's 4G LTE network were fast. According to Ookla's speed test, it had an average download rate of 11.7Mbps and upload rate of 15.82Mbps. It took about 4 seconds to load each of CNET's mobile and desktop site and 34 seconds to download and install the 44.52MB game Temple Run 2. One attempt to download the 1.7GB, high-definition movie "Gravity" took 24 minutes and 31 seconds.
Battery Life
With heavy usage, the Motorola X Pure Edition's non-removable battery can deplete quickly. After spending a workday surfing the Web, downloading apps and making calls, I hit 30 percent by late afternoon. To last the rest of the evening, I had to plug in the device for a charge.
During our battery drain test for continuous video playback, the handset lasted an average of 8 hours and 46 minutes. Although last year's Moto X had a smaller screen, its lower-capacity 2,300mAh battery lasted over 10 hours. And compared to its rivals, the OnePlus 2's 3,300mAh battery lasted 9 hours and 46 minutes (though we weren't very impressed with that performance either), and the Axon Pro's 3,000mAh battery lasted shorter at 8 hours and 8 minutes (again, not the best from all parties). I you want to know what does impress us, the Samsung Galaxy Note 5 -- while admittedly a higher-tiered phone and expensive than all these devices -- lasted a whopping 15 hours of continuous playback on its 3,000mAh battery.
Motorola's handset, however, does come with a 25-watt Turbo Power charger, which promises to juice up your battery quickly. It does, in fact, charge the phone in a jiffy. When completely drained, it took only about an hour and 15 minutes to charge to 100 percent. And if you need to charge in a pinch, shutting it off and plugging it in for 10 minutes will gain about 20 percent battery life.
Conclusion
The Motorola Moto X Pure Edition is a great device for specific users. Google Android fans who can't wait until late September for the next Nexus reveal will enjoy the handset's nearly unsullied Android experience. The $400 phone bucks the current trend by offering external storage, and loops in support for the world's most prevalent network technologies -- CDMA and GSM -- so it should work with almost every carrier.
And with its numerous choices of color accents, engravings and materials, having a Moto X Pure Edition means having a device that reflects your own style. Heavily consider this handset if that's an important asset for you.
If it's not, however, there are lots of viable alternatives. If money isn't an issue, the Samsung Galaxy Note 5 is the reigning Android supersize phone: It's powerful, stylish and has a long-lasting battery.
The Moto X Pure Edition is witnessing a far more competitive landscape for unlocked handsets than its predecessor.
Josh Miller/CNET
In addition, the mobile landscape for unlocked phones has changed a lot since last year's Moto X came out. They are getting more powerful at a lower cost.
For US customers, the $500 ZTE Axon Pro costs $100 more but has a 8-core Snapdragon 810 processor, 4GB of RAM and tons of native camera features. Globally, you can try and nab the OnePlus 2 . Due to its limited availability it can be hard to get, but if you do, it starts at the very competitive price of $330 (£215 or AU$450, converted). It's also equipped with the 810 CPU and if you're keen on wood backings like the ones that come with the Moto Xs, the OnePlus 2 has that as well.
All in all, the Moto X Pure Edition is a reliable and quality-built device, but if you have the previous model, don't feel like you're missing out on anything. The competition is fierce these days, and while the Moto X may be partially to blame for setting my expectations too high, the X Pure Edition just doesn't deliver that winning combination of style, power and value that I've come to expect.