DJI Phantom 3

How To Screenshot On Windows

Embark on a Quest with How To Screenshot On Windows

Step into a world where the focus is keenly set on How To Screenshot On Windows. Within the confines of this article, a tapestry of references to How To Screenshot On Windows awaits your exploration. If your pursuit involves unraveling the depths of How To Screenshot On Windows, you've arrived at the perfect destination.

Our narrative unfolds with a wealth of insights surrounding How To Screenshot On Windows. This is not just a standard article; it's a curated journey into the facets and intricacies of How To Screenshot On Windows. Whether you're thirsting for comprehensive knowledge or just a glimpse into the universe of How To Screenshot On Windows, this promises to be an enriching experience.

The spotlight is firmly on How To Screenshot On Windows, and as you navigate through the text on these digital pages, you'll discover an extensive array of information centered around How To Screenshot On Windows. This is more than mere information; it's an invitation to immerse yourself in the enthralling world of How To Screenshot On Windows.

So, if you're eager to satisfy your curiosity about How To Screenshot On Windows, your journey commences here. Let's embark together on a captivating odyssey through the myriad dimensions of How To Screenshot On Windows.

Showing posts sorted by relevance for query How To Screenshot On Windows. Sort by date Show all posts

Need To Take A Screenshot On Windows 11? Here's How


Need to take a screenshot on windows 11 here s how a charitable need to take a screenshot on windows 11 here s how to calculate need to take a screenshot on windows 11 here s my number so call me maybe need to take a screenshot on hp need to take a screenshot on hp do i need to take a multivitamin constant need to take a deep breath sometimes you need to take a step back need to take deep breaths sometimes you need to take a step back do you need to take calcium with vitamin d need to know lyrics
Need to Take a Screenshot on Windows 11? Here's How


Need to Take a Screenshot on Windows 11? Here's How

Screenshots are used for a variety of reasons. Maybe you're sending someone a photo of your screen over Slack to diagnose a problem, or you just need to take a quick snippet of an important document to save for later. Regardless of the reason, there are multiple ways to take a screenshot using a Windows 11 computer.

Whether you want to take a full-screen grab, you only want to capture part of the screen or you'd prefer to use a keyboard shortcut or application, the process is simple. Here are all the ways to take a screenshot on Windows 11.

Don't have Windows 11 yet? Check out these two important things you need to do before you can download Windows 11. And if you're unsure about updating, read more about the major differences between Windows 11 and Windows 10.

1. Take a screenshot of the entire screen

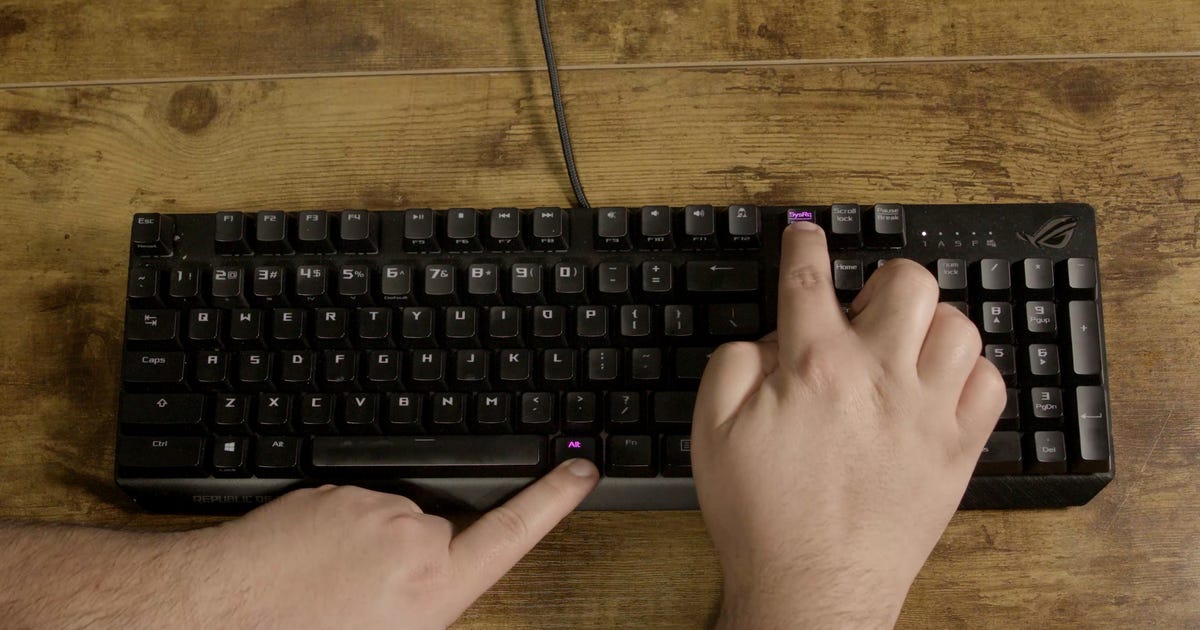
The easiest way to take a screenshot of your entire desktop is with the PrtSc key at the top of your keyboard. After tapping on the PrtSc key, the screenshot will be saved to your clipboard, although you won't receive any indication the screenshot has successfully been taken. To view the full-screen screenshot, use Ctrl-V to paste it into an application like Paint or Microsoft Word, or even into the body of an email.

2. Take a screenshot of the entire screen and save it to your computer

Similar to the first option, hitting the Windows-PrtSc keys will take a screenshot of your entire desktop, but it'll also save the screenshot to a folder on your computer. If you hit the keys correctly, your whole screen will flash, indicating the screenshot has been taken and saved. You can find all of your full-screen screenshots in Pictures > Screenshots.

using a rectangular snip to take a screenshot on a computer

You can take four types of screenshots: rectangular, freeform, window and full-screen.

CNET

3. Take a screenshot of only part of the screen

Not everyone wants a screenshot of their entire screen, which is why Windows 11 gives you the option to take only a partial screenshot. If you tap on Win + Shift +S, your screen will flash and a small Snipping Tool menu will appear at the top of the screen, allowing you to do the following (from left to right):

  • Rectangular Snip: Draw a box around what you want to capture
  • Freeform Snip: Draw any shape around what you want to capture.
  • Window Snip: Choose a window to capture.
  • Full-screen Snip: Capture your entire screen (same thing as PrtScr).

Once the screenshot's taken, it'll be saved to your clipboard, as with the PrtScr key option. You can then paste it elsewhere to look at it. However, if you click the Snipping Tool preview that appears at the bottom of the screen, you'll find options to edit the screenshot (crop, rotate and more) and save it to your desktop.

screen for delaying a screenshot

You can delay your screenshot by 3, 5 or 10 seconds.

CNET

4. Use the Snipping Tool to take delayed screenshots

The Snipping Tool comes built into Windows 11, and is the same tool used in the previous section, except with a few tiny additions. To use it, type in Snipping Tool in the Search feature and open the application to take a screenshot.

In Snipping Tool, if you click on New you'll open the mini Snipping Tool menu (like in the section before), where you can then choose between several different snips. However, with this full version of the Snipping Tool, you can choose any of the four snipping options (rectangular, freeform, window and fullscreen) and then choose a delay option. You can choose between a 3-, 5- and 10-second delay. This will give you a bit of time to set up whatever it is you're attempting to screenshot and might make it easier than taking the shot manually.

To take the delayed screenshot, simply hit Win-Shift-S, which will then be copied to your clipboard. You can also click on the screenshot preview that appears to make any edits or save it to your computer as a JPEG, PNG or other.


Source

Photoshop And Lightroom Super Resolution: How To Quadruple Your Photo Size


Photoshop and lightroom super resolution how to quadruple click photoshop and lightroom super resolution how to quadruple crochet photoshop and lightroom super resolution howell photoshop and lightroom super resolution video photoshop and lightroom super resolution gan photoshop and lightroom super resolution ultrasound photoshop and lightroom plan photoshop and lightroom tutorials photoshop and editing free download arabic in adobe photoshop and games photoshop and lightroom
Photoshop and Lightroom Super Resolution: How to quadruple your photo size


Photoshop and Lightroom Super Resolution: How to quadruple your photo size

Adobe's Super Resolution feature in Lightroom and Photoshop is remarkable technology that uses artificial intelligence to quadruple the size of your photos. It's not perfect, but it's a great way to breathe new life into older shots and to print photos larger with twice the number of pixels in both width and height. Here's what it is and how to use it.

To build the Super Resolution feature, Adobe trained its Sensei artificial intelligence technology on millions of real photos. It compared originals with quarter-size versions so the system could learn the best way to blow them back up again. It applies that behavior to your own photos, making very well-informed guesses about how to increase their resolution.

Yes, Photoshop is fabricating pixels that weren't there in the first place, and no, it's not going to magically add detail the way Rick Deckard does with "enhance" commands in the sci-fi movie Blade Runner. Those caveats aside, I find it works well on many images, particularly when expanding edges, where it often does so without adding artifacts like mushiness or jaggy pixelization. Even faces -- the parts of images that we're often most concerned about -- come out well.

Super Resolution works through the Adobe Camera Raw tool in Photoshop. Adobe trained the feature to work on raw photos, the format that photo enthusiasts and pros prefer for editing flexibility and image quality. But Super Resolution can work on conventional images, like the JPEGs and HEICs your phone probably captures.

With that said, let's jump in. I'll explain first how to use Super Resolution on its own, then how to apply it to JPEGs, and finally how use it in Adobe's Lightroom software for editing and cataloging photos.

How to use Super Resolution in Photoshop's Adobe Camera Raw

Begin the Super Resolution process by opening a raw file. Photoshop will open raw files in the Adobe Camera Raw tool directly.

Next, right-click the photo and select the Enhance option. You can also use the keyboard shortcut Command-Shift-D on MacOS and Control-Shift-D on Windows.

Photoshop Super Resolution
Screenshot by Stephen Shankland/CNET

You'll see an Enhanced Preview dialog box with a couple of options to control the process. First, the Raw Details option Adobe added in 2019 improves how raw files are rendered. Below that, make sure you've checked the Super Resolution checkbox. To see the expected results, click and drag to pan around the preview image, or click on the magnifying glass icon to zoom out and then click again on the patch you want to scrutinize.

Photoshop Super Resolution preview
Screenshot by Stephen Shankland/CNET

Next, click the Enhance button and wait. Photoshop shows its estimate for how long the process will take -- several minutes in some cases -- but often it gets done faster in my testing, sometimes just a few seconds to turn 12 megapixel photos into 48 megapixels.

If you want to bypass the Enhanced Preview dialog box, hold down Option on MacOS or Alt on Windows as you click the Enhance option.

After that comes the fine tuning. I recommend zooming in closely to edit details like sharpness, texture and noise reduction using the sliders on the right edge of the tool.

Super Resolution sharpness adjustment
Screenshot by Stephen Shankland/CNET

Last, click either the Done button, which will save the new version next to the original with "-Enhanced" added to its filename, or Open, which opens the image in Photoshop.

How to use Super Resolution on a JPEG

To apply Super Resolution to JPEG, HEIC or TIFF, you'll first have to change Photoshop's preferences to open those file formats in Adobe Camera Raw by default. Unfortunately, you can't just use the Filter menu's Camera Raw Filter menu command.

First, open Photoshop preferences, go to the File Handling section, then click Camera Raw Preferences. In the next dialog box that appears, click the File Handling section. Change the JPEG/HEIC dropdown to "Automatically open all supported" images, and do the same with TIFF images if you want that, too.

Setting ACR default for JPEG Super Resolution
Screenshot by Stephen Shankland/CNET

Note that this will mean these images will open in Adobe Camera Raw even if you don't want to use Super Resolution and the rest of the Adobe Camera Raw editing options. Personally, I like them, since I do most of my photo editing in Lightroom -- a close relative to Adobe Camera Raw. But if you want Photoshop's regular behavior, you'll have to switch it off in Photoshop's preferences again.

DSLRs and mirrorless cameras from Sony, Nikon, Canon and other camera makers all have the option to shoot raw, but smartphones are getting better at it too, with Apple's ProRaw and Google's computational raw technology.

How to use Super Resolution from Adobe Lightroom

For a few months there, it was tough to use Super Resolution if you use Lightroom for cataloging and editing your photos. Happily, with the June 2021 Lightroom release, the feature is built in.

Using it is simple, but it's a step off the beaten track from your usual editing and catalog operations. Select the photo in Lightroom's Library mode, then choose "Enhance" from the Photo menu. You can also right-click on the image to get the option in a pop-up menu.

Lightroom Super Resolution menu command
Screenshot by Stephen Shankland/CNET
Lightroom Super Resolution dialog box
Screenshot by Stephen Shankland/CNET

After a moment to generate a preview, you'll see a dialog box that lets you pan around the preview, zoom and out, click to compare before-and-after previews, and check Lightroom's estimate for how long the job will take. Click "Enhance" when you're ready.

As with Photoshop, it's best to pixel peep to check your detailed edits zoomed in. You might want to turn down sharpness, particularly in areas like hair, where Super Resolution can make mistakes, or to crank up noise reduction. I've also found that manually adjusting purple and green fringing problems in the Lens Corrections panel can be useful to reduce color artifacts.

Lightroom Super Resolution sharpness
Screenshot by Stephen Shankland/CNET

Note that the keyboard shortcut for Enhance is different for Lightroom and Lightroom Classic, Adobe's two very different versions of Lightroom. For Lightroom Classic (which stores photos on your computer's storage system) it's Ctrl-Alt-I on Windows and Ctrl-Opt-I on MacOS. For Lightroom (which stores photos in the cloud and syncs them across your computer, phone and other devices) the shortcut is Ctrl-Alt-E  on Windows Cmd-Opt-E on MacOS.

Also, in Lightroom Classic, you can skip the Enhance dialog box and just kick off a Super Resolution expansion with Shift-Ctrl-Alt-I on Windows and Shift-Ctrl-Option-I on MacOS. It'll apply the previous Enhance settings, so if you unchecked Super Resolution before, you'll have to reselect it through the dialog box first.

Super resolution in Lightroom can handle JPEGs as well as raw images, though it'll turn the JPEG into a DNG file. As with all DNG files, you'll have to export a JPEG for easy sharing.


Source

How To Use An External Drive With A Chromebook


How to use an external drive with a Chromebook


How to use an external drive with a Chromebook

Chromebooks are built with cloud storage in mind and offer a pittance of local storage -- usually only 32GB or 64GB. So, instead of storing a bunch of Word docs and Excel files on a Chromebook, for example, you are meant to use Google Drive or Dropbox. Instead of a large music library stored locally in iTunes, you are meant to use Google Play or Spotify. Same deal with photos -- instead of storing photos locally, Google Photos, Flickr or another cloud service.

Chromebooks feature USB ports and SD card slots, however, which let you connect to external storage devices for those times when you need to access a file that you have saved not to the cloud but an external hard drive, thumb drive or SD card. When you connect an external drive or SD card to your Chromebook, however, nothing happens. You won't see a helpful prompt or a new desktop icon that, A. lets you know the system has recognized whatever it is that you connected to it, and B. provides a quick way to view its contents.

Using an external storage device with a Chromebook takes a little more work on your part. I'll show you how to view and download files on an external drive and which types of files types and file systems Chrome OS can recognize.

Supported file systems

Chrome OS supports a wide range of file systems for external drives. It can read and write to the NTFS file system that Windows PCs use, read (but not write to) the HFS+ file system that Macs use, and cross-platform FAT16, FAT32 and exFAT file systems. It also supports the MTP file system used by digital music players and ISO9660 and UDF used by CDs and DVDs.

Supported file types

According to Google, these are the types of files Chrome OS supports:

  • Microsoft Office files: .doc, .docx, .xls, .xlsx, .ppt (read-only), .pptx (read-only).
  • Media: .3gp, .avi, .mov, .mp4, .m4v, .m4a, .mp3, .mkv, .ogv, .ogm, .ogg, .oga, .webm, .wav
  • Images: .bmp, .gif, .jpg, .jpeg, .png, .webp
  • Compressed files: .zip, .rar
  • Other: .txt, .pdf (read-only)

How to read files

When you connect an external storage device to a Chromebook, you'll need to do a little legwork to access its contents. Click the Launcher button in the lower-left corner of your Chromebook's display and then click the Files app. If you don't see it listed, it means you haven't used it recently and will need to click All Apps and find the Files app listed among all of your Chromebook's apps.

Screenshot by Matt Elliott/CNET

With the Files window opened, in the left panel you should see your external drive listed directly below the Downloads folder. Just as you can in Windows Explorer on a PC or Finder on a Mac, you can view the drive's folders and files here. Just double click a file to open it.

Screenshot by Matt Elliott/CNET

How to transfer files

If you want to move a file from an external drive to your Chromebook, you have two options: drag and drop or copy and paste.

The Downloads folder is where all of your Chromebook's local files are stored. You can copy a file from the drive to your Chromebook by dragging it from the external drive and dropping it on the Downloads folder listed in the left panel. You can select multiple files by clicking the tiny, circular thumbnail to the left of the file name; the thumbnail turns into a blue checkmark icon to indicate it's been selected.

The other option is to copy a file by right-clicking and choosing Copy or using keyboard shortcut Ctrl-C, opening the Downloads folder, and then pasting by using the right-click menu or Ctrl-V.

You can also choose to cut instead of copy, of course, if you want to move the file instead of just copying it. You can also move in the reverse direction and move files from your Downloads folder to your external drive (or Google Drive) to free up drive space on your Chromebook.

Last step: Eject

Like Windows and MacOS, ChromeOS will scold you if you remove a drive before ejecting it. To eject a drive, click the little eject button to the right of it in the left panel of the the Files window.


Source

Tags:

How To Use Your IPad As A Second Monitor For Your Mac


How to use your ipad as a second monitor on windows computer how to use your ipad as a second monitor for free windows 10 how to use your ipad as a second display how to use your ipad as a second monitor for free windows how to use your ipad as a secondary monitor how to use your ipad as a document camera how to use your ipad as a notebook how to use your ipad as a light box how to use your ipad to display on tv how to use a bidet how to screenshot on windows how to download youtube videos
How to use your iPad as a second monitor for your Mac


How to use your iPad as a second monitor for your Mac

A dual monitor setup helps with multitasking, organization and overall efficiency, which is why so many people spend hundreds of dollars on a second monitor for their computer. That extra real estate can be used for video calls, browsing the web, sending emails or even drawing with your stylus. But if you own a Mac and an iPad, you may not have to spend any money to put together a two-monitor setup in your home.

As long as you have a compatible Mac and iPad, you can quickly and easily connect the two Apple devices and use the iPad as an extra display for your Mac computer. Using Sidecar, which comes built-in to supported devices, you can then either extend your MacOS desktop or mirror it onto your iPad, equipped with touch screen controls to seamlessly use the two devices together.

Here's what you need to know.

Requirements to use your iPad as a second display

As mentioned above, both of your devices need to support Sidecar, which is the feature that allows you to use your iPad as a second monitor for your Mac. For your Mac, you must be running MacOS Catalina or later and it has to be one of the following models:

  • MacBook Pro (2016 or later)
  • MacBook (2016 or later)
  • MacBook Air (2018 or later)
  • iMac (2017 or later and Retina 5K, 27-inch, Late 2015)
  • iMac Pro
  • Mac Mini (2018 or later)
  • Mac Pro (2019 or later)

And for your iPad, it must be running iPadOS 13 or later and includes the following models:

It's best to update your devices to the latest software available to avoid any issues. 

Also, both devices must be logged in to the same Apple ID account, using two-factor authentication. 

If you plan on going wireless, the two devices must be within 30 feet of one another. You can also use your USB to connect the two devices, with the advantage of being able to also charge your iPad while it's in use as a second monitor.

Share your entire Mac desktop to your iPad

Depending on what software update you have on your computer, sharing your computer desktop to your tablet may vary. If you're running MacOS Big Sur or later, click the Display icon in the menu bar at the top right. In the menu that appears, choose your iPad.

If you're on MacOS Catalina, you'll instead click on the AirPlay icon in the menu bar and then select your iPad. If for some reason you don't see the AirPlay icon, click the Apple menu in the top right and go to System Preferences > Displays and check Show mirroring options in the menu bar when available.

screen-shot-2022-01-24-at-8-28-52-am.png

Click the Display option in the menu bar to find your iPad.

Nelson Aguilar/CNET

Once your Mac and iPad are connected, you have several options to choose from that appear in the Display/AirPlay menu:

  • Mirror Built-in Retina Display: Mirror your exact desktop to your iPad. This will shift your computer desktop to look more like your iPad.
  • Use As Separate Display: Use the iPad as an extension to your desktop. To use your iPad display, drag any window or files from your Mac computer to the right of your screen, which will take you to the tablet. To go back to your computer, simply drag your cursor back to where you came from.

Share only one Mac window to your iPad

Alternatively, you can quickly share a window instead of dragging it over to your iPad. For example, you could share your web browser in Safari or what you've jotted down in your Notes. To do this, simply hover your mouse cursor over the green full-screen button that appears on the top left of most windows. After a second of hovering, you should see an option that says "Move to iPad," which will share that window to your tablet. You can share multiple windows, in succession, to your iPad.

screen-shot-2022-01-24-at-8-57-08-am.png

Hover over the full-screen button to send that window to your iPad.

Nelson Aguilar/CNET

Using the Sidebar controls, gestures, and Touch Bar on your iPad

Once your screen is shared over to your iPad, a set of controls will appear on the left side of your iPad, which are Sidebar controls you'll commonly see on your Mac. That includes, from top to bottom:

  • Menu bar: Show or hide menu bar when in full-screen
  • Dock: Show or hide dock
  • Command: Double-tap to lock key
  • Option: Double-tap to lock key
  • Control: Double-tap to lock key
  • Shift: Double-tap to lock key
  • Undo: Undo last action
  • Keyboard: Show or hide keyboard
  • Disconnect: Disconnect iPad from Mac

In addition to these Mac controls, you can also use a number of swipe gestures to control certain things on the second monitor (you won't be able to use the touchscreen as usual though). That includes swiping with two fingers to scroll, pinching in with three fingers to copy, swiping left with three fingers to undo and more.

And finally, you may also be able to use the Touch Bar, if the application on your iPad is compatible. For instance, if you move Safari over to the iPad, you'll see Touch Bar controls to go back and forward, use the search bar, flip between tabs and open a new tab. In Messages, you would see controls to create a new text, send an emoji and predictive text. The Touch Bar may not appear for every app you use on your iPad.

img-0007.png

This is what your iPad will look like as a second monitor.

Nelson Aguilar/CNET

If you don't want to use the Sidebar or Touch Bar controls, you can also get rid of them. On your Mac, click on the Display icon in the menu bar, and underneath your connected iPad, you should see Hide SideBar and Hide Touch Bar. Click on either or both options to hide the controls from your iPad.

Using your iPad while connected to your Mac

Even if you're using your iPad as a second monitor, you can still swipe up to exit the Sidecar application and use your iPad as usual. In your dock, you'll see a blue icon with two monitors on it -- this is Sidecar. To go back to using your iPad as a second monitor, tap on the Sidecar app icon in the dock.

img-0006.png

You can use your iPad as usual, even when connected to a Mac via Sidecar.

Nelson Aguilar/CNET

If you're interested in learning more about what your iPad is capable of, check out how to declutter your iPad dock by removing this annoying feature and 9 things to do immediately after you get a new iPad.


Source

How To Give Your Yoga Mat The Scrub-Down It Desperately Needs


How to give yourself a hickey how to give yourself op in minehut how to give yourself a sharpness 1000 sword how to give yourself items in ark how to give a cat a pill how to give feedback how to give people robux in a group how to give points in microsoft family how to get help in windows how to screenshot on windows 10 how to screenshot on pc how to add signature in outlook

How to Give Your Yoga Mat the Scrub-Down It Desperately Needs


How to Give Your Yoga Mat the Scrub-Down It Desperately Needs

This story is part of Home Tips, CNET's collection of practical advice for getting the most out of your home, inside and out.

My yoga mat goes through a lot each week. Between taking it to boxing training sessions each day for core workouts to using it for morning yoga, my mat gets dragged around to some not-so-clean surfaces -- not to mention how it inevitably gets covered in my sweat, too.

CNET Home Tips logo

Because yoga mats are often used for intense, sweaty workouts, it's easy for them to harbor germs and bacteria. So whether you're sharing mats at a yoga class or using your own, it's worth taking the time to clean your mat often to banish bacteria and prevent it from falling apart.

Here are several tips and tricks on how to best clean your yoga mat. (For more cleaning tips, here's our guide on how to clean your mattress, how to kill mold in your washer and how to declutter your closet.)

How to clean your yoga mat

For everyday cleaning

For just the regular daily cleaning you'll want to do after a class or practice, I recommend using a homemade cleaning solution. You can simply mix white vinegar or witch hazel with water at a 1-to-4 ratio in a spray bottle and shake slightly to combine. (You can add a few drops of tea tree oil or another essential oil if you want a scent.) Then spray down your mat and gently wipe the solution all around the surface. Let your mat fully dry before rolling it up. 

For deep cleaning 

Believe it or not, one of the best methods to deep-clean your yoga mat is to give it a bath. Fill up a sink or bathtub with enough temperate water to fully submerge the mat. You can add a tablespoon of dish soap or detergent for each gallon of water. Allow it to soak for about 10 minutes, then gently wipe the front and back down with a cloth. Rinse your mat off with clean water before drying off the mat. I recommend wiping the mat off with a dry cloth before hanging the mat somewhere to hang-dry fully. 

I like to leave my mat to dry overnight to be completely moisture-free before I roll it back up. 

four yoga mats rolled up outside on a deck

Depending on how much you use it, you'll need to deep clean your yoga mat every few weeks or monthly.

Amanda Capritto/CNET

Can you wash a yoga mat in the washing machine? 

While I recommend the above cleaning methods, some yoga mats are machine washable. If you really want to machine-wash your mat, do so on a cold gentle cycle. Check the mat's care instructions before trying this method, though, because some yoga mats will fall apart in the wash. But never put your yoga mat in the dryer: Always leave it to air-dry. 

How often should you clean your yoga mat?

With frequent usage, your yoga mat can quickly accumulate sweat, lint, skin oils, dirt and other grime. And over time, they can begin to smell if you're not careful. Depending on how much you use it, you should deep clean it around once a month. It's also just good practice to give it a wipe down with disinfecting wipes or a gentle cleaning solution after every use. 

It's important to note that yoga mats are supposed to feel tacky, or slightly sticking. Mats are made that way intentionally to help you hold more difficult yoga poses. While cleaning, be careful to not use harsh chemicals or scrub so hard that you eliminate the sticky finish so you keep your mat grippy and extend its longevity. 

Looking to get into yoga? Try out these yoga poses for better sleep and read about the benefits associated with hot yoga

More cleaning recommendations 

The information contained in this article is for educational and informational purposes only and is not intended as health or medical advice. Always consult a physician or other qualified health provider regarding any questions you may have about a medical condition or health objectives.


Source

How To Factory Reset A MacBook, Windows Laptop Or Chromebook To Sell Or Give Away


How to Factory Reset a MacBook, Windows Laptop or Chromebook to Sell or Give Away


How to Factory Reset a MacBook, Windows Laptop or Chromebook to Sell or Give Away

One side effect of spending more time at home during the pandemic is the realization that I have a lot of old tech lying around. A lot. Then, when I made a KonMari attempt at decluttering said tech, I unearthed several things I forgot I had -- including an old laptop I stopped using years ago because it was too slow for my high-end computing needs. 

While this laptop no longer sparked joy for me, it turned out to be a perfect fit for my mom. It just needed to be cleaned up first, and I'm not just talking about removing dust and mystery goo with a few swipes of a disinfectant wipe, though you'll want to do that, too. The type of cleaning I'm talking about is restoring the laptop to like-new condition inside and out. Cleaning the outside is the easy part. Wiping the computer of all your apps, files, folders and other personal information isn't necessarily as straightforward. Of course, how much data scrubbing you need to do will likely depend on the recipient. 

The big picture steps you take to refresh a laptop are the same regardless of whether it's a Windows laptop. Apple MacBook or Chromebook -- save your old data, remove all personal information, then go for a factory reset. It's the actual step-by-step procedure that differs depending on the type of laptop you're dealing with. Below, you'll find everything you need to know and do before giving your laptop a second life. And with supply chain issues, shipping problems and chip shortages making new devices harder to get, passing along a new-to-you laptop can be a welcome holiday gift. 

Last thing first

I typically save the laptop's physical cleaning until last (why clean your fingerprints off twice?), but you may want to start there -- especially if it's been gathering dust in the back of a closet/under a bed/in the garage for the past several years. The basic equipment required for a good laptop cleaning is a can of compressed air and some disinfectant or alcohol wipes. For a slightly deeper clean, you may also want to grab a screwdriver and remove the bottom cover of your laptop (if possible) so you can carefully blow out any dust that's accumulated on the fans and vents. 

After the laptop is clean, you can also wipe down the power adapter and any related accessories. It's also a good idea to ensure the power adapter is still in good, working condition. If you're still not quite sure where to start with the cleaning, check out our complete guide to getting your laptop looking its best.


Gifting a used MacBook

macbook-air-2018-analisis-3
Óscar Gutiérrez/CNET

Before you even think about doing a factory reset on your MacBook, you need to save any data you want to keep. You may have already done this at some point if you migrated data from this old MacBook to a new one using using Apple's Migration Assistant. If that's not the case, it's time to hook up an external drive and use MacOS' built-in Time Machine tool to create a backup. If you have an iCloud account, you can back up your data there as well. 

Sign out of everything

You'll also want to log out of all accounts before wiping your MacBook's drive. Start with iCloud, Find My Mac and iMessage. Then look for individual software accounts you may need to deregister. If you use a browser other than Safari, such as Chrome or Firefox, you should sign out of those as well. Basically, if it's got personal account information, you'll want to sign out. (Here's how to find account settings in MacOS.)

Two other things you should do before a factory reset: Unpair any Bluetooth devices -- particularly if the MacBook is being gifted to someone in your household -- and reset the NVRAM. The latter is memory that holds onto settings that the MacBook needs before loading MacOS. On startup, press and hold Option-Command-P-R to reset the NVRAM.

Perform a factory reset

If you've done everything above, you're ready to return your MacBook to its out-of-the-box state. On an Intel-based Mac, reboot the system and press and hold Command-R to enter Recovery Mode. (Accessing Recovery Mode on MacBooks running on the company's Apple Silicon chips is different, however.) 

Read more: Before selling your MacBook, you need to factory reset it

Once in Recovery Mode, you'll see a window of MacOS utilities. Use the Disk Utility to erase your drive. When that's complete, you'll be able to reinstall MacOS. After it's done reinstalling, you'll reach the Setup Assistant. From there you can stop and shut it down or set it up for the recipient. 


Gifting a used Windows laptop

reset-windows-10-laptop.png
Screenshot by Josh Goldman/CNET

As with gifting a MacBook, start by backing up any important folders and files on your old laptop to cloud storage or an external drive. If you're doing the latter, go to Settings > Update & Security > Backup > Add a drive and select the external drive. Then click on Backup Now. 

Sign out of all your apps

A lot of paid software requires you to sign in with an account, a product key or both. Before you wipe your laptop's storage, sign out of any accounts and deregister software licenses (if possible). If you need those product keys to re-register software on a new laptop, be sure to save that information. If you use a browser other than Edge, such as Chrome or Firefox, sign out of those as well. Basically, if it's got personal account information, sign out.

Reset the laptop

Ready to clean the drive and reinstall Windows? Go to Settings > Update and security > Recovery. At the top of the window, you'll see Reset this PC. Click on Get Started and select Remove Everything from the box that appears. From there, you can select to reinstall Windows from the local drive or download from the cloud. After that, Windows cleans the drive of all software, settings and data. When it's done, the laptop will start in its setup assistant mode. You can then stop and shut it down for a fresh-out-of-the-box experience or do some setup, which is nice touch, especially if it's going to a family member so they can use it right away.

Unlink from your Microsoft account

If you used a Microsoft account to sign in to the laptop, the last thing you'll want to do is remove the laptop from that account. Sign in to your account from another computer and click on the Devices tab at the top of the page. Find the laptop that you're gifting on the list of devices, and at the bottom of the listing, you'll see the option to remove the device. Click it and you're done. 


Gifting a used Chromebook

Asus Chromebook CX9400
Sarah Tew/CNET

Chromebooks are the easiest to refresh for gifting. That's mainly because of their cloud-based design. Google also makes it extremely easy to wipe your data and securely clean the internal storage as well as remove the Chromebook from your Google account. 

Check the AUE first

Before you even consider gifting an old Chromebook, check its auto-update expiration. Google only guarantees Chrome OS and browser feature support on non-Google hardware for so long. Every device has a date on which it stops receiving updates, aka its AUE date. Current models receive updates for eight years; older models could potentially be a year or two away from reaching their AUE. 

Google maintains an AUE list, so finding the date your Chromebook will stop receiving updates is as easy as locating your model on that list. The AUE can also be found in your Chromebook's settings. Here's how to find the AUE from Google and in your Chromebook.

Give it a Powerwash

Powerwash is Google's built-in factory reset tool for Chromebooks. Once you've backed up folders or files stored on the Chromebook's internal drive, running Powerwash will securely scrub the system and reboot. When it restarts, it'll be just like the day you unboxed it. 

The actual Powerwash typically takes less than a minute to complete. A simple search for "powerwash" in your Chromebook's settings will bring you right to the feature, but here's everything you need to know about the procedure. 

Remove the Chromebook from your Google account

Although you've removed your account from the Chromebook, you haven't removed the Chromebook from your account. Start by signing into your Google account and head to the Security settings. If you use the Chrome browser, you can also click on your account avatar and select Manage your Google Account from the drop-down menu. 

In the Security section, scroll down until you see a box labeled Your devices, which lists all the devices attached to your account. At the bottom of the box, click on Manage devices and find the Chromebook you're gifting and select Sign Out

Give the Chromebook a good external cleaning, gather up any accessories and it's ready to hand off to your giftee.

Read more: How to regift a game console

How Factory Reset Your Devices

Make sure to wipe personal data before selling, trading in or regifting your gear.


Source

Tags:

How To Change Your Windows 11 Wallpaper In 5 Easy Steps


How to Change Your Windows 11 Wallpaper in 5 Easy Steps


How to Change Your Windows 11 Wallpaper in 5 Easy Steps

Microsoft's Windows 11 operating system came with a ton of new features like Android apps on your Windows PC, natively supporting Microsoft Teams and a cleaner, more Mac-like design. But Windows 11 also gives you options for new wallpaper

how-to-tech-tips-logo-badge.png

If you're not a fan of Microsoft's new default wallpaper -- a blooming, abstract flower shape that pays homage to Windows 10's royal blue colors -- you can change it up. Windows 11 has other default images, or you can change your wallpaper to a photo you've saved or uploaded to your PC.

Read more: Windows 11 is Familiar but Fresh

We'll show you how to switch your wallpaper to a background you're fond of with just a few steps. You can also create virtual desktops and a breakdown of our favorite features. This story was recently updated. 

microsoft-windows-11-announcements-june-24-2021-cnet-024.png

The default Windows 11 wallpaper features an abstract blue swirl design.

Microsoft/Screenshot by Sarah Tew/CNET

Once you have access to Windows 11, here's how to change your wallpaper: 

1. Click the on-screen Windows button or press the Windows button on your keyboard.

2. Click Settings.

3. Go to Personalization.

4. Choose Background.

5. Select an already available image or click Browse to search for an image you've saved to your PC.

Changes to the default wallpaper only scratch the surface of the design and feature changes found on the Windows 11 desktop. For example, you'll also find ways to customize your Windows 11 desktop with widgets, virtual desktops and Snap Group layouts. 

For more, check out the big changes between Windows 10 and Windows 11 and where you can find the new Start menu.


Source

Tags:

Download The Latest Windows ISO: How To Create A Windows 11 Install USB Drive


Create windows install iso create iso software free download latest windows 7 iso download latest windows iso file download latest windows 11 iso download the latest windows update download the latest version of google chrome
Download the latest Windows ISO: How to create a Windows 11 install USB drive


Download the latest Windows ISO: How to create a Windows 11 install USB drive

Windows 11  will start rolling out to eligible devices today, but not everyone will get it right away. The free update brings plenty of new features, complete with a new start menu, widgets and a refreshed interface. Even the Microsoft Store is getting a big update (though don't expect to see Android apps right away).

Launches are bound to run into issues and bugs. Sometimes, those issues may force you to reinstall Windows 11. An easy way of doing that is by using a USB installation drive that has a copy of Windows 11 on it. With the update safely stored on a flash drive, you can reinstall it at any time, should any issues get bad enough that your only option is to reinstall the update. 

You can also use a USB drive to make it easier to install Windows 11 on multiple computers, or to quickly set up a virtual machine to make testing possible without risking your personal data. 

Microsoft has updated its Media Creation Tool to include Windows 11. You can download the ISO image straight from the source and flash to a USB drive yourself. 

To create a Windows 11 installation drive, you'll need an empty 8GB USB drive, a Windows PC and up to a few hours of your time. You can download the system image using a Linux computer or Mac, but we're going to focus on using a PC for this guide. Below are the steps you'll need to follow.

Download the latest Windows 11 ISO from Microsoft

To download the Windows 11 ISO image you'll need to create a USB bootable drive. First, visit the Download Windows 11 page. You'll see a few other options for installation, but you're looking for Download Windows 11 Disk Image (ISO).

Scroll down the page until you see a dropdown labeled Select Download. Click the dropdown and then select Windows 11, then click Download. Next you'll be asked to select a language, then click Confirm again, followed by clicking on the 64-bit Download button to finally begin downloading the ISO. It's a fairly large file at 5.1GB, so depending on your internet connection, it may take some time for the download to finish. 

Once the download finishes, your work isn't completely done. You need to burn that ISO image onto a USB drive. And to do that, you'll need some extra software. Don't worry, though, it's an easy process. 

With the ISO finished, this is how Rufus should look before you flash Windows 11 to your USB drive. 

Screenshot by Jason Cipriani/CNET

How to flash Windows 11 to your USB drive

To turn a standard USB drive into an installation drive, you'll need to use a program called Rufus. It's the same app that Microsoft itself uses in its guide for creating a Windows 10 bootable drive. Visit the company's website to download and install Rufus, which should only take a few seconds. It's a small program. 

Plug in your USB drive and open Rufus. Select your USB drive using the Device dropdown. Remember, anything on your thumb drive will be erased during this process -- so make sure it's empty or you have everything you need off of it. 

Under Boot Selection select Disk or ISO image and then click on the text that reads SELECT and pick the ISO file you created in the previous step. 

There's a section in Rufus labeled Image option with several different settings -- leave everything as the default. The same can be said for format options unless you want to change the name of the USB drive to something like "Windows 11 install" or along those lines. 

Click Start when you're sure all of the options are set. You'll again have to wait while the program does its job, but it should be a much quicker process than downloading and creating the ISO. It took just over 15 minutes on a Surface Pro X for me. 

Windows 11 update on a laptop

You can now install Windows 11 with ease. 

Sarah Tew/CNET

What to do with a Windows 11 installation drive

Once Rufus finishes, you can remove the USB drive from your PC and either keep it somewhere safe in case you need to reinstall Windows 11 on your PC, or you can plug it into another PC and use it to install Windows 11 by opening the drive and double-clicking the setup.exe file. A few seconds later, a Windows 11 installation screen will appear, walking you through the rest of the process. 

Alternatively, you can try and use the USB drive as a bootable installation drive. However, this is where things get even more complicated, due to Windows 11 requiring Secure Boot, and the USB drive we just created not being compatible with that feature. I suggest waiting for Microsoft to release an official tool, but if you insist, I found a guide that walks you through the extra steps of making a bootable USB drive that's compatible with secure boot on Tom's Hardware, starting at step 11. 

Curious what all the fuss is about Windows 11? We have your back. There's a big interface redesign making its debut that includes a centered Start menu, but don't worry, you can move it back to the left corner if you want. And, finally, if you've ever had the desire to use Android apps on your PC, well, Microsoft is making that possible.


Source

https://recipesblogg.kian.my.id/

.

Search This Blog

Menu Halaman Statis

close