
How to Factory Reset a MacBook, Windows Laptop or Chromebook to Sell or Give Away
One side effect of spending more time at home during the pandemic is the realization that I have a lot of old tech lying around. A lot. Then, when I made a KonMari attempt at decluttering said tech, I unearthed several things I forgot I had -- including an old laptop I stopped using years ago because it was too slow for my high-end computing needs.
While this laptop no longer sparked joy for me, it turned out to be a perfect fit for my mom. It just needed to be cleaned up first, and I'm not just talking about removing dust and mystery goo with a few swipes of a disinfectant wipe, though you'll want to do that, too. The type of cleaning I'm talking about is restoring the laptop to like-new condition inside and out. Cleaning the outside is the easy part. Wiping the computer of all your apps, files, folders and other personal information isn't necessarily as straightforward. Of course, how much data scrubbing you need to do will likely depend on the recipient.
The big picture steps you take to refresh a laptop are the same regardless of whether it's a Windows laptop. Apple MacBook or Chromebook -- save your old data, remove all personal information, then go for a factory reset. It's the actual step-by-step procedure that differs depending on the type of laptop you're dealing with. Below, you'll find everything you need to know and do before giving your laptop a second life. And with supply chain issues, shipping problems and chip shortages making new devices harder to get, passing along a new-to-you laptop can be a welcome holiday gift.
Last thing first
I typically save the laptop's physical cleaning until last (why clean your fingerprints off twice?), but you may want to start there -- especially if it's been gathering dust in the back of a closet/under a bed/in the garage for the past several years. The basic equipment required for a good laptop cleaning is a can of compressed air and some disinfectant or alcohol wipes. For a slightly deeper clean, you may also want to grab a screwdriver and remove the bottom cover of your laptop (if possible) so you can carefully blow out any dust that's accumulated on the fans and vents.
After the laptop is clean, you can also wipe down the power adapter and any related accessories. It's also a good idea to ensure the power adapter is still in good, working condition. If you're still not quite sure where to start with the cleaning, check out our complete guide to getting your laptop looking its best.
Gifting a used MacBook
Before you even think about doing a factory reset on your MacBook, you need to save any data you want to keep. You may have already done this at some point if you migrated data from this old MacBook to a new one using using Apple's Migration Assistant. If that's not the case, it's time to hook up an external drive and use MacOS' built-in Time Machine tool to create a backup. If you have an iCloud account, you can back up your data there as well.
Sign out of everything
You'll also want to log out of all accounts before wiping your MacBook's drive. Start with iCloud, Find My Mac and iMessage. Then look for individual software accounts you may need to deregister. If you use a browser other than Safari, such as Chrome or Firefox, you should sign out of those as well. Basically, if it's got personal account information, you'll want to sign out. (Here's how to find account settings in MacOS.)
Two other things you should do before a factory reset: Unpair any Bluetooth devices -- particularly if the MacBook is being gifted to someone in your household -- and reset the NVRAM. The latter is memory that holds onto settings that the MacBook needs before loading MacOS. On startup, press and hold Option-Command-P-R to reset the NVRAM.
Perform a factory reset
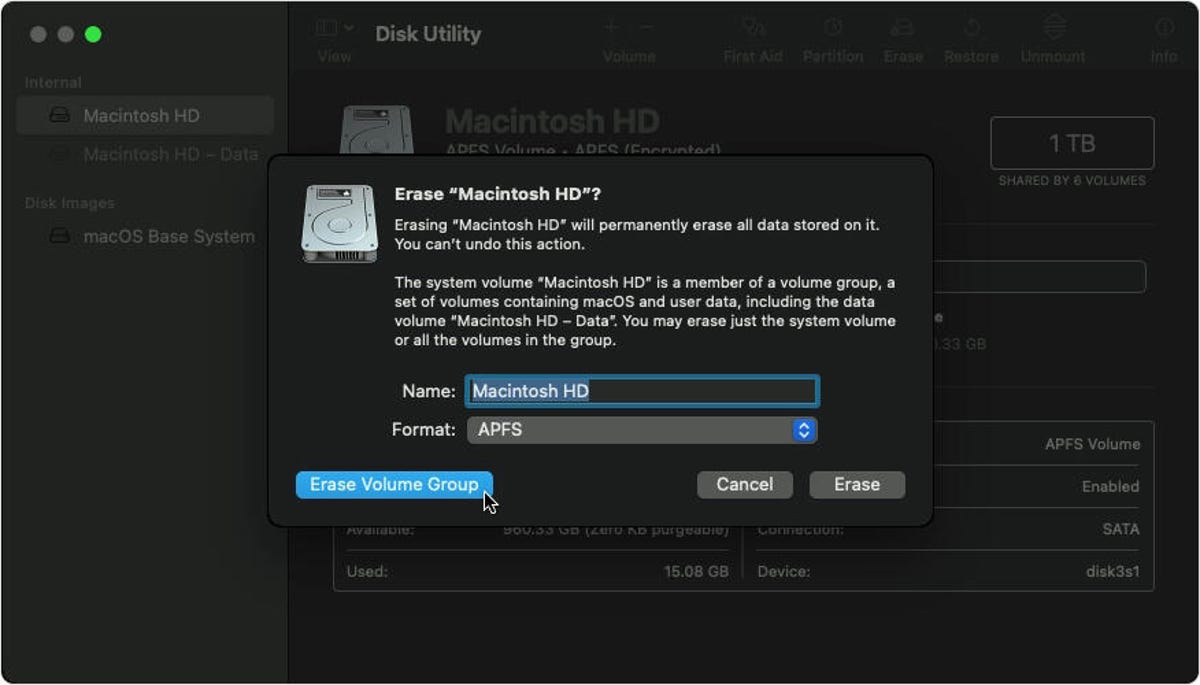
If you've done everything above, you're ready to return your MacBook to its out-of-the-box state. On an Intel-based Mac, reboot the system and press and hold Command-R to enter Recovery Mode. (Accessing Recovery Mode on MacBooks running on the company's Apple Silicon chips is different, however.)
Read more: Before selling your MacBook, you need to factory reset it
Once in Recovery Mode, you'll see a window of MacOS utilities. Use the Disk Utility to erase your drive. When that's complete, you'll be able to reinstall MacOS. After it's done reinstalling, you'll reach the Setup Assistant. From there you can stop and shut it down or set it up for the recipient.
Gifting a used Windows laptop

As with gifting a MacBook, start by backing up any important folders and files on your old laptop to cloud storage or an external drive. If you're doing the latter, go to Settings > Update & Security > Backup > Add a drive and select the external drive. Then click on Backup Now.
Sign out of all your apps
A lot of paid software requires you to sign in with an account, a product key or both. Before you wipe your laptop's storage, sign out of any accounts and deregister software licenses (if possible). If you need those product keys to re-register software on a new laptop, be sure to save that information. If you use a browser other than Edge, such as Chrome or Firefox, sign out of those as well. Basically, if it's got personal account information, sign out.
Reset the laptop
Ready to clean the drive and reinstall Windows? Go to Settings > Update and security > Recovery. At the top of the window, you'll see Reset this PC. Click on Get Started and select Remove Everything from the box that appears. From there, you can select to reinstall Windows from the local drive or download from the cloud. After that, Windows cleans the drive of all software, settings and data. When it's done, the laptop will start in its setup assistant mode. You can then stop and shut it down for a fresh-out-of-the-box experience or do some setup, which is nice touch, especially if it's going to a family member so they can use it right away.
Unlink from your Microsoft account
If you used a Microsoft account to sign in to the laptop, the last thing you'll want to do is remove the laptop from that account. Sign in to your account from another computer and click on the Devices tab at the top of the page. Find the laptop that you're gifting on the list of devices, and at the bottom of the listing, you'll see the option to remove the device. Click it and you're done.
Gifting a used Chromebook

Chromebooks are the easiest to refresh for gifting. That's mainly because of their cloud-based design. Google also makes it extremely easy to wipe your data and securely clean the internal storage as well as remove the Chromebook from your Google account.
Check the AUE first
Before you even consider gifting an old Chromebook, check its auto-update expiration. Google only guarantees Chrome OS and browser feature support on non-Google hardware for so long. Every device has a date on which it stops receiving updates, aka its AUE date. Current models receive updates for eight years; older models could potentially be a year or two away from reaching their AUE.
Google maintains an AUE list, so finding the date your Chromebook will stop receiving updates is as easy as locating your model on that list. The AUE can also be found in your Chromebook's settings. Here's how to find the AUE from Google and in your Chromebook.
Give it a Powerwash
Powerwash is Google's built-in factory reset tool for Chromebooks. Once you've backed up folders or files stored on the Chromebook's internal drive, running Powerwash will securely scrub the system and reboot. When it restarts, it'll be just like the day you unboxed it.
The actual Powerwash typically takes less than a minute to complete. A simple search for "powerwash" in your Chromebook's settings will bring you right to the feature, but here's everything you need to know about the procedure.
Remove the Chromebook from your Google account
Although you've removed your account from the Chromebook, you haven't removed the Chromebook from your account. Start by signing into your Google account and head to the Security settings. If you use the Chrome browser, you can also click on your account avatar and select Manage your Google Account from the drop-down menu.
In the Security section, scroll down until you see a box labeled Your devices, which lists all the devices attached to your account. At the bottom of the box, click on Manage devices and find the Chromebook you're gifting and select Sign Out.
Give the Chromebook a good external cleaning, gather up any accessories and it's ready to hand off to your giftee.
Read more: How to regift a game console
How Factory Reset Your Devices
Make sure to wipe personal data before selling, trading in or regifting your gear.
Source
Tags:
- Factory Reset Macbook Pro For Windows 10
- How To Factory Reset A Macbook
- How To Factory Reset A Macbook Air
- How To Factory Reset A Chromebook
- How To Factory Reset
- How To Factory Reset Iphone
- How To Factory R eset Ipad
- How To Draw
- How To Get Free Robux
- How To Print Screen
- How To Delete A Page In Word
- How To Recall An Email In Outlook