Step into a world where the focus is keenly set on How To Re Apply For Snap. Within the confines of this article, a tapestry of references to How To Re Apply For Snap awaits your exploration. If your pursuit involves unraveling the depths of How To Re Apply For Snap, you've arrived at the perfect destination.
Our narrative unfolds with a wealth of insights surrounding How To Re Apply For Snap. This is not just a standard article; it's a curated journey into the facets and intricacies of How To Re Apply For Snap. Whether you're thirsting for comprehensive knowledge or just a glimpse into the universe of How To Re Apply For Snap, this promises to be an enriching experience.
The spotlight is firmly on How To Re Apply For Snap, and as you navigate through the text on these digital pages, you'll discover an extensive array of information centered around How To Re Apply For Snap. This is more than mere information; it's an invitation to immerse yourself in the enthralling world of How To Re Apply For Snap.
So, if you're eager to satisfy your curiosity about How To Re Apply For Snap, your journey commences here. Let's embark together on a captivating odyssey through the myriad dimensions of How To Re Apply For Snap.
It's no secret Snapchat is confusing to use. In fact, when Snap, the social media app's parent company, released its IPO filing documents earlier this month, the app's confusing user interface was listed as one of the risk factors for investors.
Lo and behold, on Friday, Snap released the user manual many bewildered Snapchatters (or their parents) have been asking for. It came in the form of a video, labeled "Snapchat Product Overview," in its "roadshow" materials -- the stuff it uses to convince potential investors to buy in.
"Making a Snap is simple," a friendly-voiced narrator says in the video as he takes more than eight and a half minutes to explain the app.
Among the things the video covers: how to record a video, how to use lenses and how to use a geofilter.
Watch the whole thing here.
CNET Magazine: Check out a sampling of the stories you'll find in CNET's newsstand edition.
Batteries Not Included: The CNET team shares experiences that remind us why tech stuff is cool.
Cheaper, richer, tastier coffee: How to roast your own beans at home
Cheaper, richer, tastier coffee: How to roast your own beans at home
For many, coffee isn't just a luxury, but a habit that adds structure and satisfaction to the daily routine. With states mandating you to stay inside most of the day and even Starbucks stores closing to foot traffic, chances are you're making more coffee yourself. Now's the chance to uplevel your skills and consider roasting your own coffee right at home.
Raw coffee lasts for years on the shelf, yet still retains its flavor. It's only when you introduce intense heat through the roasting process that the powerful coffee essence unlocks, and then begins to slowly fade. But if you roast your own beans, you can stock up in bulk on raw product and roast only as much as you need in the short term. In some ways, it's the perfect quarantine staple.
Plus, freshly roasted coffee is outrageously delicious compared with the standard store-bought variety that's typically months old, even the whole roasted beans.
Unroasted, or green, coffee costs less, too, so you'll save money in the long run. In fact, you can get your hands on green coffee for as little as $4 to $5 a pound. Sure, the idea of home roasting might sound intimidating at first, but the payoffs are huge. Here's how to get started.
These are raw, or green, coffee beans that have not been roasted.
Tyler Lizenby/CNET
From raw to roasted coffee
With enough heat energy applied to green coffee, the hard structure of a bean breaks down to release its complex mixture of contents. This cocktail includes everything from water to sugars, proteins, fats and, yes, caffeine.
The high temperature of roasting chemically alters many of these compounds (such as by caramelizing sugars and oxidizing lipids, proteins and starches), and ultimately creates what we expect to see, smell and taste in freshly roasted coffee.
Read more: The best espresso machine for 2020
Gather the tools and hardware you need for this project.
Tyler Lizenby/CNET
Build a backyard roaster
You can build a coffee roaster easily from inexpensive items you can buy at a hardware or kitchen supply store. Here's a list of the parts I used.
To begin, drill a hole through the center of the base of each colander with a three-eighths-inch metal drill bit. Next, spin one nut and one wing nut onto one end of the threaded rod (go about halfway) and from the opposite side, slide one washer down the rod. Then, slide one of the colanders onto the rod through its drilled hole, next to the washer, with the open side up. Follow with another washer and two regular nuts, and tighten all nuts so the colander stays fixed in place.
In the same way, attach the other colander to the rod so that the rims of the bowls face each other. Leave a 6-inch gap between the two vessels, hold the rod vertically and add your green coffee to the lower colander. It's a 5 quart model with plenty of room for the 1 pound batches I suggest you roast. Finish by slipping the second colander down to close the gap and securely tighten the nuts.
The roaster you've constructed should rest above the burners and be able to spin freely around its threaded rod.
Tyler Lizenby/CNET
Prepare your barbecue
I suggest using a gas grill to roast coffee. These grills have responsive burners powered by propane. That makes their internal temperature easier to control compared with charcoal grills. Begin by removing your grill grates, heat diffuser (bars or pan) and warming rack. If your grill has a slot for a rotisserie accessory, use this opening to place the threaded rod across the burners. If not, lay the rod across the hood's sides with the hood open. (Many grill hoods have sections cut out of their sides to make room for accessory mounts when closed. Line the rod up to match these gaps.)
Your roaster should now be suspended and centered over the barbecue's burners. To spin the apparatus, connect an electric drill to one end of the roaster's rod as if it were a drill bit and tighten the drill's chuck jaws around it.
Use a cordless drill as a motor to rotate your roaster.
Brian Bennett/CNET
An adjustable hose clamp wrapped around the drill's trigger is a simple way to apply steady pressure and spin the roaster drum at a constant rate. Aim for 120 rpm (I count revolutions for 30 seconds and then double the number).
That's quick for a rotisserie motor (10 to 55 rpm) but easy for a power drill (600 to 1,500 rpm). The goal is to mix the beans quickly enough so heat hits them evenly, yet slowly enough to minimize stress on the drill and avoid loosening any nuts and washers.
Fill your roaster with raw coffee beans.
Tyler Lizenby/CNET
Roast, baby, roast
How long any given roasting session will take can vary greatly depending on factors like the coffee variety, how hot your roaster gets and whether you'd like a light, medium or dark roast. As a general guide, expect a small batch of beans (1 pound or less) to take about 10 minutes.
Fire up your grills burners and start roasting.
Tyler Lizenby/CNET
Start by firing up the grill and turning the burners up to maximum. Close the hood to let the grill cavity warm up and when the grill thermometer hits 400 degrees Fahrenheit, turn the burners down to medium. Next, add green coffee to the drum, tighten the two colander halves together, carefully set the rod in place and start spinning.
Now you're ready to close the hood while keeping your ears, nose and eyes peeled to monitor what's going on inside. It's OK to take a few quick peeks, but open the hood too many times and you risk losing vital heat. Ideally, you want to keep temperatures in the roaster consistently between 400 and 500 degrees Fahrenheit. Since it's difficult to mount a heat sensor inside a spinning roaster, just use your grill's built-in thermometer instead.
Pay close attention to what you see, hear, and smell as the beans roast.
Tyler Lizenby/CNET
Listen out for the pop and don't burn your beans
The first change happens visibly when the beans shift from a muddled green to yellow to a darker golden hue. As the beans' internal temperature approaches and exceeds the boiling point of water, steam forms and trapped water vapor fights to escape.
When it finally does, the coffee beans begin to snap with an audible pop. In what's known as the "first crack," the beans split open down their middle and swell in size. At this point your beans are technically roasted, but they'll have a bright acidity on the edge of sourness. Drinking coffee from this roast level is perfectly fine, but to develop a traditional coffee flavor, you must go a little further.
Roasting coffee beans definitely creates a lot of smoke. That's why it's best to do this outdoors.
Tyler Lizenby/CNET
As the temperature climbs higher (435 to 445 Fahrenheit) fats, sugars and proteins break down. The beans are now roasting in earnest. Be careful at this stage because the pace of these reactions will speed up. If you're not paying close attention, you'll end up with burnt beans in no time.
As gases including CO2 (carbon dioxide) form, they cause another round of sustained snaps called the "second crack." The beans will then release oils giving them a shiny, glossy look. Roast longer and the beans will darken further to dark brown, even bordering on black. This creates dark roasts such as French roast.
Transfer the just-roasted coffee beans to another vessel. An extra metal colander will do the trick.
Tyler Lizenby/CNET
Cool things down
Once you've reached your desired roast level, turn off the grill and gas and quickly transfer the roasted coffee beans from the roaster to a metal oven sheet pan. Remember to use heat-resistant gloves or oven mitts to handle the apparatus.
Set the pan and contents aside for 24 hours to let the beans cool. As long as they're not smoking you can do this inside. Technically you can brew coffee from these beans. However, it's best to hold off for another 24 hours. Freshly roasted coffee typically gives off CO2 gas that can create funky flavors. Finally, preserve your roast by storing it in an airtight container, a special valve bag or at least a zip-closure pouch.
Brew, sip and tweak
Congratulations! You've turned raw green coffee into the essential ingredient for brewing a uniquely delicious beverage. Of course, you'll need a quality brewer and grinder to harness all that coffee flavor. And if the joe you've made isn't to your liking, there are a ton of ways to tweak the roasting process for an outcome more to your tastes.
Even with the same coffee variety, changing the roast level will greatly alter the flavors that ultimately land in your cup. And just wait until you start experimenting with beans and blends sourced from exotic locales. Better hold onto your mug.
For more tips to brew better coffee at home or fun projects to help pass the time while in self-quarantine, check out how to make wine in your Instant Pot, how to keep bread from going stale and cleaning your oven without harsh chemicals.
If you live in an area where temperatures dip below the freezing point, it's important to prepare for cold weather and take preventive steps to keep your pipes from bursting.
Burst pipes are not only frustrating, but they're also expensive. Depending on the severity of the problem, unfreezing and fixing burst pipes can cost more than $1,000. Fortunately, there are several simple strategies you can adopt to avoid this issue. Below, we've included six tips to help your pipes stay freeze-free this winter.
1. Cover exposed pipes
When your water supply pipes are exposed, they're more susceptible to freezing and bursting -- especially if they're located along exterior walls or in unheated spaces like your basement or attic. To prevent this, it's a good idea to protect your pipes with insulation.
Covering your exposed plumbing is one of the cheapest and easiest ways to prevent burst pipes. Your local hardware store will have several different materials that you can use to insulate your pipes, including foam and fiberglass insulation. You can even use newspaper to cover your exposed pipes if you live in a place where freezing temperatures only happen on occasion.
2. Insulate unheated areas
When you have plumbing running through an unheated basement, attic, garage or crawl space, the pipes don't get as much warmth as they would in a heated bedroom or living room. By insulating the unheated areas in your home, your pipes will stay warmer and be less likely to burst. Plus, well-insulated homes contain heat more effectively, which can save you money on winter heating bills.
If you're the DIY type, you should be able to add insulation on your own. Otherwise, you can hire a professional to do it for you. Either way, it's a cost-effective and energy-efficient way to protect your pipes and keep your home at a comfortable temperature.
Jon Skillings/CNET
3. Keep a tap running on cold days
You might be surprised to find out that something as simple as running a tap can help prevent frozen pipes. But in reality, it's one of the most effective things you can do. You don't need to leave your tap running at full blast, but make sure you've at least got a slow drip.
For the best results, choose the faucet that's furthest away from your water source. Doing this will force the water to run through a large portion of your plumbing system, keeping it active and less likely to freeze. Similarly, if you have any taps that are served by exposed pipes, it's a good idea to keep them trickling as well.
4. Open bathroom and kitchen cabinet doors
Another small (but useful) strategy to prevent burst pipes is to open the cabinet doors under your kitchen and bathroom sinks. By doing so, the heated air from your home will start to circulate beneath your cabinets and warm up your pipes.
It's particularly important to open your cabinet doors if they're located along an exterior wall of your home. As you might expect, pipes in these areas are more likely to freeze since they're closer to the cold outdoors.
5. Don't adjust your thermostat
You may be familiar with the Department of Energy's recommendation to adjust your thermostat during the winter to save energy, but that guidance doesn't apply during a cold snap.
Instead, you should keep your thermostat at a constant temperature throughout the day and night. Doing this will help your pipes stay warmer, making them less likely to freeze and burst. Plus, maintaining a steady temperature will put less stress on your furnace, which is important during periods of extreme cold.
6. Seal leaks and drafty areas
Our final tip to prevent burst pipes this winter is to patch up drafty areas in your home. When you have gaps or leaks between the inside and outside of your home, it's possible for cold air to come in, lower the temperature around your plumbing and cause your pipes to burst.
The good news: it's easy to seal these leaks. Get started by taking a quick walk around your house and looking for any places where air could sneak in, including window and door frames, electrical wiring and dryer vents. Once you've identified the problem areas, use insulation or caulk to seal them up.
The bottom line
Even if home maintenance isn't your strong suit, you should be able to tackle all of these repairs in a single weekend. It may seem inconvenient, but making these minor upgrades is a small commitment that can prevent serious headaches and expensive repairs in the future.
Dji phantom 3 advanced review the sweet spot for intermittent dji phantom 3 advanced review the sweet spot for achievement dji phantom 3 advanced review the lincoln dji phantom 3 advanced manual dji phantom 3 advanced vs professional dji phantom 3 standard dji phantom 3 firmware update dji phantom 3 advanced
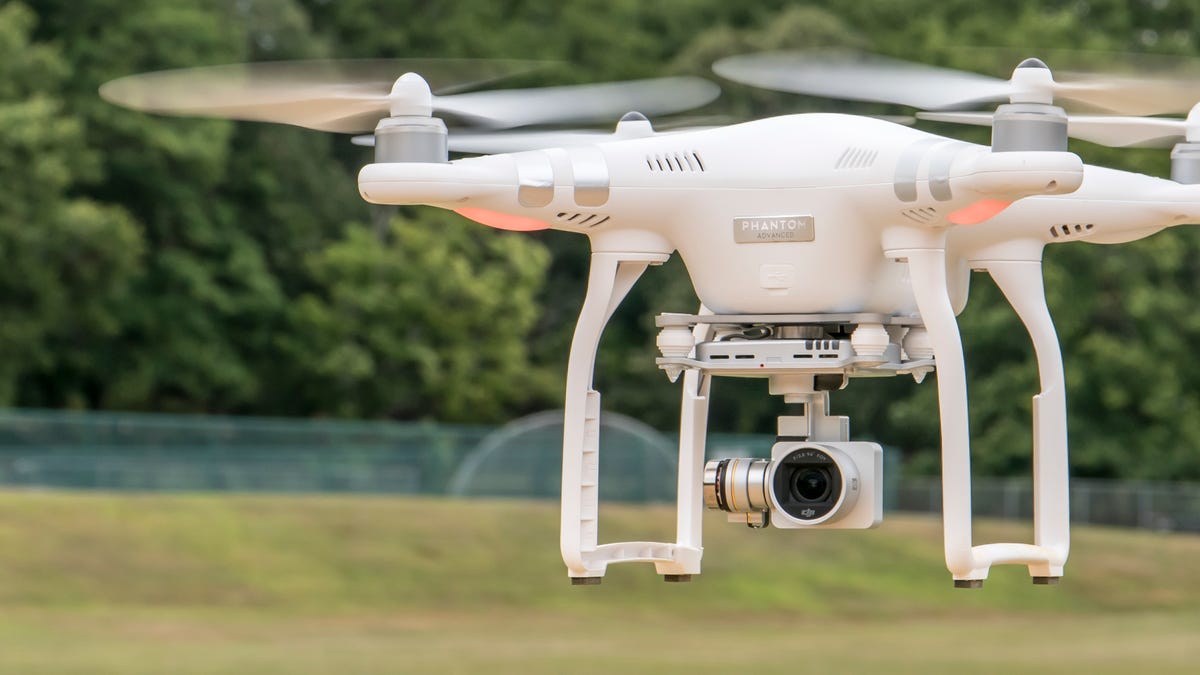
DJI Phantom 3 Advanced review: The sweet spot for features, performance and price
DJI Phantom 3 Advanced review: The sweet spot for features, performance and price
DJI currently has three versions of its Phantom 3 drone: the Standard , Advanced and Professional . While there are several important differences between the entry-level Phantom 3 Standard ($799, £649 or AU$1,299) and its two linemates, the feature gap between the Professional and Advanced amounts to two things.
The Phantom 3 Professional shoots video in 4K (3,820x2,160-pixel) resolution and has a 100-watt battery charger. It retails for $1,259, £1,159 or AU$1,950. The Advanced captures video in 1080p (1,920x1,080) and has a slower 57-watt charger, but costs $999, £899 or AU$1,550. That's it.
The 4K video from the Professional is a step up from the Advanced's full-HD results. But it's not a big step up, and unless you want or need the extra resolution and have a computer powerful enough to play and edit 4K video, the Advanced's 1080p video doesn't disappoint. And since the drones' features and controllers are the same, the Phantom 3 Advanced is as easy to recommended as it is to fly. Which is to say it's really easy.
Joshua Goldman/CNET
Design and features
The quadcopter itself is, for the most part, unchanged from its predecessor, the Phantom 2 Vision+. You'll find all the same convenience features like color-coded, self-tightening propellers for easy installation and replacement, and a slot-loading battery pack, though it's a newly designed battery making the Phantom 2's batteries incompatible with the 3.
The three-axis gimbal on its belly stabilizes the camera in roll, pitch and yaw directions keeping the video looking smooth even with sudden stick movements or wind gusts. Plus, the camera can do a 90-degree tilt, letting you shoot straight down, straight ahead and anywhere in between. The camera is permanently attached to the gimbal, so if you irreparably damage one or the other, you'll have to replace the entire gimbal-and-camera assembly. It also means you don't have the option of using the camera for anything else, unlike models that use GoPro or other small cameras such as 3D Robotic's Solo or EHang's Ghost.
The Advanced's camera features a Sony-made 12-megapixel 1/2.3-inch CMOS sensor behind a new f2.8 20mm lens (35mm equivalent), which gives you a 94-degree field of view. That's much narrower than the Vision+ camera's 140-degree field of view resulting in far less distortion.
Joshua Goldman/CNET
Sitting to the back of the gimbal is the new Vision Positioning System, a set of sensors to help the Phantom 3 hover while indoors when GPS isn't available. There are many caveats for it to work properly, however, such as not flying over sound-absorbing materials, water or highly reflective surfaces. It's also only effective up to about 10 feet (3 meters). If you're thinking of getting the Advanced to fly above crowds in an arena or auditorium, you better up your piloting skills first.
When you're outside, GPS is used to help the drone determine its position and yours and is what makes it possible for the drone to stop and hover in place when you release the controller's sticks as well as delivering accurate location data for safety features like automatically returning to a home position. The more satellites it can lock onto, the better off you are, so DJI added the Russian navigational system, GLONASS, which lets it tap into more satellites than GPS alone.
Satellite acquisition speeds are noticeably faster compared to the Phantom 2 Vision+, so you can lock on and start flying more quickly. Also, with the Vision+ there were times I would struggle to get a solid lock on six satellites (the minimum for GPS-assisted flight). The Advanced never had a problem grabbing onto 10 satellites or more in a matter of seconds and regularly had upward of 15 in my testing. This makes a huge difference when it comes to putting the drone in the exact position you want for photos and video.
Joshua Goldman/CNET
The controller and DJI Go mobile app (formerly called Pilot) are important, too, of course. The Advanced and its controller have DJI's Lightbridge technology for better image transmission between the sky and ground. Lightbridge allows for a continuous connection back and forth between the two and increases flight range over the wireless range extender used for the Phantom 2 and the entry-level Phantom 3 Standard. This does mean you'll need your iOS or Android device's charging cable to use it, but the performance improvement is well worth it.
On each of the top corners you'll find discrete camera controls for starting and stopping recordings, taking pictures, reviewing your shots and two wheels, one for adjusting exposure compensation, ISO and shutter speed and the other for the gimbal's tilt. Two customizable buttons are on the bottom as well that can be used for a handful of gimbal or camera functions. Overall it's a great setup, but more than a few times I accidentally switched to playback mode while trying to snap a photo.
DJI also included a Return-to-Home button for those times when panic starts to set in and you just want to bring it on back. The controller's battery is built in and will last through several flights before you'll need to recharge it. DJI simplified charging, too, using one power supply with two cables attached: one for the controller's battery and one for the drone's.
Andrew Hoyle/CNET
Connecting your iOS or Android smartphone or tablet is as simple as plugging in your device's charging cable into the USB port on the Advanced's controller. (It'll keep your device charged while you use it for flying, too.) Then, with the controller and drone turned on, you just open the DJI Go app and tap to get the camera view.
The controller's device mount can handle phones and tablets big and small, however the app is optimized for use with the iPhone 5S, 6 and 6 Plus. Android device support is thin, with just the Samsung Galaxy S5 and Note 3, Sony Xperia Z3, Google Nexus 7 II, Google Nexus 9, Xiaomi Mi 3 and ZTE Nubia Z7 Mini listed. I tested with both a 6 Plus and a Galaxy S5 and the app performance was clearly stronger on the iOS device with the S5 occasionally freezing up forcing me midflight to restart the app.
In addition to a first-person view from the camera, you get complete camera controls, meters for signal strengths, GPS and battery life and access to settings for the whole system. It will also notify you if a firmware update is necessary (which occur with some regularity) and, eventually, you'll be able to do the updates through the app; currently they're done by downloading a file to a microSD card and popping the card into the drone's camera.
The app can also be used for automated take-offs and landings, if you don't want to handle them with stick commands, and triggering the Return-to-Home safety function. Another new safety feature of sorts is the Beginner Mode. This sets up virtual barriers called a geofence with a maximum altitude and flight distance of 30 meters (98 feet), giving you a safe way to limit where the drone can travel. It's pretty amazing to see in action as you send the Phantom full throttle toward its limit and the drone stops as if it's been snagged in an invisible net.
As for the camera settings, video recording options include full HD (1,920x1,080-pixel) and HD (1,280x720-pixel) resolutions at 24, 25, 30, 48, 50, 60 frames per second and you can choose between MOV or MP4 formats. Thanks to the Lightbridge technology, you can even use it to live-stream video straight to YouTube and uses your mobile device's mic for capturing audio.
Joshua Goldman/CNET
For photos, you can capture in JPEG, DNG raw format or both simultaneously. Shooting modes include single shots or bursts of three, five or seven; HDR and auto exposure bracketing (0.7EV bias) of three or five pictures; and time-lapse continuous shooting at 5-, 7-, 10-, 20- and 30-second intervals. You can also control ISO, exposure compensation and white balance.
At the time of this review the Phantom 3 Advanced (and Professional) didn't have DJI's Intelligent Flight features including waypoint navigation, point of interest (POI) flight planning or Follow Me function, but these are now available.
Waypoint navigation lets you set up a multipoint path for the drone to follow while you control the camera, while POI flight planning allows you to autonomously fly a circle around a subject, keeping it centered. Follow Me sets the drone to track your movement based on your orientation. Support for SDK apps already created by third-party DJI developers is available as well, giving the Advanced more features and future potential.
Joshua Goldman/CNET
Flying
If you're reading this review, you probably already know that DJI's Phantom quadcopters have a reputation of being extremely easy to fly (and fly away, but it's something I've never experienced). With the Phantom 3 the experience has only improved.
DJI has added a flight simulator to the mobile app (iOS only) that you can use to learn your way around the app and controls. I found it to be a little frustrating because the actual drone performs so much better in real life. Regardless of safety features and how stable the Phantom 3 is, I highly recommend taking your first flights out in an open area where there are no people or distractions.
Again, if you don't want to use stick commands, you can takeoff and land with a tap and a swipe on your screen. With GPS, the drone will just sit and hover wherever you leave it. Start flying a bit too close to a tree and you can just let go of the sticks and it will stop while you regroup and steer away. You can fly without GPS, but if you release the sticks the Phantom won't stop but instead continues to drift in the direction it was last headed. It's a gut-wrenching experience watching $1,000 float away seemingly uncontrollably, so it's best to fly with GPS until you fully understand the controls.
Joshua Goldman/CNET
The app is well laid out and at a glance you can see all the information you need. There's even a battery timeline meter giving you estimates on everything from remaining flight time to the power required to return home or land.
Speaking of battery life, DJI says you'll be able to get up to 23 minutes of flight time. I was able to get to just under 21 minutes of flying -- nothing too aggressive, mostly hovering in place and in light wind -- before it took over and landed itself. That flight time is very good when you factor in all that it's doing to stay in the air while recording video. It does feel short, though, especially if you're trying to get out some distance for a picture and still make it back. And extras are pricey at around $149, £125 or AU$205 each.
Video and photo quality
Closely examining the 4K video of the Phantom 3 Professional or DJI's higher-end Inspire 1 straight from the camera against the 1080p clips from the Advanced, there are noticeable differences, mainly in the level of fine detail and sharpness of subjects. There is better detail from the 4K and it's especially visible if you're viewing on a large TV or monitor. So, if it's necessary for you to capture the highest quality video without ponying up a ton more cash, the Phantom 3 Professional is the better choice.
Frankly, though, the full-HD clips from the Advanced look pretty great as do its photos, and they're more than suitable for sharing online and/or viewing on a phone, tablet or laptop. It's also a huge jump in quality from the Phantom 2 Vision+. For those considering an upgrade from that model to the Professional, your needs might be met with the less expensive Advanced.
Joshua Goldman/CNET
The live-streaming quality to YouTube is just OK. You have to have a pretty strong wireless connection to keep the video moving smoothly and even then the results were a bit glitchy and compressed. Still, it's sort of amazing it can do it at all and could be helpful for professional uses.
Lastly, whenever you record a video, a compressed 720p version is stored to your mobile device. To help make the most of these clips, DJI built in a basic video editor to the Go app. You can use it to cut up your clips, gather them up and then combine them into one movie. DJI also included some style templates with music you can apply before you save. Then you can just share away.
Joshua Goldman/CNET
Conclusion
The DJI Phantom 3 Advanced is a great little aerial photo and video machine, however it's the whole system -- the drone, the controller and the app -- that make it so easy to pick up and just start flying. It's not inexpensive, but compared with the $900 Parrot Bebop with its Skycontroller , you won't regret spending the extra money. And if you don't need the Professional's 4K video, you can put your money toward a spare battery or two so the good times don't come to an end after 20 minutes.
Dji phantom 3 advanced review the sweet spot for those big dji phantom 3 advanced review thesaurus dji phantom 3 advanced review the lincoln dji phantom 3 advanced review the midnight dji phantom 3 advanced review the ordinary dji phantom 3 advanced review the batman dji phantom 3 advanced drone review dji phantom 3 advanced downloads dji phantom 3 advanced quadcopter drone dji phantom 3 professional dji phantom 3 standard manual pdf dji phantom 2
DJI Phantom 3 Advanced review: The sweet spot for features, performance and price
DJI Phantom 3 Advanced review: The sweet spot for features, performance and price
DJI currently has three versions of its Phantom 3 drone: the Standard , Advanced and Professional . While there are several important differences between the entry-level Phantom 3 Standard ($799, £649 or AU$1,299) and its two linemates, the feature gap between the Professional and Advanced amounts to two things.
The Phantom 3 Professional shoots video in 4K (3,820x2,160-pixel) resolution and has a 100-watt battery charger. It retails for $1,259, £1,159 or AU$1,950. The Advanced captures video in 1080p (1,920x1,080) and has a slower 57-watt charger, but costs $999, £899 or AU$1,550. That's it.
The 4K video from the Professional is a step up from the Advanced's full-HD results. But it's not a big step up, and unless you want or need the extra resolution and have a computer powerful enough to play and edit 4K video, the Advanced's 1080p video doesn't disappoint. And since the drones' features and controllers are the same, the Phantom 3 Advanced is as easy to recommended as it is to fly. Which is to say it's really easy.
Joshua Goldman/CNET
Design and features
The quadcopter itself is, for the most part, unchanged from its predecessor, the Phantom 2 Vision+. You'll find all the same convenience features like color-coded, self-tightening propellers for easy installation and replacement, and a slot-loading battery pack, though it's a newly designed battery making the Phantom 2's batteries incompatible with the 3.
The three-axis gimbal on its belly stabilizes the camera in roll, pitch and yaw directions keeping the video looking smooth even with sudden stick movements or wind gusts. Plus, the camera can do a 90-degree tilt, letting you shoot straight down, straight ahead and anywhere in between. The camera is permanently attached to the gimbal, so if you irreparably damage one or the other, you'll have to replace the entire gimbal-and-camera assembly. It also means you don't have the option of using the camera for anything else, unlike models that use GoPro or other small cameras such as 3D Robotic's Solo or EHang's Ghost.
The Advanced's camera features a Sony-made 12-megapixel 1/2.3-inch CMOS sensor behind a new f2.8 20mm lens (35mm equivalent), which gives you a 94-degree field of view. That's much narrower than the Vision+ camera's 140-degree field of view resulting in far less distortion.
Joshua Goldman/CNET
Sitting to the back of the gimbal is the new Vision Positioning System, a set of sensors to help the Phantom 3 hover while indoors when GPS isn't available. There are many caveats for it to work properly, however, such as not flying over sound-absorbing materials, water or highly reflective surfaces. It's also only effective up to about 10 feet (3 meters). If you're thinking of getting the Advanced to fly above crowds in an arena or auditorium, you better up your piloting skills first.
When you're outside, GPS is used to help the drone determine its position and yours and is what makes it possible for the drone to stop and hover in place when you release the controller's sticks as well as delivering accurate location data for safety features like automatically returning to a home position. The more satellites it can lock onto, the better off you are, so DJI added the Russian navigational system, GLONASS, which lets it tap into more satellites than GPS alone.
Satellite acquisition speeds are noticeably faster compared to the Phantom 2 Vision+, so you can lock on and start flying more quickly. Also, with the Vision+ there were times I would struggle to get a solid lock on six satellites (the minimum for GPS-assisted flight). The Advanced never had a problem grabbing onto 10 satellites or more in a matter of seconds and regularly had upward of 15 in my testing. This makes a huge difference when it comes to putting the drone in the exact position you want for photos and video.
Joshua Goldman/CNET
The controller and DJI Go mobile app (formerly called Pilot) are important, too, of course. The Advanced and its controller have DJI's Lightbridge technology for better image transmission between the sky and ground. Lightbridge allows for a continuous connection back and forth between the two and increases flight range over the wireless range extender used for the Phantom 2 and the entry-level Phantom 3 Standard. This does mean you'll need your iOS or Android device's charging cable to use it, but the performance improvement is well worth it.
On each of the top corners you'll find discrete camera controls for starting and stopping recordings, taking pictures, reviewing your shots and two wheels, one for adjusting exposure compensation, ISO and shutter speed and the other for the gimbal's tilt. Two customizable buttons are on the bottom as well that can be used for a handful of gimbal or camera functions. Overall it's a great setup, but more than a few times I accidentally switched to playback mode while trying to snap a photo.
DJI also included a Return-to-Home button for those times when panic starts to set in and you just want to bring it on back. The controller's battery is built in and will last through several flights before you'll need to recharge it. DJI simplified charging, too, using one power supply with two cables attached: one for the controller's battery and one for the drone's.
Andrew Hoyle/CNET
Connecting your iOS or Android smartphone or tablet is as simple as plugging in your device's charging cable into the USB port on the Advanced's controller. (It'll keep your device charged while you use it for flying, too.) Then, with the controller and drone turned on, you just open the DJI Go app and tap to get the camera view.
The controller's device mount can handle phones and tablets big and small, however the app is optimized for use with the iPhone 5S, 6 and 6 Plus. Android device support is thin, with just the Samsung Galaxy S5 and Note 3, Sony Xperia Z3, Google Nexus 7 II, Google Nexus 9, Xiaomi Mi 3 and ZTE Nubia Z7 Mini listed. I tested with both a 6 Plus and a Galaxy S5 and the app performance was clearly stronger on the iOS device with the S5 occasionally freezing up forcing me midflight to restart the app.
In addition to a first-person view from the camera, you get complete camera controls, meters for signal strengths, GPS and battery life and access to settings for the whole system. It will also notify you if a firmware update is necessary (which occur with some regularity) and, eventually, you'll be able to do the updates through the app; currently they're done by downloading a file to a microSD card and popping the card into the drone's camera.
The app can also be used for automated take-offs and landings, if you don't want to handle them with stick commands, and triggering the Return-to-Home safety function. Another new safety feature of sorts is the Beginner Mode. This sets up virtual barriers called a geofence with a maximum altitude and flight distance of 30 meters (98 feet), giving you a safe way to limit where the drone can travel. It's pretty amazing to see in action as you send the Phantom full throttle toward its limit and the drone stops as if it's been snagged in an invisible net.
As for the camera settings, video recording options include full HD (1,920x1,080-pixel) and HD (1,280x720-pixel) resolutions at 24, 25, 30, 48, 50, 60 frames per second and you can choose between MOV or MP4 formats. Thanks to the Lightbridge technology, you can even use it to live-stream video straight to YouTube and uses your mobile device's mic for capturing audio.
Joshua Goldman/CNET
For photos, you can capture in JPEG, DNG raw format or both simultaneously. Shooting modes include single shots or bursts of three, five or seven; HDR and auto exposure bracketing (0.7EV bias) of three or five pictures; and time-lapse continuous shooting at 5-, 7-, 10-, 20- and 30-second intervals. You can also control ISO, exposure compensation and white balance.
At the time of this review the Phantom 3 Advanced (and Professional) didn't have DJI's Intelligent Flight features including waypoint navigation, point of interest (POI) flight planning or Follow Me function, but these are now available.
Waypoint navigation lets you set up a multipoint path for the drone to follow while you control the camera, while POI flight planning allows you to autonomously fly a circle around a subject, keeping it centered. Follow Me sets the drone to track your movement based on your orientation. Support for SDK apps already created by third-party DJI developers is available as well, giving the Advanced more features and future potential.
Joshua Goldman/CNET
Flying
If you're reading this review, you probably already know that DJI's Phantom quadcopters have a reputation of being extremely easy to fly (and fly away, but it's something I've never experienced). With the Phantom 3 the experience has only improved.
DJI has added a flight simulator to the mobile app (iOS only) that you can use to learn your way around the app and controls. I found it to be a little frustrating because the actual drone performs so much better in real life. Regardless of safety features and how stable the Phantom 3 is, I highly recommend taking your first flights out in an open area where there are no people or distractions.
Again, if you don't want to use stick commands, you can takeoff and land with a tap and a swipe on your screen. With GPS, the drone will just sit and hover wherever you leave it. Start flying a bit too close to a tree and you can just let go of the sticks and it will stop while you regroup and steer away. You can fly without GPS, but if you release the sticks the Phantom won't stop but instead continues to drift in the direction it was last headed. It's a gut-wrenching experience watching $1,000 float away seemingly uncontrollably, so it's best to fly with GPS until you fully understand the controls.
Joshua Goldman/CNET
The app is well laid out and at a glance you can see all the information you need. There's even a battery timeline meter giving you estimates on everything from remaining flight time to the power required to return home or land.
Speaking of battery life, DJI says you'll be able to get up to 23 minutes of flight time. I was able to get to just under 21 minutes of flying -- nothing too aggressive, mostly hovering in place and in light wind -- before it took over and landed itself. That flight time is very good when you factor in all that it's doing to stay in the air while recording video. It does feel short, though, especially if you're trying to get out some distance for a picture and still make it back. And extras are pricey at around $149, £125 or AU$205 each.
Video and photo quality
Closely examining the 4K video of the Phantom 3 Professional or DJI's higher-end Inspire 1 straight from the camera against the 1080p clips from the Advanced, there are noticeable differences, mainly in the level of fine detail and sharpness of subjects. There is better detail from the 4K and it's especially visible if you're viewing on a large TV or monitor. So, if it's necessary for you to capture the highest quality video without ponying up a ton more cash, the Phantom 3 Professional is the better choice.
Frankly, though, the full-HD clips from the Advanced look pretty great as do its photos, and they're more than suitable for sharing online and/or viewing on a phone, tablet or laptop. It's also a huge jump in quality from the Phantom 2 Vision+. For those considering an upgrade from that model to the Professional, your needs might be met with the less expensive Advanced.
Joshua Goldman/CNET
The live-streaming quality to YouTube is just OK. You have to have a pretty strong wireless connection to keep the video moving smoothly and even then the results were a bit glitchy and compressed. Still, it's sort of amazing it can do it at all and could be helpful for professional uses.
Lastly, whenever you record a video, a compressed 720p version is stored to your mobile device. To help make the most of these clips, DJI built in a basic video editor to the Go app. You can use it to cut up your clips, gather them up and then combine them into one movie. DJI also included some style templates with music you can apply before you save. Then you can just share away.
Joshua Goldman/CNET
Conclusion
The DJI Phantom 3 Advanced is a great little aerial photo and video machine, however it's the whole system -- the drone, the controller and the app -- that make it so easy to pick up and just start flying. It's not inexpensive, but compared with the $900 Parrot Bebop with its Skycontroller , you won't regret spending the extra money. And if you don't need the Professional's 4K video, you can put your money toward a spare battery or two so the good times don't come to an end after 20 minutes.
Galaxy s21 ultra vs google pixel 6 pro pixel 6 pro vs galaxy s21 ultra pixel 6 pro vs galaxy s21 pixel 6 pro vs galaxy s22 pixel 6 pro vs galaxy s21 pixel 6 pro vs s21 ultra pixel 6 pro vs iphone 13 pixel 6 pro price pixel 6 review
Pixel 6 Pro vs. Galaxy S21 Ultra: Which camera is better?
Pixel 6 Pro vs. Galaxy S21 Ultra: Which camera is better?
Samsung's Galaxy S21 Ultra and Google's Pixel 6 Pro were both among our top-rated phones of 2021. With their impressive performance, their glorious displays and feature-rich experiences, both phones deserve the titles of "flagship" Android handsets and are still well worth considering even as 2022's new phones begin to appear.
And they both have amazing cameras, with the S21 Ultra particularly impressive with its astonishing 10x zoom lens, while the Pixel 6 Pro manages to give the iPhone 13 Pro a run for its money.
But which camera is better? Is it still all about that zoom on the S21 Ultra? I took both phones out for a spin to see what's what.
Pixel 6 Pro.
Andrew Hoyle/CNET
Galaxy S21 Ultra.
Andrew Hoyle/CNET
In this first outdoor shot using the main cameras on both phones, there's little to choose between them. The S21 Ultra's shot is perhaps a touch warmer overall, but the exposure, contrast and detail are basically identical.
Pixel 6 Pro.
Andrew Hoyle/CNET
Galaxy S21 Ultra.
Andrew Hoyle/CNET
And it's the same story here: both phones have captured sharp, well-exposed images, but the S21 Ultra's image has warmer tones, which gives a nice sunset feel to the image.
Pixel 6 Pro, 4x telephoto zoom.
Andrew Hoyle/CNET
Galaxy S21 Ultra, 10x telephoto zoom.
Andrew Hoyle/CNET
Switching to the maximum optical zooms of both phones from the same shooting position, it's clear the difference that the huge zoom on the S21 Ultra makes. At 10x, it's able to get much closer on the buildings, allowing for a different composition.
Pixel 6 Pro, 4x zoom.
Andrew Hoyle/CNET
Galaxy S21 Ultra, 10x zoom.
Andrew Hoyle/CNET
And it's not just for travel pictures; that zoom can be great for getting close up on the local wildlife, too. The Pixel 6 Pro's 4x zoom can take some great shots, but it just doesn't have the reach of the S21 Ultra's 10x zoom.
Pixel 6 Pro.
Andrew Hoyle/CNET
Galaxy S21 Ultra.
Andrew Hoyle/CNET
A solid balance of exposure from both phones in this sunny outdoor scene. The S21 Ultra's shot has a touch more contrast, which isn't always a positive thing, but it's helped make the stark shadows on the ground more defined here.
Pixel 6 Pro.
Andrew Hoyle/CNET
Galaxy S21 Ultra.
Andrew Hoyle/CNET
That additional contrast on the S21 Ultra is more pronounced here, with much deeper blues seen in the sky and its reflection in the water. For a quick snap that might be preferable, but I'd rather have a more natural-looking image straight out of the camera in order to apply more contrast -- or other effects -- later on if I choose. It's why I shoot in raw format on my DSLR and it's why I prefer the Pixel 6 Pro's shot here.
Pixel 6 Pro, super-wide lens.
Andrew Hoyle/CNET
Galaxy S21 Ultra, super-wide lens.
Andrew Hoyle/CNET
The situation is identical when I switched to the super-wide lenses on both phones; that contrast boost from the S21 Ultra is particularly noticeable, and I'm not keen on how punchy and oversaturated the shot looks here.
Pixel 6 Pro.
Andrew Hoyle/CNET
Galaxy S21 Ultra.
Andrew Hoyle/CNET
In the fading evening light, that color balance has played in the S21 Ultra's favor, with vibrant green grass visible in its shot, against the Pixel 6 Pro's more muddy, greeny-brown tones. The S21 Ultra's shot is sharper, too, with more noticeable clarity on the blades of grass.
Pixel 6 Pro, night mode.
Andrew Hoyle/CNET
Galaxy S21 Ultra, night mode.
Andrew Hoyle/CNET
Taken using night mode, both phones have done a solid job of capturing this night-time scene, with great overall brightness and contrast. I prefer the Pixel 6 Pro's shot however as its color balance is less purply and the fine details are clearer overall.
In general, it's evident that both phones can take some superb images from their cameras. Overall. I prefer the look from the Pixel 6 Pro thanks to its more natural approach to color and contrast in a scene. Samsung's phones have always had a tendency toward high contrast and saturation in images and the S21 Ultra is no exception.
However, there's no escaping that the S21 Ultra remains unrivaled when it comes to zoom skills. The 10x optical lens allows you to take shots that you simply cannot get on the Pixel 6 Pro, or from almost any of its main rivals. If zoom skills are paramount in your photography then the S21 Ultra is the phone to go for. If you're more bothered about overall image accuracy and tend to prefer wider-angle images then you'll feel right at home with the Pixel 6 Pro.