Step into a world where the focus is keenly set on How To Get On Snapchat. Within the confines of this article, a tapestry of references to How To Get On Snapchat awaits your exploration. If your pursuit involves unraveling the depths of How To Get On Snapchat, you've arrived at the perfect destination.
Our narrative unfolds with a wealth of insights surrounding How To Get On Snapchat. This is not just a standard article; it's a curated journey into the facets and intricacies of How To Get On Snapchat. Whether you're thirsting for comprehensive knowledge or just a glimpse into the universe of How To Get On Snapchat, this promises to be an enriching experience.
The spotlight is firmly on How To Get On Snapchat, and as you navigate through the text on these digital pages, you'll discover an extensive array of information centered around How To Get On Snapchat. This is more than mere information; it's an invitation to immerse yourself in the enthralling world of How To Get On Snapchat.
So, if you're eager to satisfy your curiosity about How To Get On Snapchat, your journey commences here. Let's embark together on a captivating odyssey through the myriad dimensions of How To Get On Snapchat.
How to see my memories on snapchat how to check memories on snapchat how to look at snapchat memories how to use snapchat on xbox how to use vlookup how to use chopsticks how to use microsoft teams how to get help in windows how to take a screenshot how to get free robux
How to use Snapchat Memories
How to use Snapchat Memories
Snapchat wants you to hold on to your photos and videos for a little while longer.
The new Memories feature is a searchable and shareable archive of snaps that you can access within the app. Memories backs up snaps to Snapchat's servers and automatically pulls together saved snaps into categories based on location. But you can also search on a keyword, such as food.
How do I get Memories?
Snapchat's new Memories feature has tabs along the top to divide up snaps and stories.
Screenshot by Lexy Savvides/CNET
The first step is to update the Snapchat app for iOS or Android. The Memories feature is rolling out progressively to users over the next month. When the new feature is available for your account, you'll receive a snap from Team Snapchat.
Snapchat's main camera interface now has an extra icon underneath the camera button. Swipe it up to access Memories.
Memories has a series of tabs that let you switch between viewing snaps, stories and the contents of your camera roll.
Making Memories
To make a new memory, create a snap as usual with all the filters and stickers you desire. Then, tap the Save icon like you normally would to download the snap to your camera roll or gallery. Rather than saving to the roll, however, the snap will save to the Memories section.
To create a story from snaps within the Memories section, press and hold on an individual snap, then tap "My Snap" at the top of the screen. From here, tap "Create story from this snap" and select any additional snaps you want to include. Now you can save or send this snap to friends or to the My Story section as you would normally.
Note that if you post a snap to a story that was taken earlier than the past 24 hours, it will have a frame around it with the timestamp.
If you want to import snaps from your camera roll or gallery, go to Snapchat's settings and find Memories. Select "Import Snaps from Camera Roll."
Note that this will only surface actual Snapchats you have previously saved to your phone -- not photos taken with the regular camera app.
For My Eyes Only
Don't want those eggplant photos visible in your Memories section when you pass your phone around? Add them to a section called My Eyes Only.
Press and hold on the snap, tap My Snap, and select "Move to My Eyes Only." Snapchat will prompt you for a passcode or passphrase. Once you've set this up, a new tab will appear within Memories that contains these less-than-salubrious snaps for your private viewing pleasure.
So what's backed up?
Any snap you save in your Memories section is saved to Snapchat's servers, so if you log in on another device these snaps are available.
It's important to note that even though you have access to your camera roll or gallery within Memories, these photos and videos are not being backed up on Snapchat's servers.
What if I don't want to use Memories?
Within the Snapchat settings, navigate to the Memories section and find the Saving section. Tap "Save To..." and select "Camera Roll Only." This section also lets you automatically save stories to Memories or set to My Eyes Only by default.
How to see memories in snapchat how to use snapchat how to use snapchat on pc how to use vlookup how to use index match how to take a screenshot how to make slime how to print screen how to delete a page in word
How to use Snapchat Memories
How to use Snapchat Memories
Snapchat wants you to hold on to your photos and videos for a little while longer.
The new Memories feature is a searchable and shareable archive of snaps that you can access within the app. Memories backs up snaps to Snapchat's servers and automatically pulls together saved snaps into categories based on location. But you can also search on a keyword, such as food.
How do I get Memories?
Snapchat's new Memories feature has tabs along the top to divide up snaps and stories.
Screenshot by Lexy Savvides/CNET
The first step is to update the Snapchat app for iOS or Android. The Memories feature is rolling out progressively to users over the next month. When the new feature is available for your account, you'll receive a snap from Team Snapchat.
Snapchat's main camera interface now has an extra icon underneath the camera button. Swipe it up to access Memories.
Memories has a series of tabs that let you switch between viewing snaps, stories and the contents of your camera roll.
Making Memories
To make a new memory, create a snap as usual with all the filters and stickers you desire. Then, tap the Save icon like you normally would to download the snap to your camera roll or gallery. Rather than saving to the roll, however, the snap will save to the Memories section.
To create a story from snaps within the Memories section, press and hold on an individual snap, then tap "My Snap" at the top of the screen. From here, tap "Create story from this snap" and select any additional snaps you want to include. Now you can save or send this snap to friends or to the My Story section as you would normally.
Note that if you post a snap to a story that was taken earlier than the past 24 hours, it will have a frame around it with the timestamp.
If you want to import snaps from your camera roll or gallery, go to Snapchat's settings and find Memories. Select "Import Snaps from Camera Roll."
Note that this will only surface actual Snapchats you have previously saved to your phone -- not photos taken with the regular camera app.
For My Eyes Only
Don't want those eggplant photos visible in your Memories section when you pass your phone around? Add them to a section called My Eyes Only.
Press and hold on the snap, tap My Snap, and select "Move to My Eyes Only." Snapchat will prompt you for a passcode or passphrase. Once you've set this up, a new tab will appear within Memories that contains these less-than-salubrious snaps for your private viewing pleasure.
So what's backed up?
Any snap you save in your Memories section is saved to Snapchat's servers, so if you log in on another device these snaps are available.
It's important to note that even though you have access to your camera roll or gallery within Memories, these photos and videos are not being backed up on Snapchat's servers.
What if I don't want to use Memories?
Within the Snapchat settings, navigate to the Memories section and find the Saving section. Tap "Save To..." and select "Camera Roll Only." This section also lets you automatically save stories to Memories or set to My Eyes Only by default.
How to make a snapchat everything you need to know about snapchat how to make a snapchat snapchat create your own website what was snapchat made who is the creator of snapchat who are the creators of snapchat our most asked snapchat snapchat australia login
Snapchat just made it super-easy to design a custom filter on the fly
Snapchat just made it super-easy to design a custom filter on the fly
Ever wanted to create your very own Snapchat filter for a party or wedding, but didn't know where to start? Instead of paying someone on Fiverr or Etsy to do it for you, Snapchat's new tool has filter templates you can create in minutes. You can go through the process on your computer, or use the Snapchat app on your phone.
From your computer
Screenshot by Jason Cipriani/CNET
To get started, visit geofilters.snapchat.com. You don't have to log in to your account to mess around with the templates and get an idea of how the process works. However, if you do log in you'll have access to your personal Bitmoji stickers.
Snapchat currently has filters for eight different categories: Graduation, summer vibes, wedding, bachelor(ette), birthdays, baby shower, celebration and love.
Step 1: Select a category, then find a filter that fits your personal tastes. Use the tools on the right side of the page to add your own text or change the placeholder text. Alternatively, you can upload your own filter creation. Click Next when you're happy with the filter.
Step 2: Choose the date and time you want the filter to be active for.
Step 3: Create a geofenced area using the map. Snapchat requires a minimum 20,000-square-foot area geofence and will let you know if you need to expand your selected area to meet its criteria. Custom filters start at $5.99 and increase in cost depending on size of the geofence and the amount of time the filter will remain active. Each time you adjust the size of the geofence, the price estimate will update to let you know the correct price.
Tip: Choose a geofence larger than the actual venue. Since GPS reception can be wonky -- especially at remote wedding locations -- a wider range helps make sure your guests don't miss the filter.
Step 4: Fill in the submission form, which requires a name for the filter and payment info. Snapchat will review your filter, and if approved, charge your payment info.
From the app
Screenshots by Jason Cipriani/CNET
Using the Snapchat app, the process is nearly the same, although a bit more streamlined. To view the On-Demand Geofilter tool in the app, open Settings and select On-Demand Geofilter. The first time you visit this section of the app, a brief explainer will show up. Future visits will show you a list of previously created filters.
Step 1: Pick a category for the filter.
Step 2: Choose a predesigned filter, then edit or add the text, and add emoji or Bitmoji. Almost everything on the screen can be adjusted or moved. Tap and swipe around to get the hang of it.
Screenshot by Jason Cipriani/CNET
Step 3: Pick a start and end time, along with a location for the filter. The app will default the location to the 20,000-square-foot minimum based on your current location. However, you can search for venues or adjust the location with the search bar at the top. As with the process via computer, the price will be adjusted as you adjust the size of the geofence.
Step 4: Give the filter a name, then submit it and wait for Snapchat's approval. I created a filter when working on this article and it was approved within a few seconds. You will receive an email once it's approved.
Step 5: Pay for the filter! Don't forget to open the app and process payment. Your filter will not show up until you've paid for it.
WhatsApp Status: Everything you need to know about the Snapchat clone
WhatsApp Status: Everything you need to know about the Snapchat clone
WhatsApp is rolling out a new Status feature to all users. Instead of the text-only status that lets people know whether you're busy or available to chat, the new Status feature uses photos, text, emojis and sketches to show what you're doing. If that sounds familiar, it could be because it appears to be inspired by Snapchat.
And unlike Snapchat and Instagram, WhatsApp can protect your Status updates with end-to-end encryption.
Here's what you need to know about the new feature.
When will I get the Status feature?
Screenshot by Jason Cipriani/CNET
When your account gets access to Status, you won't have to download or install an app update from the App Store or Play Store -- it'll just show up.
You'll know if you have access to Status on iOS when the Contacts tab gets replaced with a camera icon (see photo above), and the far-left tab reads "Status." Android users will see a new Camera icon to the left of the Chats tab, next to a new Status tab.
Who can see my Status?
Screenshot by Jason Cipriani/CNET
WhatsApp includes privacy settings, giving you complete control over who sees your Status. By default, only your contacts can view your Status, but the privacy settings let you change that.
With the Status tab selected on an iPhone, tap on Privacy. Android users, tap the menu button > Status Privacy.
You are given three options:
My Contacts: All of your WhatsApp contacts can view your Status.
My Contacts Except...: Select the people you don't want to show your Status to. This still shares your Status with the rest of your Contact list.
Only Share With..: Select only with the contacts you want to show your Status to.
If you change your privacy settings after uploading a Status, keep in mind the new settings will only impact future updates.
Viewing your friends' Statuses is a lot like Snapchat
If you already use Snapchat Stories or Instagram Stories, then you'll feel right at home with Status. Here are the basics:
To view a Status uploaded by your friend, open the Status tab. A list of friends who've shared a Status will fill in.
Touch the screen to pause a Status, giving you more time to view it, tap to skip through a Status, or swipe left to go to the next person.
Swipe up on a status to reply to the the Status you are currently viewing.
...And so is updating your Status
Screenshot by Jason Cipriani/CNET
WhatsApp Status includes all the familiar features of Snapchat and Instagram Stories -- stickers, text captions, drawings and more. Here's how to update your Status:
To add a photo or video to your WhatsApp Status, open the app and tap the camera icon. Take a photo or video, or pick one from your camera roll.
You can draw, write and place emojis on the photo. There's also an option to add a caption that will be shown on the bottom of the photo or video as your contacts watch it.
Finally, tap the paper airplane icon. You can either send your Status directly to a friend, as a photo or video within a conversation thread, or you can tap My Status at the top of the list to update your Status.
Videos can go longer than 10 seconds
Screenshot by Jason Cipriani/CNET
Instead of limiting your video status updates to just 10 seconds (like Snapchat), videos you record and share as a Status can be as long as 45 seconds.
And you can upload GIFs!
In the year 2017, supporting animated images, or GIFs, in an app is a requirement. As such, WhatsApp Status will accept GIFs you've saved to your camera roll or photos app. Select a GIF, trim it down if you need to, and share just as you would a regular, boring, photo or video.
Your Status will remain active for 24 hours, after which it disappears.
Sadly, there doesn't appear to be a way to save a Status to your phone. Whatever you capture and create in WhatsApp is limited to WhatsApp.
Find out who's viewing your Status
A view counter is placed at the bottom of your screen, showing you how many people have watched or looked at your status. You can swipe up on the screen to view a list of contact names who have viewed your Status.
You can get away with screenshots
Unlike Snapchat, WhatsApp does not alert you when a contact takes a screenshot of your Status. In other words, be conscious of exactly what you are sharing to your Status, just because it disappears from your Status after 24 hours doesn't mean no one saved a copy.
Check out our complete guide to Instagram Stories.
Snapchat's Spectacles are now available for purchase online. Here's our review.
It's no secret Snapchat is confusing to use. In fact, when Snap, the social media app's parent company, released its IPO filing documents earlier this month, the app's confusing user interface was listed as one of the risk factors for investors.
Lo and behold, on Friday, Snap released the user manual many bewildered Snapchatters (or their parents) have been asking for. It came in the form of a video, labeled "Snapchat Product Overview," in its "roadshow" materials -- the stuff it uses to convince potential investors to buy in.
"Making a Snap is simple," a friendly-voiced narrator says in the video as he takes more than eight and a half minutes to explain the app.
Among the things the video covers: how to record a video, how to use lenses and how to use a geofilter.
Watch the whole thing here.
CNET Magazine: Check out a sampling of the stories you'll find in CNET's newsstand edition.
Batteries Not Included: The CNET team shares experiences that remind us why tech stuff is cool.
Snapchat custom emoji ideas friend emoji ideas for snapchat snapchat friend emoji list snap chat emoji people snapchat friend emoji ideas what do the snapchat emojis mean 3956921 all emoji meanings on snapchat emoji next to snapchat snapchat emoji meanings snapchat sign up create account
Snapchat's emoji pins are crazy fun. Here's how to use them
Snapchat's emoji pins are crazy fun. Here's how to use them
Snapchat sensed you might be getting bored with swapping faces, so you can now stick emojis on moving objects in your Snapchat videos instead.
You've always been able to add emojis to your photo or video snaps, but now those emojis can move along with whatever face -- or thing -- you tie it to.
The end result makes something like this possible:
Fun, right? As you can see with the taco emojis (below), the emoji pins don't have to cover the selected object -- they can move around it too.
How to use Snapchat's emoji pin feature
To pin an emoji in Snapchat, record a video, ideally one that focuses on a moving object. It could be someone dancing or a dog running around (see above). Once you're happy with the video, tap the emoji icon at the top of the preview screen and select the one you want to use.
Twitter user @NoPattern used the new feature to fill his world with emoji tacos.
Twitter user @NoPattern.
I suggest re-sizing the emoji at this point. Once you pin it, it's harder to re-size it without having to re-pin. Next, long press on the emoji until the video pauses. Drag the emoji to the item you want it to follow. Snapchat will reload the video, and the emoji should follow along.
In testing, it's taken me a few tries to get Snapchat's tracking feature to work properly. I captured another video which started with my dog further away, but Snapchat couldn't track him until he got much closer. The new feature is easiest to use on videos that feature objects moving closer to the camera.
While you're learning new Snapchat features, read about the five hidden features that every Snapchat user needs to try.
Snapchat's emoji pins are crazy fun. Here's how to use them
Snapchat's emoji pins are crazy fun. Here's how to use them
Snapchat sensed you might be getting bored with swapping faces, so you can now stick emojis on moving objects in your Snapchat videos instead.
You've always been able to add emojis to your photo or video snaps, but now those emojis can move along with whatever face -- or thing -- you tie it to.
The end result makes something like this possible:
Fun, right? As you can see with the taco emojis (below), the emoji pins don't have to cover the selected object -- they can move around it too.
How to use Snapchat's emoji pin feature
To pin an emoji in Snapchat, record a video, ideally one that focuses on a moving object. It could be someone dancing or a dog running around (see above). Once you're happy with the video, tap the emoji icon at the top of the preview screen and select the one you want to use.
Twitter user @NoPattern used the new feature to fill his world with emoji tacos.
Twitter user @NoPattern.
I suggest re-sizing the emoji at this point. Once you pin it, it's harder to re-size it without having to re-pin. Next, long press on the emoji until the video pauses. Drag the emoji to the item you want it to follow. Snapchat will reload the video, and the emoji should follow along.
In testing, it's taken me a few tries to get Snapchat's tracking feature to work properly. I captured another video which started with my dog further away, but Snapchat couldn't track him until he got much closer. The new feature is easiest to use on videos that feature objects moving closer to the camera.
While you're learning new Snapchat features, read about the five hidden features that every Snapchat user needs to try.
Snapchat just made it super easy to design a custom shirt snapchat just made it super easy to design a research snapchat just made it super easy to design a banner snapchat just made it super easy to design a model snapchat just made it super easy chicken snapchat just made 4 snapchat justine winslow and brenda banks
Snapchat just made it super-easy to design a custom filter on the fly
Snapchat just made it super-easy to design a custom filter on the fly
Ever wanted to create your very own Snapchat filter for a party or wedding, but didn't know where to start? Instead of paying someone on Fiverr or Etsy to do it for you, Snapchat's new tool has filter templates you can create in minutes. You can go through the process on your computer, or use the Snapchat app on your phone.
From your computer
Screenshot by Jason Cipriani/CNET
To get started, visit geofilters.snapchat.com. You don't have to log in to your account to mess around with the templates and get an idea of how the process works. However, if you do log in you'll have access to your personal Bitmoji stickers.
Snapchat currently has filters for eight different categories: Graduation, summer vibes, wedding, bachelor(ette), birthdays, baby shower, celebration and love.
Step 1: Select a category, then find a filter that fits your personal tastes. Use the tools on the right side of the page to add your own text or change the placeholder text. Alternatively, you can upload your own filter creation. Click Next when you're happy with the filter.
Step 2: Choose the date and time you want the filter to be active for.
Step 3: Create a geofenced area using the map. Snapchat requires a minimum 20,000-square-foot area geofence and will let you know if you need to expand your selected area to meet its criteria. Custom filters start at $5.99 and increase in cost depending on size of the geofence and the amount of time the filter will remain active. Each time you adjust the size of the geofence, the price estimate will update to let you know the correct price.
Tip: Choose a geofence larger than the actual venue. Since GPS reception can be wonky -- especially at remote wedding locations -- a wider range helps make sure your guests don't miss the filter.
Step 4: Fill in the submission form, which requires a name for the filter and payment info. Snapchat will review your filter, and if approved, charge your payment info.
From the app
Screenshots by Jason Cipriani/CNET
Using the Snapchat app, the process is nearly the same, although a bit more streamlined. To view the On-Demand Geofilter tool in the app, open Settings and select On-Demand Geofilter. The first time you visit this section of the app, a brief explainer will show up. Future visits will show you a list of previously created filters.
Step 1: Pick a category for the filter.
Step 2: Choose a predesigned filter, then edit or add the text, and add emoji or Bitmoji. Almost everything on the screen can be adjusted or moved. Tap and swipe around to get the hang of it.
Screenshot by Jason Cipriani/CNET
Step 3: Pick a start and end time, along with a location for the filter. The app will default the location to the 20,000-square-foot minimum based on your current location. However, you can search for venues or adjust the location with the search bar at the top. As with the process via computer, the price will be adjusted as you adjust the size of the geofence.
Step 4: Give the filter a name, then submit it and wait for Snapchat's approval. I created a filter when working on this article and it was approved within a few seconds. You will receive an email once it's approved.
Step 5: Pay for the filter! Don't forget to open the app and process payment. Your filter will not show up until you've paid for it.
How to google something without a word search google without a word google maps without words how to get google to say words how to google with a picture how to create a google account without phone how to google translate 100 times how to draw how to take a screenshot how to screenshot on pc
How to Google Without Words: The Coolest Searches You May Not Know
How to Google Without Words: The Coolest Searches You May Not Know
When you think of "Googling," you almost certainly think of entering text and getting millions of results, so much so that the Google search page has become a cultural icon. But some of the most interesting Google results arise from images, live camera views, or the sounds around you, making them not only useful but a taste of what's to come in augmented reality and metaverses. Here's a quick look at ways to Google without words.
Image search
This is also called a reverse image search: Instead of searching for an image you search with an image. On the desktop, go to Google Images. There, you can drag and drop any GIF, PNG, JPG or WEBP image file into the search field. The results will include different sized versions of the image, sites where the image is found and images that are similar but not identical to it. You can use these results to identify what an image depicts, find higher-resolution versions of it or track down places where it's being used.
Google Images reverse image search will find many examples of an image you drag and drop to it.
Screenshot by Brian Cooley/CNET
Live camera search
Also called Google Lens, this is similar to image search above but uses a live image from your phone's camera instead of uploading an image file. The easiest way is to tap the Lens button on your Android home screen then aim your phone's camera at an object or scene. If you don't see the Lens button, you can add it to your phone via the official Lens app.
The Lens button should be right next to the search box and voice icon on most Android phones.
Brian Cooley/CNET
Most of the time Google will figure out what you're aiming it at and return results that include content and shopping links. It's a rudimentary cousin of augmented reality and a technique that's also used in the Amazon and Snapchat apps but Google results tend to be more agnostic than those two. To be fair, I find Lens to be a more brittle tool than image search, but when it works it can give you results you probably won't find any other way.
You can also use Lens to search text that you aim your camera at, or use the Google Translate app, which uses the same core technology to translate printed text into another language.
Google Lens image search is great for searching things you don't know the name or proper description of. Searching for "red power screwdriver" probably wouldn't have nailed it the way this Lens search did.
Brian Cooley/CNET
Background music search
Finding the name of a song that's playing is nothing new -- anyone can holler out, "Hey, Google, what song is this?" But the most elegant way of identifying music is one of the most overlooked tricks in Google's Pixel phones.
On a Pixel 2 or later Pixel with Android 10 or higher go to Settings > Sound and Vibration > Now Playing and activate the Identify songs playing nearby slider. While you're in there, turn on Show search button on lock screen. Now your phone will always be trying to identify the music around you and it'll show the title on your phone's lock screen.
The Android phone on the right automatically ID'd the song playing from the speakers of the phone on the left.
Brian Cooley/CNET
If it fails, you'll find a subtle new button on your lock screen that you can press to ID the music around you. And you'll find a history of all songs that have been detected around you when you click on the song title on the lock screen.
If you don't have a Pixel phone, there's at least one other way to graft it onto other Android devices via the Ambient Music Mod developed by Kieron Quinn and Varun Shanbhag. Installing it is not for the average phone user, however.
Snapchat time machine filter snapchat time machine the time machine app shmoop the time machine the time machine machine how long does the timer last on snapchat can you see how many times snapchat story what does the timer mean on snapchat snapchat stock snapchat sign up email snapchat stories
Snapchat's Time Machine AR lens creepily shows what you'll look like old
Snapchat's Time Machine AR lens creepily shows what you'll look like old
So far this year, we've been introduced to popular photo filters like Snapchat'sgender-swapping filter and the FaceApp challenge that makes you look super young or gives you wrinkles you're not ready to see. Now Snapchat has come out with Time Machine, a new filter that lets you swipe left and right to watch yourself age from a child to an adult, and finally to an older and grayer version of yourself.
Unlike the FaceApp challenge I tried, I don't see as many wrinkles as I "age" with this new Snapchat filter -- but I did get white hair, a wider face and saggy skin (ugh!). Somewhere in the middle of the aging timeline seems to be the best look for me.
Snapchat released the new filter earlier this week, so if you don't see it yet, you may need to update the app. Here's how to use it.
Katie Conner/CNET
1. Open the Snapchat app on your phone.
2. The camera screen should be the first to open, but if not, tap the bottom circle to launch the camera.
3. Select the smiley face icon.
4. Make sure the camera is facing you by tapping the rectangular arrows in the top right corner.
5. Multiple filters will appear, but the Time Machine filter will be one of the first options, so select that one. It's purple has a baby face and an older face in the icon.
6. Use the slider at the bottom of the screen to change the appearance of your age.
7. You can either snap one picture or you can record yourself as you go through an entire life cycle.
Now you can send your age timeline to all of your friends and family (and see if you'll look more like Mom or Dad in the future). You can also save your photo or video by pressing the arrow in the lower-left corner to save it to your photo album. Then you can upload it to Facebook or Instagram.
Want more filters to try out on yourself? Check out how to do the gender-face-swap and how to do the FaceApp challenge to make yourself look older.
Apple watch versus fitbit versa 2 apple watch vs fitbit versa fitbit versa vs apple watch 6 fitbit versa 2 size vs apple watch apple watch vs fitbit versa apple watch series 6 vs fitbit sense apple watch series 5 vs se 2022 apple watch series 5 vs 8 apple watch series 5 44mm apple watch series 5 vs 6 apple watch series 9 apple watch series 3
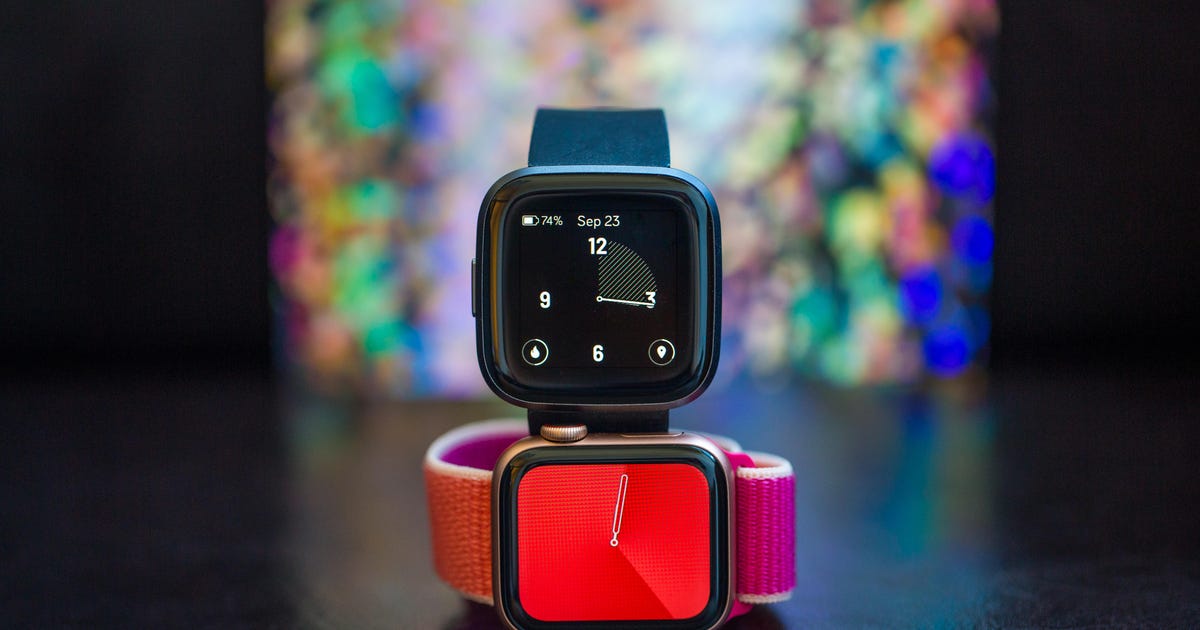
Apple Watch Series 5 vs. Fitbit Versa 2: Best smartwatch to give as a gift
Apple Watch Series 5 vs. Fitbit Versa 2: Best smartwatch to give as a gift
The Apple Watch Series 5 starts at $399 (£399, AU$649) and makes an ideal gift for an iPhone user who wants to keep an eye on their health and fitness goals, or get notifications from their phone. But the Fitbit Versa 2 costs half as much and has many similar features, plus it works across Android and iOS. I've been wearing both these watches for a few weeks to determine which one is better at tracking workouts, getting notifications and has the best battery life.
Read more:Best gifts for people who are obsessed with CrossFit
Angela Lang/CNET
A versatile hybrid that's equal parts smartwatch and fitness tracker, the Versa 2 adds a few improvements over the first version that make it a good option for Apple and Android owners alike. Like the Apple Watch, it too has an always-on display, but the battery will last more than twice as long. Expect at least five days between charges if you don't have the always-on display active. It also gives you built-in sleep tracking, Alexa support and Spotify control on your wrist.
Read the Fitbit Versa 2 hands-on.
All-day comfort so you can go from the office to the gym
The Apple Watch comes in two sizes (40mm and 44mm) while the Versa 2 just comes in one size. I have a fairly small wrist and found both of these watches very comfortable to wear all day. With the Versa 2, I hardly had to take it off at all because I could use it to track my sleep.
Want a wide range of finishes and straps to choose from? You'll find the biggest selection with the Apple Watch. Everything from aluminum and stainless steel to the more expensive ceramic and titanium finishes that cost upward of $800. The Versa 2 has three aluminum color finishes with a variety of straps.
Angela Lang/CNET
The Versa 2 gets a much nicer color AMOLED display than the first generation Versa and it's easy to see in bright sunlight when the brightness is turned to max. (The always-on display could be a little brighter for me during outdoor workouts, however.) Notifications and on-screen prompts are clear and legible.
The Apple Watch uses a color LTPO OLED Retina display. It also has Force Touch, so you can press on the screen to register different options.
They're both water-resistant to 50 meters (164 feet) so you can use them to track swims and they'll be fine if subjected to occasional splashes.
Fitbit still makes its straps pretty difficult to swap in and out, as they have tiny toggles, whereas the Apple Watch is simpler with a button to slide the strap in and out. The charging dock for the Versa 2 is also a pain. Not only is it not backward-compatible with older generations of Fitbit watches like the original Versa, the cord doesn't tuck underneath the dock neatly so it's next to impossible to get your watch to lie flat on the dock when it's charging.
Smart features put the Apple Watch a step ahead
If you like customizing the look of your watch face, the Versa 2 has a lot more options to choose from than the Apple Watch, including third-party watch faces. There's even a Bitmoji watch face that changes expressions depending on your activity or time of day (my personal favorite).
Both have an always-on display and, thanks to the latest Fitbit OS 4.1 update, the Versa 2 now gets the option of a color always-on display, like the Apple Watch. But the Apple Watch only makes it through one whole day with a little extra to spare when I have the always-on display active. That's with a 40-minute workout thrown in and regular use throughout the day getting notifications from my phone. The Versa 2 makes it two-and-a-half days with always-on active and the same usage. That goes up to five-and-a-half days when the display is set to raise-to-wake.
The always-on display on the Versa 2.
Angela Lang/CNET
Being smartwatches, both support voice assistants, though they handle that in a different way. With the Versa 2 you get Alexa support to control smart devices, check the weather, start a workout or set reminders. There's no speaker, so you'll have to read the screen to check responses. And it's kind of slow.
With the Apple Watch closely integrated with Siri, you can speak the wake word or hold the button to summon the assistant. You'll be able to hear Siri talk, send text messages, speak responses and do most of what Siri offers on your phone.
Of course, you'll also be able to customize what notifications come through from your phone on both of these watches. However, you will only be able to respond to notifications from the Versa 2 if you're on Android, not iPhone. Both allow you to accept and reject calls from your wrist, regardless of what phone you're tied to, but if you have the Versa 2 you won't be able to take the call on your wrist because there's no speaker -- you'll need to grab your phone.
For me, the biggest advantage that the Apple Watch has over the Versa 2 when it comes to smart features is built-in connectivity, both GPS and cellular, which means you can leave your phone at home and take calls, send messages or stream music on the go when doing an outdoor workout, for example. (It does come at an extra cost, however.) With Emergency SOS you'll also be able to call emergency services from your wrist and share your location, plus alert your emergency contacts. The Apple Watch Series 5 also offers a built-in compass.
Both offer music storage, although it's more complicated to pull across music to the Versa 2 from a computer than it is to use the seamless transfer offered between the iPhone and Apple Watch. You can also pay with your wrist thanks to Fitbit Pay and Apple Pay on the Versa 2 and Apple Watch respectively.
I've been testing the Apple Watch and Versa 2 primarily with an iPhone and definitely feel the Apple Watch was the faster of the two when it comes to syncing and transferring settings. Occasionally, I have noticed integrations with third-party apps such as Spotify and Snapchat for the Bitmoji face require me to log in and sync again through the Fitbit app.
Read about some of the other features offered in WatchOS 6 on the Apple Watch.
Fitness tracking is Fitbit's forte, but Apple has ECG
I have used both of these watches during a number of different workouts (Pilates, indoor spin class, outdoor runs and outdoor bike rides) and have been impressed with the results from both. During my outdoor run, for example, both gave fairly consistent results when it came to tracking my heart rate, although I did find the Apple Watch updated my heart rate slightly faster. I haven't yet tested these watches against the gold standard in consumer heart rate tracking, a chest strap.
The Versa 2, however, can show you what heart rate zone you're in during a workout, such as cardio or fat burn, which I appreciate. Only the Apple Watch offers you on-wrist cadence tracking so you can see your steps per minute, plus pace alerts for running that can notify you if you fall below your chosen pace. You can see your pace on the wrist for the Versa 2, but you won't get alerts.
Both watches can track plenty of different workouts and automatically detect certain activities like running or walking. I find it easier to see and interpret the data from my workouts using the Fitbit app rather than trying to search for it across the Activity app or Health app on iPhone.
Fitbit also offers the Coach app (you'll need to download and sync it across to the watch from the Fitbit app) which puts three free workouts with visual guidance on your wrist. This hasn't changed since the first Versa but it's still a nice touch for those who might not have time for a full workout. You can pay for a Fitbit Premium subscription ($9.99 a month in the US) to get more workouts.
Sleep tracking on the Versa 2.
Sarah Tew/CNET
Sleep tracking is only available natively on the Versa 2 and I really like how Fitbit shows you a breakdown of your different sleep stages, such as REM and deep sleep, plus gives you a sleep score out of 100. Thanks to the latest OS 4.1 update, you can now see your sleep score on the Versa 2 and the watch now has a feature that vibrates to wake you at the optimal time in your sleep cycle (within 30 minutes of your alarm). Fitbit calls this smart wake.
Unfortunately the app won't tell you much about how to improve the sleep score (apart from some standard prompts to go to bed on time) unless you have a Fitbit Premium subscription which has more advanced sleep tools and analysis.
I also found that there was sometimes a variance between how I felt and the sleep score: For example, one night I got 8.5 hours of rest and felt great in the morning, but my sleep score was in the low 60s. The sleep score does take into account your restoration, which is sleeping heart rate and how much you toss and turn during the night. (Maybe I'm an overly active sleeper, because my restoration score showed a lot of restlessness.)
The Apple Watch helps you keep tabs on your daily activity using a ring-based system, which hasn't changed since the first generation. On the Versa 2 you can find your daily metrics in the Today section by swiping down from the main screen.
As for health and heart tracking in particular, the Apple Watch Series 5 pulls ahead. With a built-in ECG (electrocardiogram) that's FDA-cleared, the watch can also detect high, low and irregular heart rates and notify you accordingly. It also has fall detection. Both watches offer menstrual cycle tracking, although you can't log details on the Versa 2 like you can on the Apple Watch. Instead, you'll need to do that in the Fitbit app.
Which one's right for me?
Considering the Versa 2 costs half as much as the Apple Watch Series 5, if money is your concern, then this is the watch for you. Especially because it works across Android and iOS. It also has a wide range of activities that it can track and the Fitbit app makes it really easy to see your fitness metrics.
For runners, or those who want to leave their phone at home and stream music on the go, make calls or send messages, the Apple Watch with built-in LTE is the clear choice. It also has the benefit of ECG in certain countries.
Also, now that Apple has reduced the entry price of the Apple Watch Series 3 (which also has GPS and an LTE option) to $200, it's another good option for Apple users who want the tightest integration with an iPhone.