DJI Phantom 3

what is machine reading

Embark on a Quest with what is machine reading

Step into a world where the focus is keenly set on what is machine reading. Within the confines of this article, a tapestry of references to what is machine reading awaits your exploration. If your pursuit involves unraveling the depths of what is machine reading, you've arrived at the perfect destination.

Our narrative unfolds with a wealth of insights surrounding what is machine reading. This is not just a standard article; it's a curated journey into the facets and intricacies of what is machine reading. Whether you're thirsting for comprehensive knowledge or just a glimpse into the universe of what is machine reading, this promises to be an enriching experience.

The spotlight is firmly on what is machine reading, and as you navigate through the text on these digital pages, you'll discover an extensive array of information centered around what is machine reading. This is more than mere information; it's an invitation to immerse yourself in the enthralling world of what is machine reading.

So, if you're eager to satisfy your curiosity about what is machine reading, your journey commences here. Let's embark together on a captivating odyssey through the myriad dimensions of what is machine reading.

Showing posts sorted by date for query what is machine reading. Sort by relevance Show all posts

DJI Phantom 3 Advanced Review: The Sweet Spot For Features, Performance And Price


Dji phantom 3 advanced review the sweet spot for intermittent dji phantom 3 advanced review the sweet spot for achievement dji phantom 3 advanced review the lincoln dji phantom 3 advanced manual dji phantom 3 advanced vs professional dji phantom 3 standard dji phantom 3 firmware update dji phantom 3 advanced
DJI Phantom 3 Advanced review: The sweet spot for features, performance and price


DJI Phantom 3 Advanced review: The sweet spot for features, performance and price

DJI currently has three versions of its Phantom 3 drone: the Standard , Advanced and Professional . While there are several important differences between the entry-level Phantom 3 Standard ($799, £649 or AU$1,299) and its two linemates, the feature gap between the Professional and Advanced amounts to two things.

The Phantom 3 Professional shoots video in 4K (3,820x2,160-pixel) resolution and has a 100-watt battery charger. It retails for $1,259, £1,159 or AU$1,950. The Advanced captures video in 1080p (1,920x1,080) and has a slower 57-watt charger, but costs $999, £899 or AU$1,550. That's it.

The 4K video from the Professional is a step up from the Advanced's full-HD results. But it's not a big step up, and unless you want or need the extra resolution and have a computer powerful enough to play and edit 4K video, the Advanced's 1080p video doesn't disappoint. And since the drones' features and controllers are the same, the Phantom 3 Advanced is as easy to recommended as it is to fly. Which is to say it's really easy.

Joshua Goldman/CNET

Design and features

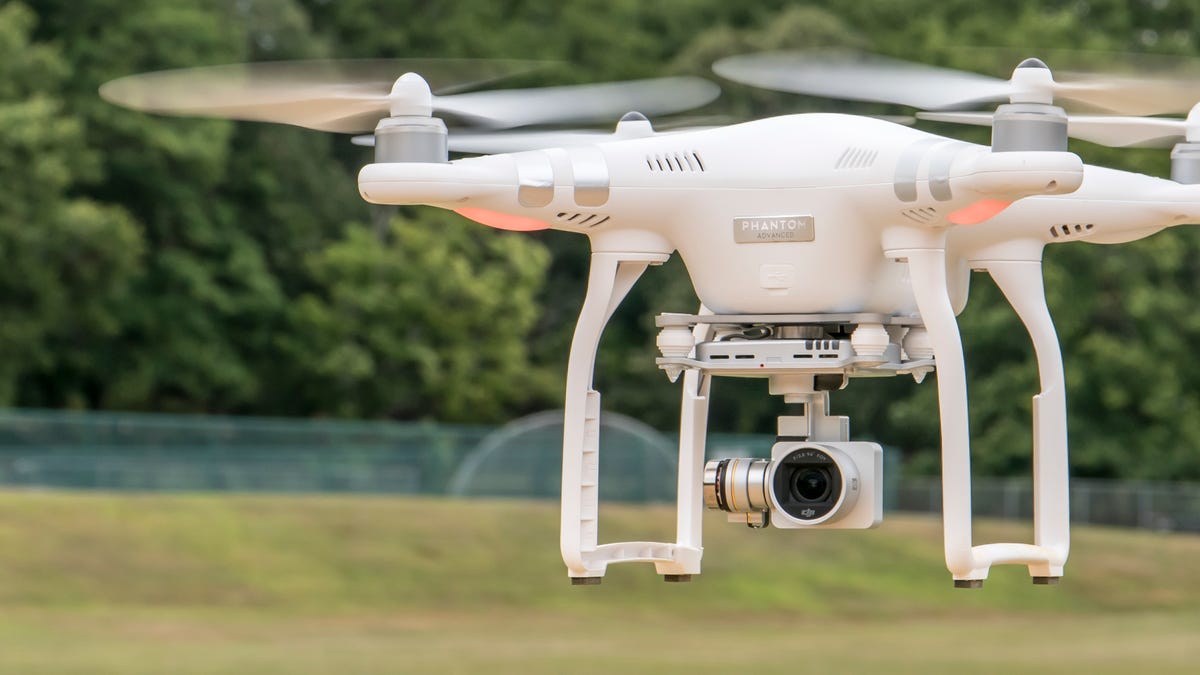
The quadcopter itself is, for the most part, unchanged from its predecessor, the Phantom 2 Vision+. You'll find all the same convenience features like color-coded, self-tightening propellers for easy installation and replacement, and a slot-loading battery pack, though it's a newly designed battery making the Phantom 2's batteries incompatible with the 3.

The three-axis gimbal on its belly stabilizes the camera in roll, pitch and yaw directions keeping the video looking smooth even with sudden stick movements or wind gusts. Plus, the camera can do a 90-degree tilt, letting you shoot straight down, straight ahead and anywhere in between. The camera is permanently attached to the gimbal, so if you irreparably damage one or the other, you'll have to replace the entire gimbal-and-camera assembly. It also means you don't have the option of using the camera for anything else, unlike models that use GoPro or other small cameras such as 3D Robotic's Solo or EHang's Ghost.

The Advanced's camera features a Sony-made 12-megapixel 1/2.3-inch CMOS sensor behind a new f2.8 20mm lens (35mm equivalent), which gives you a 94-degree field of view. That's much narrower than the Vision+ camera's 140-degree field of view resulting in far less distortion.

Joshua Goldman/CNET

Sitting to the back of the gimbal is the new Vision Positioning System, a set of sensors to help the Phantom 3 hover while indoors when GPS isn't available. There are many caveats for it to work properly, however, such as not flying over sound-absorbing materials, water or highly reflective surfaces. It's also only effective up to about 10 feet (3 meters). If you're thinking of getting the Advanced to fly above crowds in an arena or auditorium, you better up your piloting skills first.

When you're outside, GPS is used to help the drone determine its position and yours and is what makes it possible for the drone to stop and hover in place when you release the controller's sticks as well as delivering accurate location data for safety features like automatically returning to a home position. The more satellites it can lock onto, the better off you are, so DJI added the Russian navigational system, GLONASS, which lets it tap into more satellites than GPS alone.

Satellite acquisition speeds are noticeably faster compared to the Phantom 2 Vision+, so you can lock on and start flying more quickly. Also, with the Vision+ there were times I would struggle to get a solid lock on six satellites (the minimum for GPS-assisted flight). The Advanced never had a problem grabbing onto 10 satellites or more in a matter of seconds and regularly had upward of 15 in my testing. This makes a huge difference when it comes to putting the drone in the exact position you want for photos and video.

Joshua Goldman/CNET

The controller and DJI Go mobile app (formerly called Pilot) are important, too, of course. The Advanced and its controller have DJI's Lightbridge technology for better image transmission between the sky and ground. Lightbridge allows for a continuous connection back and forth between the two and increases flight range over the wireless range extender used for the Phantom 2 and the entry-level Phantom 3 Standard. This does mean you'll need your iOS or Android device's charging cable to use it, but the performance improvement is well worth it.

On each of the top corners you'll find discrete camera controls for starting and stopping recordings, taking pictures, reviewing your shots and two wheels, one for adjusting exposure compensation, ISO and shutter speed and the other for the gimbal's tilt. Two customizable buttons are on the bottom as well that can be used for a handful of gimbal or camera functions. Overall it's a great setup, but more than a few times I accidentally switched to playback mode while trying to snap a photo.

DJI also included a Return-to-Home button for those times when panic starts to set in and you just want to bring it on back. The controller's battery is built in and will last through several flights before you'll need to recharge it. DJI simplified charging, too, using one power supply with two cables attached: one for the controller's battery and one for the drone's.

Andrew Hoyle/CNET

Connecting your iOS or Android smartphone or tablet is as simple as plugging in your device's charging cable into the USB port on the Advanced's controller. (It'll keep your device charged while you use it for flying, too.) Then, with the controller and drone turned on, you just open the DJI Go app and tap to get the camera view.

The controller's device mount can handle phones and tablets big and small, however the app is optimized for use with the iPhone 5S, 6 and 6 Plus. Android device support is thin, with just the Samsung Galaxy S5 and Note 3, Sony Xperia Z3, Google Nexus 7 II, Google Nexus 9, Xiaomi Mi 3 and ZTE Nubia Z7 Mini listed. I tested with both a 6 Plus and a Galaxy S5 and the app performance was clearly stronger on the iOS device with the S5 occasionally freezing up forcing me midflight to restart the app.

In addition to a first-person view from the camera, you get complete camera controls, meters for signal strengths, GPS and battery life and access to settings for the whole system. It will also notify you if a firmware update is necessary (which occur with some regularity) and, eventually, you'll be able to do the updates through the app; currently they're done by downloading a file to a microSD card and popping the card into the drone's camera.

The app can also be used for automated take-offs and landings, if you don't want to handle them with stick commands, and triggering the Return-to-Home safety function. Another new safety feature of sorts is the Beginner Mode. This sets up virtual barriers called a geofence with a maximum altitude and flight distance of 30 meters (98 feet), giving you a safe way to limit where the drone can travel. It's pretty amazing to see in action as you send the Phantom full throttle toward its limit and the drone stops as if it's been snagged in an invisible net.

As for the camera settings, video recording options include full HD (1,920x1,080-pixel) and HD (1,280x720-pixel) resolutions at 24, 25, 30, 48, 50, 60 frames per second and you can choose between MOV or MP4 formats. Thanks to the Lightbridge technology, you can even use it to live-stream video straight to YouTube and uses your mobile device's mic for capturing audio.

Joshua Goldman/CNET

For photos, you can capture in JPEG, DNG raw format or both simultaneously. Shooting modes include single shots or bursts of three, five or seven; HDR and auto exposure bracketing (0.7EV bias) of three or five pictures; and time-lapse continuous shooting at 5-, 7-, 10-, 20- and 30-second intervals. You can also control ISO, exposure compensation and white balance.

At the time of this review the Phantom 3 Advanced (and Professional) didn't have DJI's Intelligent Flight features including waypoint navigation, point of interest (POI) flight planning or Follow Me function, but these are now available.

Waypoint navigation lets you set up a multipoint path for the drone to follow while you control the camera, while POI flight planning allows you to autonomously fly a circle around a subject, keeping it centered. Follow Me sets the drone to track your movement based on your orientation. Support for SDK apps already created by third-party DJI developers is available as well, giving the Advanced more features and future potential.

Joshua Goldman/CNET

Flying

If you're reading this review, you probably already know that DJI's Phantom quadcopters have a reputation of being extremely easy to fly (and fly away, but it's something I've never experienced). With the Phantom 3 the experience has only improved.

DJI has added a flight simulator to the mobile app (iOS only) that you can use to learn your way around the app and controls. I found it to be a little frustrating because the actual drone performs so much better in real life. Regardless of safety features and how stable the Phantom 3 is, I highly recommend taking your first flights out in an open area where there are no people or distractions.

Again, if you don't want to use stick commands, you can takeoff and land with a tap and a swipe on your screen. With GPS, the drone will just sit and hover wherever you leave it. Start flying a bit too close to a tree and you can just let go of the sticks and it will stop while you regroup and steer away. You can fly without GPS, but if you release the sticks the Phantom won't stop but instead continues to drift in the direction it was last headed. It's a gut-wrenching experience watching $1,000 float away seemingly uncontrollably, so it's best to fly with GPS until you fully understand the controls.

Joshua Goldman/CNET

The app is well laid out and at a glance you can see all the information you need. There's even a battery timeline meter giving you estimates on everything from remaining flight time to the power required to return home or land.

Speaking of battery life, DJI says you'll be able to get up to 23 minutes of flight time. I was able to get to just under 21 minutes of flying -- nothing too aggressive, mostly hovering in place and in light wind -- before it took over and landed itself. That flight time is very good when you factor in all that it's doing to stay in the air while recording video. It does feel short, though, especially if you're trying to get out some distance for a picture and still make it back. And extras are pricey at around $149, £125 or AU$205 each.

Video and photo quality

Closely examining the 4K video of the Phantom 3 Professional or DJI's higher-end Inspire 1 straight from the camera against the 1080p clips from the Advanced, there are noticeable differences, mainly in the level of fine detail and sharpness of subjects. There is better detail from the 4K and it's especially visible if you're viewing on a large TV or monitor. So, if it's necessary for you to capture the highest quality video without ponying up a ton more cash, the Phantom 3 Professional is the better choice.

Frankly, though, the full-HD clips from the Advanced look pretty great as do its photos, and they're more than suitable for sharing online and/or viewing on a phone, tablet or laptop. It's also a huge jump in quality from the Phantom 2 Vision+. For those considering an upgrade from that model to the Professional, your needs might be met with the less expensive Advanced.

Joshua Goldman/CNET

The live-streaming quality to YouTube is just OK. You have to have a pretty strong wireless connection to keep the video moving smoothly and even then the results were a bit glitchy and compressed. Still, it's sort of amazing it can do it at all and could be helpful for professional uses.

Lastly, whenever you record a video, a compressed 720p version is stored to your mobile device. To help make the most of these clips, DJI built in a basic video editor to the Go app. You can use it to cut up your clips, gather them up and then combine them into one movie. DJI also included some style templates with music you can apply before you save. Then you can just share away.

Joshua Goldman/CNET

Conclusion

The DJI Phantom 3 Advanced is a great little aerial photo and video machine, however it's the whole system -- the drone, the controller and the app -- that make it so easy to pick up and just start flying. It's not inexpensive, but compared with the $900 Parrot Bebop with its Skycontroller , you won't regret spending the extra money. And if you don't need the Professional's 4K video, you can put your money toward a spare battery or two so the good times don't come to an end after 20 minutes.


Source

https://nichols.my.id/how-to-download-draft-tiktok.html

.

The Most Accurate Calorie Burn Tracker Isn't A Smartwatch -- And You Can Make One Yourself


Most accurate calorie tracker best calories burned tracker most accurate calorie tracker calorie burn tracker watch best fitness tracker to track calories burned most accurate calories burned watch most accurate food calorie counter the most accurate bible the most accurate thermometer the most accurate psychic readings the most accurate dna ancestry test
The most accurate calorie burn tracker isn't a smartwatch -- and you can make one yourself


The most accurate calorie burn tracker isn't a smartwatch -- and you can make one yourself

Smartwatches are great tools for keeping track of your activity. They can monitor your heart rate during a workout and track your sleep, and some even help manage workout recovery. But severalstudies show smartwatches and fitness trackers don't do as good of a job at calculating calorie burn during activity and can be off anywhere between 40% to 80% of your actual energy expenditure. 

A new wearable developed at Stanford University claims to be far more accurate. It's not worn on the wrist -- you put it on your leg.

That's because it measures leg motion, where most of your energy is used during lower body exercises like walking, running, climbing stairs and cycling. It uses two inertial measurement units (IMUs) plus a battery unit and microcontroller worn on the hip. Definitely not as convenient as strapping on a wrist-based smartwatch or tracker, but it's the first proof of concept developed by Stanford University graduate student Patrick Slade. 

Measuring calorie burn accurately is important for a number of reasons, but mainly because it can help people manage their weight. "We want to understand the connection between physical activity and obesity so we can develop new interventions to help people live longer, healthier and more fulfilling lives," says Steve Collins, associate professor of mechanical engineering at Stanford University, who co-authored the findings with Slade.

Naturally, I wanted to put this system to the test to see if a tracker worn on my leg could really be more accurate at estimating calories burned than one on my wrist.

stanfordwearable

Stanford graduate student Delaney Miller wearing the leg tracker.

Andrew Brodhead

Measuring calorie burn is complex

Most consumer wearables use heart rate and wrist-based motion to calculate calorie burn during activity. But heart rate isn't directly related to the energy you are expending, says Slade. "Your heart is just pumping blood through your body and has a bunch of different factors that affect it," he says. "How tired you are, if you had coffee, worked out, this time history makes it really volatile."

legwearable

Despite the wires, the tracker didn't get in the way during my workouts and is lightweight.

Lexy Savvides/CNET

Instead, his system breaks down motion into each step, then uses a machine-learning model to calculate energy expenditure. It was tested with over a dozen participants of varying ages and weights and averaged 13% error, compared with 40% to 80% error from consumer wearables.

To test its accuracy for myself, I've come to Stanford University's human performance lab, filled to the brim with a range of sophisticated workout equipment including an antigravity treadmill. But for the purposes of testing out this new wearable, only regular gym machines like a stair climber and exercise bike are needed. I'll be doing four workouts for 5 minutes each: walking, running, cycling and stair stepping.

Putting on Slade's system is straightforward. You strap two stretchy bands with the IMUs on your thigh and shin, then wrap a controller and battery around your waist. It feels like I have a small smartphone strapped to my midsection and I don't even notice the wires running down my legs. 

I also put on a lab-grade respirometer to measure my actual energy expenditure. This monitors the carbon dioxide I breathe out and the oxygen I breathe in to give me what Slade calls the "ground truth" reading, or my actual calorie burn. It costs tens of thousands of dollars and weighs about 5 pounds complete with mask and backpack, so it's not really the best tool for people to use outside the lab.

Finally, I strap a smartwatch to my wrist to get its calorie estimations. After my workouts, we'll compare results from all three devices. 

Once we get a baseline reading from the respirometer, I start working out. I know I'm not going to be setting any pace records with all these tools strapped to my body, but fortunately that doesn't matter -- we're only tracking energy expenditure.

The results are in -- and they're surprising

After gathering all the data points from each device, Slade walks me through the results. For running, the respirometry device said I burned 87 calories, the leg wearable 66 calories and the smartwatch 52 calories. You can see the rest of the calorie counts per exercise in the video on this page, but across all four workouts, the leg wearable error rate was 14% compared with 58% from the watch on my wrist. Turns out the watch was underestimating my overall calorie burn during each exercise, but Slade tells me it could overestimate for someone else. "People can't necessarily just scale the smartwatch estimates by a fixed amount to make them accurate for everyone," he says.

For now, this leg-based system only works for lower-body exercises, but he's already thinking of ways to make a version that can also take into account upper-body movement like weightlifting. "Maybe using an IMU in your smartwatch to get that arm motion, if you're doing a rep you could perhaps use the same modeling approach," he says. The research paper also encourages smartwatch engineers to use its method to improve calorie tracking effectiveness.

You can't buy this new wearable, but you can make it yourself. All of the instructions and code were made available in the hopes this will help speed up development. Slade is also working on a smaller and lighter version that could be integrated into clothing and maybe even use a smartphone as the controller.

For these sorts of trackers viable, they'll need to be affordable and small enough to wear all day, so we can track our energy expenditure on a second-by-second basis. "So you can really understand which activities led to the energy expenditure and how intense it was," Collins tells me. The end goal? By tracking our activity more accurately, wearables will be able to give us personalized insights into how to exercise or manage our weight.


Source

https://reinavietc.kian.my.id/

.

Keurig Coffee: 4 Tips To Make It Taste Better


Using regular coffee in keurig using regular coffee in keurig how to brew coffee in keurig keurig coffee how to use using your own coffee in a keurig coffee for a keurig keurig coffee maker manual
Keurig coffee: 4 tips to make it taste better


Keurig coffee: 4 tips to make it taste better

Keurig coffee makers  are ridiculously convenient. Drop in a pod, press the button and seconds later you have a steaming cup of joe in your hands. Quality and flavor, on the other hand, are not Keurig's strengths. Pods can spend months on store shelves or in your pantry, a far cry from what you'll get with beans that are freshly roasted and ground. Worse, Keurig K-cups contain less grounds than needed for brewing ideal java.

That said, there are definitely things you can do to get the most out of your machine. From preheating it and reconsidering your water supply to choosing the right settings and accessories, this guide has tips you'll certainly want to try.  

Check your tap water quality with a TDS meter.

Brian Bennett/CNET

Use water that's pure

You can't make a good cup of coffee without using clean, pure water. One way to confirm the quality of your water supply is to check with your local utility. That's no problem here in Louisville, Kentucky, where the city water company takes its mission seriously. After all, superb bourbon requires water that's top-notch. 

Another way to check your tap water is to test it yourself. The easiest method is to use a TDS meter. These handheld devices measure the total amount of dissolved solids, or TDS, in water by checking for electrical conductivity. The more impurities present, the more conductive a water sample will be.

According to the Environmental Protection Agency, the maximum TDS level for drinking water should not exceed 500 parts per million. Anything higher is associated with water hardness, staining and a salty taste. 

A quick reading at my kitchen tap came in at a solid TDS of 185 ppm. While that number is slightly outside the Specialty Coffee Association's brewing regulations, it's well below EPA guidelines. To get that value down even further I could use bottled or filtered water.

Preheat the machine

Extracting flavor from coffee grounds is a tricky job, so before you brew your first cup of the day, it's a good idea to give your Keurig machine some assistance by preheating it. The reason why is simple: Good coffee requires water that's hot enough to extract flavor the moment it hits the grounds -- ideally between 195 and 203 degrees F (90-95 C). 

The easiest way to help that to happen is by running a pod-free brew cycle first. It sounds like a minor step, but it makes a difference. Water that exited my Keurig machine's second cycle was a full 10 degrees hotter than the first time around.

There was only 11.1 grams of ground coffee in this K-cup.

Brian Bennett/CNET

Brew it stronger

One key failing of Keurig coffee pods is that they contain a relatively small amount of coffee. For example, my Keurig Donut Shop K-cup came with 11.1 grams (0.39 ounces) of grounds. For a standard 12-ounce cup of joe, I typically use roughly twice as much (20 grams). Anything less than that tastes weak and watery.

Brewing a 12-ounce cup from one Keurig pod makes weak joe.

Brian Bennett/CNET

If your Keurig brew gives you multiple cup size options, choose the smallest available to eke out a more concentrated brew. For instance, a 12-ounce cup brewed from one Donut Shop pod had a low TDS percentage of 0.8%. When I made a smaller, 8-ounce cup with an identical K-cup, I measured a TDS percentage of 1%.

That's still below the SCA's golden cup standard (1.15-1.35% TDS), but even so, it was an improvement over cup No. 1 -- and one that I could taste. 

Put fresh coffee in your pods

One last, simple way of getting around the deficiencies of disposable K-cups is to skip them altogether and get a reusable one that you fill with your own coffee grounds. Plenty of companies sell them -- even Keurig hawks its own model. There are lots of different styles to choose from, too. You'll find everything from inexpensive plastic K-cups all the way up to fancy, stainless steel K-cups.

You'll no doubt brew better coffee than before with an accessory like that (not to mention the environmental benefits). For best results, get a good coffee grinder and grind your own beans right before you brew, and use about twice as much of the grounds as you'll find in a typical K-cup. Your taste buds will thank you.


Source

6 Tips To Use If You Want To Fall Asleep Faster


6 Tips to Use if You Want to Fall Asleep Faster


6 Tips to Use if You Want to Fall Asleep Faster

How did you sleep last night? The question typically goes one of two ways -- well enough or terrible. On nights when you can't seem to fall asleep, you'll do just about anything to make it happen. And sometimes, counting sheep doesn't cut it. Use these six tips to fall asleep easier each night. 

1. Use breathing techniques 

CNET Sleep Tips logo

Don't worry if you don't fall asleep immediately when you slip between the sheets. For most people, it takes 15 to 20 minutes to fall asleep. Breathing techniques are an effective way to relieve stress and relax. Some methods -- like 4-7-8 breathing -- are specifically designed to help you sleep better

There are also guided meditation apps designed to help you sleep. Popular apps like Calm and Headspace have guided meditations that can help you drift off to sleep. Calm has celebrity sleep stories that feature favorites like Harry Styles, Matthew McConaughey and Emma Thompson. 

2. Get out of bed

This one seems counterintuitive, but trust me. If you are awake after 20 minutes of trying to fall asleep, it's best to get out of bed. The last thing you want to do is associate your bed with scrolling through social media or watching TV. You want to save your bed for sleep.

Get out of bed and do something that relaxes you -- maybe that's light yoga or reading a book or listening to music. You want to avoid screens as much as possible. You shouldn't get back in bed until you are tired enough to fall asleep. 

3. Adjust the temperature of your bedroom

Research shows that the best temperature for sleep is between 60 and 67 degrees Fahrenheit. When your room is too warm, it can impact your body's natural thermoregulation process and keep you awake. 

If you are lying in bed and can't seem to fall asleep, check the temperature in your room. Then, don't jump right back in bed after you adjust the temperature. Let the room get cooler before you try to go back to sleep. 

4. Try a white noise machine

If you're easily distracted by sounds -- like road noises or a family member who is still awake, you may want to try a white noise machine. White noise machines help you sleep by replacing intrusive noises with consistent calming ones -- think babbling brooks and rain. You can also opt for true white noise, which encompasses all the frequencies the ear can hear. 

Man having a late night snack in front of an open refrigerator
Getty Images/domoyega

5. Be careful with the nighttime snack

When you can't fall asleep and get out of bed, it's easy to wander to the refrigerator and see what's inside. It's better to skip that late-night snack. However, if you need to eat, be careful what you choose. You want to avoid foods that are loaded with sugars or processed carbohydrates. 

Some foods contain melatonin and can help you sleep. These include milk, almonds and kiwis. As a rule, you want foods with slow-digesting proteins, like yogurt and peanut butter, or high-fiber carbs like whole grains, fruits and vegetables.

6. Consider a new mattress

Mattresses don't last forever . Typically, they have a lifespan of about seven to eight years. After that point, they stop giving you the comfort and support you need to get a good night's sleep. If you notice that you aren't getting quality sleep regularly, your mattress might be to blame. 

Key signs you need a new mattress

  • You have trouble falling asleep at night.
  • Your back hurts when you wake up. 
  • If your mattress is sagging or asymmetrical. Look for lumps of impressions of where you sleep. 
  • Your mattress is loud -- it groans and pops when you toss and turn. 

The information contained in this article is for educational and informational purposes only and is not intended as health or medical advice. Always consult a physician or other qualified health provider regarding any questions you may have about a medical condition or health objectives.


Source

Tags:

These 5 Tips Make Sleeping With A CPAP Machine Easy


These 5 Tips Make Sleeping With a CPAP Machine Easy


These 5 Tips Make Sleeping With a CPAP Machine Easy

Sleeping with a CPAP machine can be annoying -- the mask covering your face, the hose tethering you to a machine that grumbles beside your bed. We get it. Undeniably, they can be a hassle, and that's a big reason why people opt to sleep without them. Up to 35% of people don't use their prescribed CPAP machine as intended. Some people only use it for a few hours each night, while others disregard it entirely. 

CNET Sleep Tips logo

We don't recommend doing that. Ignoring sleep apnea is serious as heart disease and high blood pressure. Instead of compromising your sleep quality and health, use these quick tips to make sleeping with a CPAP mask part of your routine. 

1. Pick the right mask style

The good news is that CPAP machines have come a long way from the clunky old noise machine with a huge face mask. Newer models are very quiet, and there are various mask styles you can choose from. Modern CPAP machines offer mask variations that allow you to choose what works best for you.

Common CPAP mask styles: 

  • Full-face masks: This coverage option is what people expect from CPAP machines. It covers both your mouth and nose. It's a good option for people with nasal congestion or those who breathe through their mouths at night. 
  • Nasal mask: This mask only covers your nose. It's well suited for people who move around in their sleep. 
  • Nasal pillow mask: This mask has the smallest face covering -- it sits across your upper lip and nostrils. This option is great for people who feel claustrophobic in full coverage options or wear glasses. 
  • Oral mask: This mask covers only your mouth and is best suited for people who breathe out of their mouth at night.

Keep in mind what position you sleep in when choosing the style of mask. If you sleep on your stomach or side, the larger masks with various straps may push against your pillow.

2. Make sure your mask fits properly

Once you know which mask style best fits your needs, you must ensure it fits. An ill-fitting mask is uncomfortable and can leave you with a dry, stuffy nose. If you notice red marks on your face, it's too tight. On the other hand, you won't get the benefits CPAP machines offer if the mask is too loose. 

Make adjustments each night until you find the perfect fit. When you adjust your mask, you should do so while lying down with the mask on your face. If you are having trouble getting your mask to fit properly, your doctor will be able to help you adjust the mask accordingly. 

Woman adjusting her CPAP mask before going to sleep.
Getty Images/cherrybeans

3. Practice wearing it during the day

When you first put on a CPAP mask, it can feel a bit like having a facehugger from Alien clamped to your face. It takes time to get used to. The last thing you want to do is save the adjustment period for when you are trying to fall asleep. Instead, start wearing it during the day so you get used to the sensation of being on your face. Wear it while you're watching TV or reading a book. Soon enough, you won't notice it at all. 

If you find that you can't tolerate wearing it during the day, try breaking it down into steps. Start with just the mask -- no hose or straps. Then slowly attach the hose and straps to the process.

4. Use the 'ramp' feature

CPAP machines are designed to push air into your airways to keep them from collapsing from sleep apnea. For some people, the feeling of forced air is hard to tolerate, especially in the beginning. Many CPAP machines have a "ramp" feature that starts with lower air pressure as you fall asleep and increases through the night. Work with your doctor to find your prescribed optimal pressure for your sleep apnea.

5. Be patient

Getting used to sleeping with a CPAP machine is an ongoing process that you should measure in terms of small steps. No one brings home their brand-new CPAP machine and immediately sleeps eight uninterrupted hours with it on. CPAP machines can help you sleep better and ultimately improve your health in the long run. Despite the sometimes annoying CPAP struggles, you'll feel more rested if you sleep with it.

The information contained in this article is for educational and informational purposes only and is not intended as health or medical advice. Always consult a physician or other qualified health provider regarding any questions you may have about a medical condition or health objectives.


Source

Tags:

Best Wi-Fi 6 Routers Of 2022


Best Wi-Fi 6 Routers of 2022


Best Wi-Fi 6 Routers of 2022

The good ol' 802.11 standard we commonly call Wi-Fi gets updated every several years with new features and faster speeds. The latest iteration (802.11ax) arrived in 2019, marking the sixth major generational update, and the Wi-Fi industry dubbed it Wi-Fi 6 to make things less complicated and easier to identify for customers.

Since then, Wi-Fi 6 has established itself as the de facto standard for next-gen gadgets. Just about every new phone and computer release supports it, and we're starting to see support pop up among peripheral devices, too. Did you pick up an Apple TV 4K or Amazon Fire TV 4K Max media streamer last Black Friday? Both of those support Wi-Fi 6. Have you managed to score a new PlayStation 5 console yet? That's a Wi-Fi 6 gadget, too.

Wi-Fi 6 devices like those are backwards compatible with older routers, but if you want to unlock their full potential, then you'll need a Wi-Fi 6 router running your home network. That was an expensive proposition back when Wi-Fi 6 first arrived, but not any more. Shop around, and you'll find a number of options available for less than $100, as well as mesh systems, gaming routers, range extenders and more. Some do the job better than others -- but that's where we come in, with comprehensive, hands-on tests to help identify the best upgrade picks for the money. 

Expect regular updates to this post as we continue to put Wi-Fi 6 to the test in 2022. Whenever we find a new router that merits consideration, we'll add it to the list. For now, here are the models I'd recommend for anyone making the purchase in August 2022.

Ry Crist/CNET

When a router supports Wi-Fi 6, that means that it's capable of using new features like OFDMA and 1024-QAM to deliver faster speeds and lower latency to busy networks with lots of connected devices. That's true even with the budget-priced value picks -- and among those, the one that performs the best is the TP-Link Archer AX21.

Currently priced at $100 and on sale for $70, the Archer AX21 did an outstanding job in my at-home speed tests. At the end of multiple days of tests across five spots in my house, the Archer AX21's average download speed on a 300Mbps fiber network was a near-perfect 299Mbps. That includes triple-digit download speeds in the very back of my house, a common dead zone where a lot of the routers I test struggle to stay connected at all. In 2022, I retested the AX21 after upgrading my home network to gigabit speeds -- it isn't powerful enough to top out a connection like that, but it still delivered fast, consistent speeds, with my downloads averaging in at 441Mbps.

That level of performance was strong enough for the Archer AX21 to beat out similar models from Netgear, Asus and D-Link, and it even kept the pace with fancier routers that cost significantly more. It's also a cinch to set up, thanks to TP-Link's Tether app for Android and iOS, which also offers quick access to basic network settings without bombarding you with ads like some other router apps will.

All of that makes the Archer AX21 an extremely worthy pick for small- to medium-size homes, and one of the best value picks you'll find that supports Wi-Fi 6.

Read our TP-Link Archer AX21 review.

Ry Crist/CNET

2021 was a very good year for TP-Link, and it wasn't just because of the Archer AX21. There's also the TP-Link Deco W7200, which cruised through my speed tests to earn a spot as my top-rated mesh router of the year. With multiple devices working like a team of routers to spread a faster, more reliable signal across a larger area than a single router can, it's a fantastic pick for large homes -- and one that won't set you back very much at just $233 for a two-pack.

What's great about the Deco W7200, along with its full support for Wi-Fi 6, is that it's a tri-band model with the usual 2.4 and 5GHz bands plus an additional 5GHz band that the system uses as a dedicated wireless backhaul connection between the main router and its satellites. That dedicated backhaul is the key to unlocking the best mesh performance, because it keeps those system transmissions separate from your regular network traffic. Tri-band mesh routers like those will often cost you $400 or more, but the Deco W7200 gets you there for hundreds less.

Sure enough, the performance was outstanding when I tested the system out. In fact, of all of the mesh routers that I've tested at home, only two averaged faster download speeds -- the first costs more than $200 more than the Deco W7200, and the other costs more than three times as much. That makes the Deco W7200 a flat-out unbeatable value, and a better, more noticeable upgrade for most homes than splurging on a high-powered standard router. 

The only real downside? So far in 2022, it's been a bit of a challenge to catch the Walmart exclusive in stock. If you're struggling to find it, keep reading for other suggestions, or check out the TP-Link Deco X90, a slightly higher-end model that performed even better than the W7200 in my tests. It's a bit more expensive, but Amazon currently has it marked down to $400.

Read our TP-Link Deco W7200 review.

Ry Crist/CNET

Asus is one of the top names in the gaming router category, boasting the best variety of fast, flashy routers that promise elite performance, low latency, and advanced controls for your connection. The Asus RT-AX86U is actually one of the more understated routers in that mix -- it doesn't include color-changing lights or an oversize, ostentatious design -- but it's still one of the best gaming routers you can buy. Gaming aside, it's one of the best Wi-Fi 6 routers you can buy, period.

Along with offering fast, consistent speeds, the RT-AX86U did a better job at managing latency than any other router I tested it against, and it comes with a full suite of tools for optimizing your connection while gaming, including an adaptive quality-of-service engine and an Open NAT database of game- and platform-specific port forwarding rules. There's even a Mobile Game Mode designed to instantly prioritize traffic to your phone.

In other words, the RT-AX86U checks all of the boxes you'd want from a gaming router (except the color-changing lights, I guess -- though you can get it Zaku-styled if you're willing to spend a little more). Most importantly, it makes strong enough use of Wi-Fi 6 to ensure that even the non-gamers in your household will appreciate having it around. 

At around $250 or less, it's definitely an upgrade pick, but a reasonable one that's still less expensive than a lot of gaming routers (and, as of writing this at the start of June, it's marked down to $200 on Amazon). And, if you're thinking about upgrading to a new multi-gig internet plan from AT&T, Frontier, Xfinity, Verizon, Ziply Fiber or another provider offering plans like those, you can get an upgraded RT-AX86U equipped with a multi-gig Ethernet jack supporting incoming wired speeds of up to 2.5Gbps for $250.

Read our Asus RT-AX86U review.

Ry Crist/CNET

Remember how I mentioned that the TP-Link Deco W7200 outperformed every other mesh router I've ever tested except for one? Well, here's the one that beat it -- the AX6000 version of the Netgear Orbi mesh system. 

With that all-important tri-band design and full support for Wi-Fi 6, the AX6000 Orbi blew us away with excellent signal strength and downright impressive top speeds when we first tested it out a year or two ago. Those speeds have held up ever since -- whether we're clocking top speeds in our lab or testing real-world speeds at home, literally nothing else I've tested performs as well. On top of that, the AX6000 Orbi deserves credit for being one of the first mesh routers to offer a multigig WAN port and breaking the bottleneck that capped incoming wired speeds at just a single gig.

Performance like that usually comes at a premium, and sure enough, the AX6000 Orbi costs $700 for a two-pack. Like a Mercedes Benz for the mesh category, it's more machine than most people need, but there's nothing wrong with coveting one -- or waiting for the rare sale. If it were my money, I'd rather go with that Deco W7200 system and spend the hundreds I'd save on something else, but if you just want the best mesh router performance that we've seen in our tests, full stop, money be damned, here it is.

Read our Netgear Orbi AX6000 review.

Ry Crist/CNET

Going with a mesh router makes a ton of sense if you live in a large, multi-story home with a lot of space to cover. In cases like that, it's worth it to prioritize getting a system with more than two devices in the mesh -- and Amazon's Eero 6 Plus gets you there for $299, complete with full support for Wi-Fi 6.

The Eero 6 Plus takes the Eero 6 that preceded it and beefs things up with a faster AX3000 build and new support for full-width 160MHz channels, up from 80MHz. Those wider channels allow the system to move data twice as efficiently to compatible devices, and they made a huge difference in my performance tests, where the 6 Plus finished as a top ten finisher among the thirty or so mesh routers I've tested at home. None of the routers that beat its average download speeds can beat its value, and that makes the Eero 6 Plus an excellent pick.

Read our Eero 6 Plus review.

Ry Crist/CNET

It was a bit too pricey for me to recommend when it launched at $380 for a two-piece setup, but I've seen the Asus ZenWifi XD6 marked down to $300 at multiple outlets in recent weeks, which makes it a much better value -- and right now, Amazon and other outlets are offering it for even less, at $260 for a 2-pack.

For the money, you're getting a dual-band Wi-Fi 6 mesh router that performed more like a fancier tri-band model in our tests, and one that was fully capable of optimizing our speeds throughout the entirety of the 5,400-square-foot CNET Smart Home. In fact, I'd go so far as to call it the most capable dual-band mesh router I've ever tested. 

As of writing this, multiple retailers (including Amazon and B&H Photo) have the XD6 on sale for $260, which is a great deal. If that price jumps up above $300 again, feel free to skip it. But this is a solid mesh router with one of the more comprehensive control apps available from a major manufacturer, making it a good pick for intermediate and advanced users who want to fine-tune their home network experience.

Read our Asus ZenWifi XD6 review.

Wi-Fi 6 router FAQs

If you've got questions about the ins and outs of Wi-Fi 6, be sure to check out my full explainer on the standard and what makes it better than the Wi-Fi of yore. You can also reach me by looking me up on Twitter (@rycrist) or by clicking the little envelope icon on my CNET profile page to send a message straight to my inbox. In the meantime, I'll post answers to any commonly asked questions below. 

What makes Wi-Fi 6 better than before?

Wi-Fi 6 includes support for new Wi-Fi features that help devices pass data back and forth faster and more efficiently. One of the key upgrades is 1024-QAM, which stands for quadrature amplitude modulation, or the trick your router uses to send radio waves that other devices can read as a series of ones and zeroes -- the binary code that makes up everything you see, read and experience online. 1024-QAM allows your router to send out 10 digits of binary code with each transmission, compared to eight digits of binary from Wi-Fi 5 routers that use 256-QAM. That's one of the key reasons why Wi-Fi 6 offers top speeds that are roughly 30% faster than before.

Other features of note include OFDMA, or orthogonal frequency division multiple access, which improves network efficiency by allowing your router to send data to multiple clients within a single channel at once. Think of that like a pizza delivery driver dropping off multiple pizzas to multiple customers in one trip to save gas. There's also Target Wake Time, which lets the router schedule devices that need to periodically check in so that they don't cause interference with one another. And, though it isn't specifically tied to Wi-Fi 6, most next-gen routers will support WPA3, the latest standard for Wi-Fi security.

Will older devices still work with a Wi-Fi 6 router?

Yes -- Wi-Fi 6 is fully backward compatible, so earlier-gen Wi-Fi devices will still be able to connect to them and get online. They just won't be able to take advantage of the new Wi-Fi 6 features that speed things up for current-gen devices.


Source

Tags:

These 5 Tips Make Sleeping With A CPAP Machine Easy


These 5 tips make sleeping with a cpap machine easy to draw these 5 tips make sleeping with the enemy these 5 tips make sleeping with sirens these 5 tips make sleeping with mouth these 5 tips make sleeping with the devil these 5 tips make sleeping mats these 5 tips make youtube these 5 tips make money never eat these 5 foods these 5 little snowmen poem tag marry him right now if he has these 5 traits word with these 5 letters
These 5 Tips Make Sleeping With a CPAP Machine Easy


These 5 Tips Make Sleeping With a CPAP Machine Easy

Sleeping with a CPAP machine can be annoying -- the mask covering your face, the hose tethering you to a machine that grumbles beside your bed. We get it. Undeniably, they can be a hassle, and that's a big reason why people opt to sleep without them. Up to 35% of people don't use their prescribed CPAP machine as intended. Some people only use it for a few hours each night, while others disregard it entirely. 

CNET Sleep Tips logo

We don't recommend doing that. Ignoring sleep apnea is serious as heart disease and high blood pressure. Instead of compromising your sleep quality and health, use these quick tips to make sleeping with a CPAP mask part of your routine. 

1. Pick the right mask style

The good news is that CPAP machines have come a long way from the clunky old noise machine with a huge face mask. Newer models are very quiet, and there are various mask styles you can choose from. Modern CPAP machines offer mask variations that allow you to choose what works best for you.

Common CPAP mask styles: 

  • Full-face masks: This coverage option is what people expect from CPAP machines. It covers both your mouth and nose. It's a good option for people with nasal congestion or those who breathe through their mouths at night. 
  • Nasal mask: This mask only covers your nose. It's well suited for people who move around in their sleep. 
  • Nasal pillow mask: This mask has the smallest face covering -- it sits across your upper lip and nostrils. This option is great for people who feel claustrophobic in full coverage options or wear glasses. 
  • Oral mask: This mask covers only your mouth and is best suited for people who breathe out of their mouth at night.

Keep in mind what position you sleep in when choosing the style of mask. If you sleep on your stomach or side, the larger masks with various straps may push against your pillow.

2. Make sure your mask fits properly

Once you know which mask style best fits your needs, you must ensure it fits. An ill-fitting mask is uncomfortable and can leave you with a dry, stuffy nose. If you notice red marks on your face, it's too tight. On the other hand, you won't get the benefits CPAP machines offer if the mask is too loose. 

Make adjustments each night until you find the perfect fit. When you adjust your mask, you should do so while lying down with the mask on your face. If you are having trouble getting your mask to fit properly, your doctor will be able to help you adjust the mask accordingly. 

Woman adjusting her CPAP mask before going to sleep.
Getty Images/cherrybeans

3. Practice wearing it during the day

When you first put on a CPAP mask, it can feel a bit like having a facehugger from Alien clamped to your face. It takes time to get used to. The last thing you want to do is save the adjustment period for when you are trying to fall asleep. Instead, start wearing it during the day so you get used to the sensation of being on your face. Wear it while you're watching TV or reading a book. Soon enough, you won't notice it at all. 

If you find that you can't tolerate wearing it during the day, try breaking it down into steps. Start with just the mask -- no hose or straps. Then slowly attach the hose and straps to the process.

4. Use the 'ramp' feature

CPAP machines are designed to push air into your airways to keep them from collapsing from sleep apnea. For some people, the feeling of forced air is hard to tolerate, especially in the beginning. Many CPAP machines have a "ramp" feature that starts with lower air pressure as you fall asleep and increases through the night. Work with your doctor to find your prescribed optimal pressure for your sleep apnea.

5. Be patient

Getting used to sleeping with a CPAP machine is an ongoing process that you should measure in terms of small steps. No one brings home their brand-new CPAP machine and immediately sleeps eight uninterrupted hours with it on. CPAP machines can help you sleep better and ultimately improve your health in the long run. Despite the sometimes annoying CPAP struggles, you'll feel more rested if you sleep with it.

The information contained in this article is for educational and informational purposes only and is not intended as health or medical advice. Always consult a physician or other qualified health provider regarding any questions you may have about a medical condition or health objectives.


Source

2 Ways To Make Almost Real Espresso Without A Pricey Machine


How to make espresso without espresso machine how to make the best espresso how to make great espresso how to make real how to make money for real how to make anything easy 2 ways to make salt conduct red dead redemption 2 best way to make money
2 ways to make almost real espresso without a pricey machine


2 ways to make almost real espresso without a pricey machine

Espresso is a tough drink to make. Brewing the stuff requires lots of steam pressure to push hot water through finely ground beans, and it all needs to happen fast, in about 30 seconds. That's something only elite espresso machines can successfully tackle. The problem is, quality espresso brewers can easily set you back multiple hundreds of dollars.

However, there are ways to mimic some of the delicious qualities of espresso without a fancy espresso machine. In this guide I'll lay out two of these far less expensive methods. While not as good as the genuine thing, the coffee you'll be able to make will be strong, rich, and super concentrated. Sometimes, that's all you need to start your morning. 

pxl-20210923-155812568-portrait

The Bialetti Moka Pot is an old school brewer that makes very strong coffee.

Brian Bennett/CNET

Option 1: Moka Pot

Invented by Italian engineer Alfonso Bialetti in 1933, the Moka Pot is a classic that remains popular today. The aluminium brewer sports a distinctive art deco design, and it doesn't even need electricity. Just heat it up on your kitchen stove to operate it. 

Start by unscrewing the brewer base from the pitcher. Fill the base with water to the fill line (just below the release valve). In my case I used 5.4 ounces of water (153.1 grams). Next add grounds to the filter funnel. Your grounds should be slightly finer than what you'd use for drip coffee -- a good coffee grinder can help with that. 

Once it's full, scrape away any excess grounds and put the funnel into the base. With that done, the amount of grounds in my brewer came to 0.42 ounces (12 grams). Next, screw the base back onto the main brewer body. Now place the Moka Pot onto one of your stove's burners. Pro tip: Try to set the brewer down a little off-center -- this way the handle won't get too hot to, well, handle.

After a few minutes of brewing on the stove, coffee will begin to flow into the main chamber.

Brian Bennett/CNET

Turn the burner on to medium heat and leave the brewer's lid open. After 5 to 7 minutes liquid coffee should start to flow up from the bottom of the brewer through the valve in its top section. Once the flow stops, or begins to sputter, turn the burner off. 

Since the Moka Pot is constructed from aluminum, its body can get hot. Take care not to touch any metal parts or you'll get burned. Immediately take the brewer to the sink and run cold water over its base. 

Coffee made with the Moka Pot had a brix percentage of 2.9. That comes to a TDS of 1.5%.

Brian Bennett/CNET

Once the base has cooled, pour coffee into your favorite cup. The coffee I made in the Moka Pot was strong and, while not true espresso, it was deep, dark and rich. A quick refractometer reading confirmed this: I recorded a high TDS (total dissolved solids) percentage of 2.5. That's slightly above the ideal range of 1.9 to 2.3%, but not outrageously so. This joe packed a big flavor punch and wasn't bitter at all. 

pxl-20210924-182702082-portrait

The Aeropress is a cross between a French press and an upside down Moka Pot.

Brian Bennett/CNET

Option 2: Aeropress

Another popular way to create really strong coffee is to use the Aeropress. This inexpensive gadget was dreamed up by the man, Alan Adler, who also brought us the aerobie frisbee-style flying disk. The Aeropress made its debut in 2005, and essentially is a cross between a French press and an upside down Moka Pot.

Start by adding a paper filter to the Aeropress' filter cap. Next twist the cap onto the brewer's brewing chamber. Add one scoop of ground coffee (coarseness suitable for drip) to the brewing chamber. In my case that came to 0.35 ounces (10 grams). Give the chamber a shake to even out the grounds inside.

Now place the chamber on top of a sturdy coffee mug. Next, add hot water to the chamber up to the "1" symbol on its inner wall. Aeropress recommends water at specifically 175 degrees Fahrenheit (79.4 Celsius), though a minute or so off the boil works, too. The amount of water I used weighed in at 4.25 ounces (120.5 grams).

Stir the grounds for about 10 seconds. Insert the Aeropress plunger into the top of the chamber. Carefully press the plunger down until it reaches the grounds and filter. You should hear a little hiss once that happens. Now your coffee is ready.

Coffee I made with the Aeropress had a brix reading of 1.8%. That translates to a TDS percentage of 1.5.

Brian Bennett/CNET

The liquid brew I made in the Aeropress was strong, too. It wasn't technically espresso, more like a robust French press. That said, it was certainly stiff enough to hit my taste buds with plenty of deep coffee flavor. It wasn't bitter and lacked grit of any kind.

I measured the TDS concentration to be 1.5%. That translates to an extraction percentage of 16. It's also a little under the recommended 19 to 23%. Still, this coffee wasn't bitter and was quite smooth, and I'm sure with a little tinkering I can create an even more powerful, balanced cup. With the right gear, there's no reason you can't as well.


Source

Fitness Trackers Are Getting More Personal, Powerful In 2022 And Beyond


Fitness trackers are getting more personal powerful in 2022 did the groundhog fitness trackers are getting more personal powerful in spanish fitness trackers are getting more personal powerful quotes fitness trackers are getting more fiber fitness trackers are getting more stuart best fitness trackers fitness trackers for women
Fitness trackers are getting more personal, powerful in 2022 and beyond


Fitness trackers are getting more personal, powerful in 2022 and beyond

Your first fitness tracker -- whether an early Fitbit, the now-defunct Jawbone, a simple pedometer or a heart monitor strap -- probably did little more than track your steps and calories burned. Early smartwatches, meanwhile, essentially felt like phone companions rather than stand-alone devices. 

But fast-forward to 2022 and a lot has changed. Wearables are no longer niche devices for early adopters or fitness fanatics. The Pew Research Center reported in 2020 that about one in five US adults regularly wears a smartwatch or fitness band. Global smartwatch shipments grew by 47% annually in the second quarter of 2021 according to Strategy Analytics, signaling the industry's fastest growth rate since 2018. 

Today's wrist-worn devices are comprehensive fitness gadgets capable of taking an ECG reading from the wrist, monitoring sleep quality and measuring blood oxygen saturation, among other things. That opens up a world of opportunities but also makes things complicated. We have more access than ever to data about our heart rate, how much sleep and activity we're getting and our overall well-being. Yet some newer, more advanced health metrics can be challenging to comprehend, raising the question of whether they're truly helpful. 

Therefore, context and personalization will be key to both current and next-generation wearables, according to conversations with medical experts, tech executives and industry analysts. The medical community is also excited about the potential that future fitness devices hold for detecting more advanced metrics, like changes in glucose levels and the role of wearables in preventive care. 

Making better sense of health data from our fitness trackers

aw-alt-5
Lexy Savvides/CNET

The biggest improvements that are likely to arrive in the near term will involve making health data more useful and personalized. Oura, Whoop and Fitbit are already helping steer the industry in this direction with their respective scoring systems, some of which require a paid subscription.

Both Oura and Fitbit, for example, offer readiness scores that help wearers decide whether it's time for a heavy workout or a rest day. Those numbers are based on metrics such as resting heart rate variability, sleep, activity and other bodily signals. Whoop has a similar recovery score that provides insight on whether a user's body is ready for strenuous exercise.

Oura's readiness score embodies the company's overall approach to health tracking, which is that devices should provide context alongside numbers and data points, according Chris Becherer, Oura's chief product officer. He added that Oura will maintain that approach with newer features, such as the period prediction tool it launched in October, and will only expand into new types of health tracking if the company can provide similarly helpful insights. 

"We won't do it just for the sake of doing it," Becherer said. "And we'll make sure that it fits with the holistic user-friendly experience that Oura is known for."

Fitbit sees another opportunity for adding more personalization and specificity to health metrics: exploring the link between mental and physical wellbeing. Fitbit is already dipping its toes into mental wellness with its EDA app, available on the Fitbit Sense and Charge 5, which measures changes in sweat to see how the body might be responding to stress. 

Fitbit also lets wearers log their mood to accompany those readings, so users can see how they felt when the measurement was taken. Analyzing that type of data over time could help Fitbit better understand what bodily changes mean for a person's overall wellness, allowing for more thorough insights. 

"We can over time get more and more correlation between this idea of, 'How do I feel?' compared to 'What is my physiology and what are the metrics telling me?'" said Jonah Becker, Fitbit's design director. "Which I think is a powerful thing." 

The ability to measure additional body signals, such as electrodermal activity (i.e., the EDA app's sweat readings), could also lay the foundation for future Fitbit features. Eric Friedman, Fitbit's co-founder and vice president of research, points to Fitbit's sleep stages functionality as an example. That feature, which tells the wearer how much time was spent in light, sleep or REM sleep, is only possible because of other metrics that came before it, like heart rate and motion measurements.

"Imagine taking that and EDA, and you ... start building things together to start layering these health metrics on top of each other, going to the next thing," Friedman said.

Blood sugar monitoring could be the next major step forward in health tracking

Apple Watch Series 7

Apple is rumored to be working on blood sugar monitoring for future versions of the Apple Watch.

Lisa Eadicicco/CNET

What exactly that "next thing" is remains unclear. But reports and expert predictions do point to blood sugar monitoring in wearables as an area of interest. 

However, that doesn't mean diabetics will be able to rely on smartwatch readings to calculate insulin dosages. That will still require more invasive devices that break the skin for the foreseeable future, says Dr. Steven LeBoeuf, president and co-founder of Valencell, which makes health sensors for wearable devices. 

Instead, a future glucose-monitoring smartwatch might be able to make broader observations about whether the wearer is in a state of low, normal or high blood sugar. That could help wearers understand whether diet or exercise changes are impacting their blood sugar, or whether the user should use a glucose meter, says Dr. LeBoeuf.

"Now that has all kinds of positive implications," said Dr. LeBoeuf. "So I think you will be seeing that technology in wearables as well, whether it comes from Valencell or some other entity."

Dr. Zahi Fayad, director of Mount Sinai's Biomedical Engineering and Imaging Institute, also sees a lot of potential in this space. Glucose monitoring capabilities like those mentioned above could help wearables offer more personalized nutrition advice. That's important because today's recommendations are typically based on broad population studies and therefore lack customization according to Dr. Fayad.

"Everybody's gut microbiome is different and reacts to food differently, or reacts to lifestyle changes differently," said Dr. Fayad.

Yet it's unclear when or if this type of functionality will arrive in everyday smartwatches or fitness trackers. Apple has been working on adding blood sugar monitoring to the Apple Watch, according to reports from Bloomberg and The Wall Street Journal, although both reports suggest the technology is in its early stages. 

Roberta Cozza, a senior director analyst at Gartner, thinks there is still a long way to go. Although research is being done in this area, she believes accuracy and medical clearances present a challenge. 

"I think for this, you're going to have to have something that is medical-approved," she said. "So it's going to take some time until we find something that is really usable and reliable."

Smartwatches and fitness trackers are already starting to blur the line between medical and wellness devices. Adding more sophisticated metrics, like glucose readings, means tech companies will have to be mindful about how users may interpret these readings.

"Maybe vendors need to find new ways in which they can be clearer with consumers around the expectations that they might have when wearing some of these devices," said Cozza. "Because this will be getting just more and more complicated."

Filing in the gaps between doctors visits

Amazon Halo View

The Amazon Halo View

Lisa Eadicicco/CNET

The medical and tech communities seem to share a common goal when it comes to progress in the wearables field: Helping people take better care of themselves between doctor's appointments. 

"Instead of having one data point per year, you have continuous data points across every single part of your day," Oura's Becherer said. 

That's part of the inspiration behind new features and capabilities that have arrived in recent wearable devices. For example, Amazon's Halo health app includes a tool for estimating your body fat percentage based on images taken from a smartphone's camera, which it analyzes using machine learning and computer vision. The feature has been somewhat controversial when it comes to personal privacy.

But Melissa Cha, vice president of Amazon's Halo division, says the goal behind this feature is to help people to keep a log of their bodily changes -- another tool for monitoring progress between doctor's visits.

"You have a long-term record that you can then share with your care provider or physician if you want to discuss changes in your body composition over time," Cha said. 

Dr. Devin Mann, associate professor of population health and medicine at New York University Langone Health, believes we're seeing more of a crossover between medical and consumer devices. That's because each side has something to learn from the other. 

Commercial wearables are gaining more advanced health monitoring capabilities, while medical device makers are trying to reach broader audiences. 

"We're sort of seeing those two streams coming together," Mann said. "And there's more overlap between them."

Over the long term, some experts are excited about the potential of using wearable devices to help detect disease early. That type of functionality is still in its early stages, but Dr. Paul Friedman, a cardiologist in the Mayo Clinic's AI in Cardiology Work Group, is encouraged by the progress the industry has made so far. A few years ago, most physicians wouldn't have trusted the data from health trackers to help inform medical treatments, according to Dr. Friedman. But that's changing.

"The answer would have been no; nine out of 10 when they were surveyed said no," Friedman said. "Now it's almost reversed."


Source

Search This Blog

Menu Halaman Statis

close