Step into a world where the focus is keenly set on You Should See Me In A Crown. Within the confines of this article, a tapestry of references to You Should See Me In A Crown awaits your exploration. If your pursuit involves unraveling the depths of You Should See Me In A Crown, you've arrived at the perfect destination.
Our narrative unfolds with a wealth of insights surrounding You Should See Me In A Crown. This is not just a standard article; it's a curated journey into the facets and intricacies of You Should See Me In A Crown. Whether you're thirsting for comprehensive knowledge or just a glimpse into the universe of You Should See Me In A Crown, this promises to be an enriching experience.
The spotlight is firmly on You Should See Me In A Crown, and as you navigate through the text on these digital pages, you'll discover an extensive array of information centered around You Should See Me In A Crown. This is more than mere information; it's an invitation to immerse yourself in the enthralling world of You Should See Me In A Crown.
So, if you're eager to satisfy your curiosity about You Should See Me In A Crown, your journey commences here. Let's embark together on a captivating odyssey through the myriad dimensions of You Should See Me In A Crown.
Your iPhone is a handy, versatile piece of technology. Looking for a new recipe? Easy. Need a new internet provider? You can do that, too. Trying to figure out which actor appeared in the most 007 movies? Just search online. (The answer: Desmond Llewelyn, who appeared as Q in 17 Bond films from the '60s through the '90s.) Regardless of what you need it for, your iPhone does a lot of work.
But here's the thing: Whether you do your browsing in Chrome, Safari or elsewhere, your cache builds up digital clutter over time. Clearing your cache gives your browser a new start, which can speed up your browsing whether you're using iOS 15 or the public beta of iOS 16. (And if you're trying to get your phone to run faster, try managing your iPhone's storage.)
Clearing your cache is like clearing out your fridge. When you visit a site, your iPhone downloads photos, banners and other data. To make that process faster, most browsers store some data in a cache to make loading faster. It's great when the fridge is fully stocked and you can quickly grab what you need... and less great when the thing you grab expired two months ago.
Eventually, your browser's cache will become outdated and the data being retrieved no longer matches the data actually being used on the website. The result? Slower load speeds and wonky website formatting. This is the equivalent of your fridge being full of gross, expired products.
That's why clearing your cache can help: It gives sites a fresh start in your browser and frees up some space in your storage. Note that clearing your cache will sign you out of sites you're currently logged into. Still, it's generally worth that mild inconvenience about every month to keep things moving quickly.
Here are step-by-step guides on how to clear your cache on your iPhone based on the browser you use.
How to clear your iPhone cache in Safari
Safari is the default browser on iPhones, and you can clear your Safari cache in a few short steps. Starting with iOS 11, following this process will affect all devices signed in to your iCloud account. As a result all your devices' caches will be cleared, and you'll need to sign in to everything the next time you use them. Here's what to do.
1.Open the Settings app on your iPhone.
2. Select Safari from the list of apps.
3. Go to Advanced > Website Data.
4. Scroll down and select Clear History and Website Data.
5. Choose Remove Now in the pop-up box.
Then you're set!
Read more:Best iPhone for 2022
How to clear your iPhone cache in Chrome
It's easy to clear your iPhone cache in Chrome.
James Martin/CNET
Chrome is another popular browser for iPhone users. The overall process for clearing your Chrome cache requires a few more steps, and you'll need to do things through the Chrome browser itself. Here's how.
1. Open the Chrome app.
2. Select the three dots in the bottom right to open more options.
3. Scroll down and select Settings.
4. Select Privacy in the next menu.
5. Then select Clear Browsing Data to open up one last menu.
6. Select the intended time range at the top of the menu (anywhere from Last Hour to All Time).
7.Make sure that Cookies, Site Data is selected, along with Cached Images and Files. Finally, hit Clear Browsing Data at the bottom of the screen.
Read more: This iPhone Setting Stops Ads From Following You Across the Web
How to clear your iPhone cache in Firefox
If you're a Firefox devotee, don't worry. Clearing the cache on your iPhone is pretty straightforward. Just follow these steps.
1. Click the hamburger menu in the bottom right corner to open up options.
2. Choose Settings at the bottom of the menu.
3. Select Data Management in the Privacy section.
4. You can select Website Data to clear data for individual sites, or select Clear Private Data at the bottom of the screen to clear data from all selected fields.
Read more: Experiencing Slow Wi-Fi? It Could Be Caused By Internet Throttling. Here's How to Tell
What happens when you clear the cache?
Clearing your cache removes the website data your phone stored locally to prevent having to download that data upon each new visit. The data in your cache builds over time and can end up slowing things down if it becomes too bulky. (My phone had about 150MB of data stored in Chrome when I checked.) Clearing that data gives sites a fresh start, which may fix some loading errors and speed up your browser. However, clearing your cache also signs you out of pages, so be prepared to sign in to everything again.
How often do I need to clear my cache?
Most people only need to clear their caches once every month or two. That's generally the point when your browser will build up a cache large enough to start slowing things down. If you frequent a large number of sites, you should err on the side of clearing your cache more often.
For more, check out how to FaceTime between an iPhone and an Android device, how to download iOS 15 on your iPhone right now and five creative, fun photo projects to try with your phone at home. You can also take a look at CNET's list of the best cases for the iPhone 13.
How to work my apple watch how to make apple watch work without iphone how to make your apple watch vibrate make your appointment today make your own logo make your own website make your own pokemon card make your own music
Make Your Apple Watch Work Better by Changing These Settings
Make Your Apple Watch Work Better by Changing These Settings
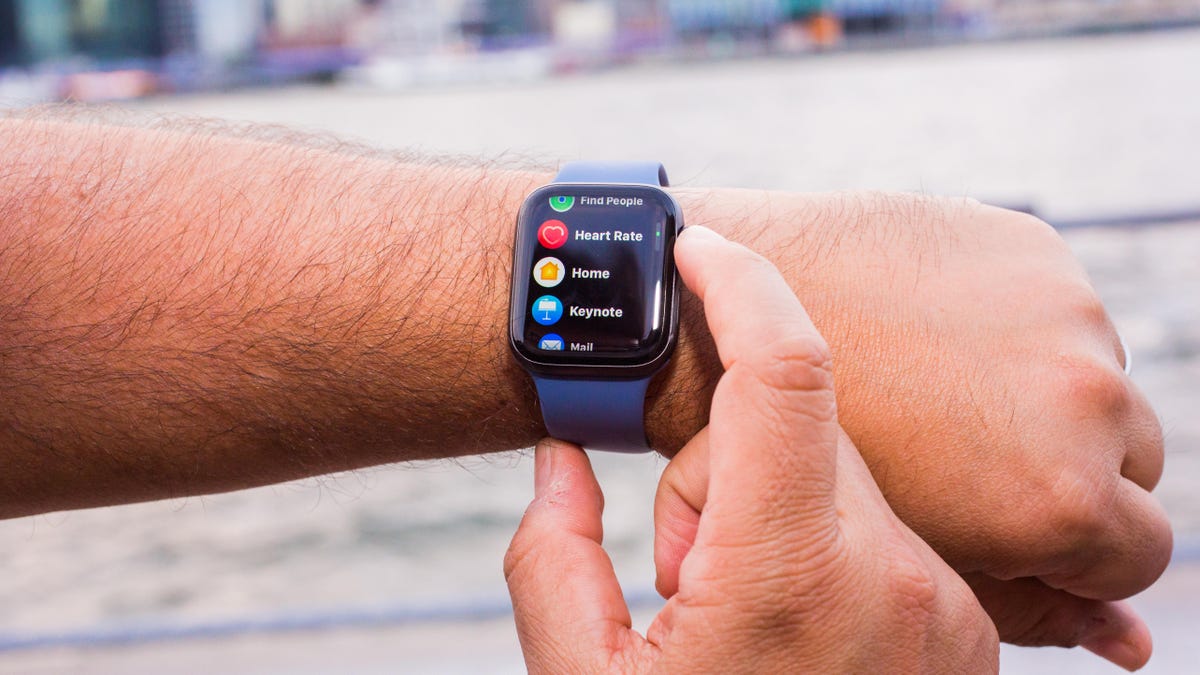
Changing a few settings on your Apple Watch can go a long way. Even though the Apple Watch is already easy to use, you'll likely benefit from making certain customizations. For example, you can choose how you'd prefer to activate Siri, make your apps appear in a list view rather than a grid and set Portrait Mode photos from your iPhone as your watch background.
You'll be able to use these features and settings on any watch model that Apple currently sells, which includes the 4-year-old Series 3 (although we wouldn't recommend buying a Series 3 in 2022). But it's best to make sure that your watch is running the latest version of Apple's WatchOS 8 software. Doing so not only ensures that your watch has access to all of the latest features and improvements, but it's also a good safety measure since updates often include security-related fixes.
This fall, Apple Watch owners will have more new features to look forward to with the debut of WatchOS 9. The update will bring more detailed sleep monitoring and a new app for tracking medications to the Apple Watch Series 4 and newer. A beta version of WatchOS 9 will be available to the public this month, Apple said when unveiling the new software in June. We're also expecting to see the rumored Apple Watch Series 8 and Apple Watch Pro debut in September, which is when Apple typically introduces new watch models.
Here's a look at the Apple Watch settings you should change to get the most out of your watch.
Read more: How WatchOS 9 Is Paving the Way for the Apple Watch's Future
Adjust all of your Activity goals
With the release of WatchOS 7 in 2020, Apple added the option to change your goals for the amount of time you stand and exercise. Previously, you could only change your Move (or calories) goal.
So instead of using the defaults -- 30 minutes of exercise and a cumulative 12 standing hours a day -- you can change either one to fit your actual daily routine.
This small change will make it possible for you to hit your own targets when you actually start your day, not when Apple tells you to. For example, if you use sleep tracking overnight and need to charge your watch more often in the morning, you won't feel like you've lost an hour of time needed to close those rings.
Open the Activity app on your watch, scroll to the bottom and tap ChangeGoals. Make your adjustments for all three metrics and start closing those rings.
Read more: Best Workout Subscription Apps
You now have full control over what it takes to close your activity rings.
Sarah Tew/CNET
So long, random screenshots
To take a screenshot on the Apple Watch, you press the Digital Crown and side button at the same time. It's a simple and convenient method, unless you're like me and find yourself frequently triggering it accidentally, filling up the Photos app with random pictures of your watch face.
To turn off the ability to take screenshots altogether, open the Settings app on your watch or use the Watch app on your phone and go to General and scroll down until you find Screenshots. Tap this option and toggle off the switch next to Enable Screenshots for a clutter-free camera roll.
Customize which apps appear in your dock
If you have a lot of apps installed on your Apple Watch, it can be difficult to find the right ones when you need them. That's where the Apple Watch's dock comes in handy. If you're not familiar, the dock is essentially the iPhone's app switcher, but for the Apple Watch. You can trigger it by tapping the side button, which pulls up a carousel of recently used apps.
However, you can also customize the dock to show any apps you want instead of your most recent apps. To do this on your watch, open the Settings menu, tap Dock and select the Favorites option. But I recommend setting this up in the Phone's Watch app instead so that you can customize these apps.
Open the Watch app on your iPhone and tap Dock. Once the Favorites option is selected, you'll see a list of apps divided into two sections: Favorites and Do Not Include. Favorites are the apps that are currently in your dock, while the latter lists all of the other apps on your watch that aren't included. Tap the Edit button in the top right corner to customize the Favorites list to your liking.
Choose the Portrait mode photos you want to see on your wrist
You can set Portrait mode photos as the background for your watch face. But first, you have to dig into the settings in the Watch app on your iPhone. To get started, launch the Watch app and navigate to the Face Gallery tab at the bottom of the screen. Then, tap the Portraits option under the New Watch Faces category. Tap the Choose Photos option under Content to select up to 24 photos that will rotate automatically when you raise your wrist or tap the screen.
Apple's new Portrait watch face lets you set photos taken in Portrait Mode as the watch's backdrop.
Lisa Eadicicco/CNET
Keep the Apple Watch's screen awake for a longer period of time
There are times when you might not want your Apple Watch's screen to go idle right away. Perhaps you were in the middle of reading a long text message and got distracted, or maybe you want to keep an eye on your timer. Once you tap the Apple Watch's screen, it typically stays active for 15 seconds. But you can extend that to 70 seconds by launching the Settings menu on your watch, tapping Display & Brightness and choosing Wake Duration. Then select the Wake for 70 Seconds option.
Stop every app from automatically installing
Every time you install an app on your iPhone, it will automatically install its Apple Watch counterpart if there is one. This can clutter up your watch's app grid pretty quickly, making it hard to find the apps you do want to use on your watch.
The Apple Watch is so much more than a way to view your notifications.
Vanessa Hand Orellana/CNET
In the Watch app on your phone, go to Settings > General and then slide the switch next to Automatic App Install to the Off position. You can also do this on the watch by opening the Settings menu, tapping App Store and toggling the switch next to Automatic Downloads.
From now on, you'll install individual apps on your watch by opening the Watch app on your phone, then scrolling to the bottom where you'll find a list of available apps.
Read more: Best Apple Watch Apps
Silence those noisy notifications
Smartwatches can be useful for discreetly checking an alert or the time. But loud notifications can defeat the purpose. Turn on your Apple Watch's silent mode by swiping up from the bottom of the screen to launch the Control Center. Then tap the icon that looks like abell to trigger Silent Mode.
You can also do this by opening the Apple Watch's Settings menu, scrolling down to Sound & Haptics and toggling the switch next to Silent Mode. There's also a volume slider for adjusting how loud or quiet incoming notifications sound if you'd rather not mute them completely.
Have Siri only speak out loud when you're wearing headphones
Siri can be useful for quickly setting timers, starting workouts or checking the weather from your watch. But you might not always want to have Siri speak out loud. You can easily change this so that Siri only provides audible feedback when you're wearing headphones. Open the Settings menu on your Apple Watch, scroll down to Siri and navigate to the Voice Feedback section. Then tap the Headphones Only option. When your Bluetooth headphones are connected to your Apple Watch, you should now see the name of your headphones appear above the Siri volume setting in the watch's settings menu.
Make text easier to read by increasing the font size
Reading notifications and news headlines can be difficult on a screen that's so small. Luckily, you can increase the font size on the Apple Watch to make things a bit easier on your eyes. To do so, launch the Settings app on your watch, tap Display & Brightness and scroll down to Text Size. Rotate the Digital Crown or tap the letters that appear on either side of the meter to adjust the text size on your watch. If you have the Apple Watch Series 7, you'll have more size options for enlarging the text, since it has a bigger display.
Stop those annoying reminders to "Breathe"
Every few hours your Apple Watch will beep and tap your wrist, reminding you to take a moment to breathe. The first time it happens it's kind of comical; Why do I need a reminder to breathe, wacky watch?! Then it happens again. And again. Every 4 hours by default, for a physiological act that is literally involuntary.
The Breathe reminder is designed to help you take a few minutes to clear your mind and control your respiration, in turn lowering your heart rate and potentially helping you feel more centered and calm. But if you're like me and never follow the prompt, take a few seconds to turn it off so you no longer have to be reminded to breathe.
Open the Apple Watch app on your iPhone, then scroll down and tap the Mindfulness app option. Next, select Notifications off. (Note: If your watch isn't running WatchOS 8, this will appear as Breathe instead of Mindfulness.)
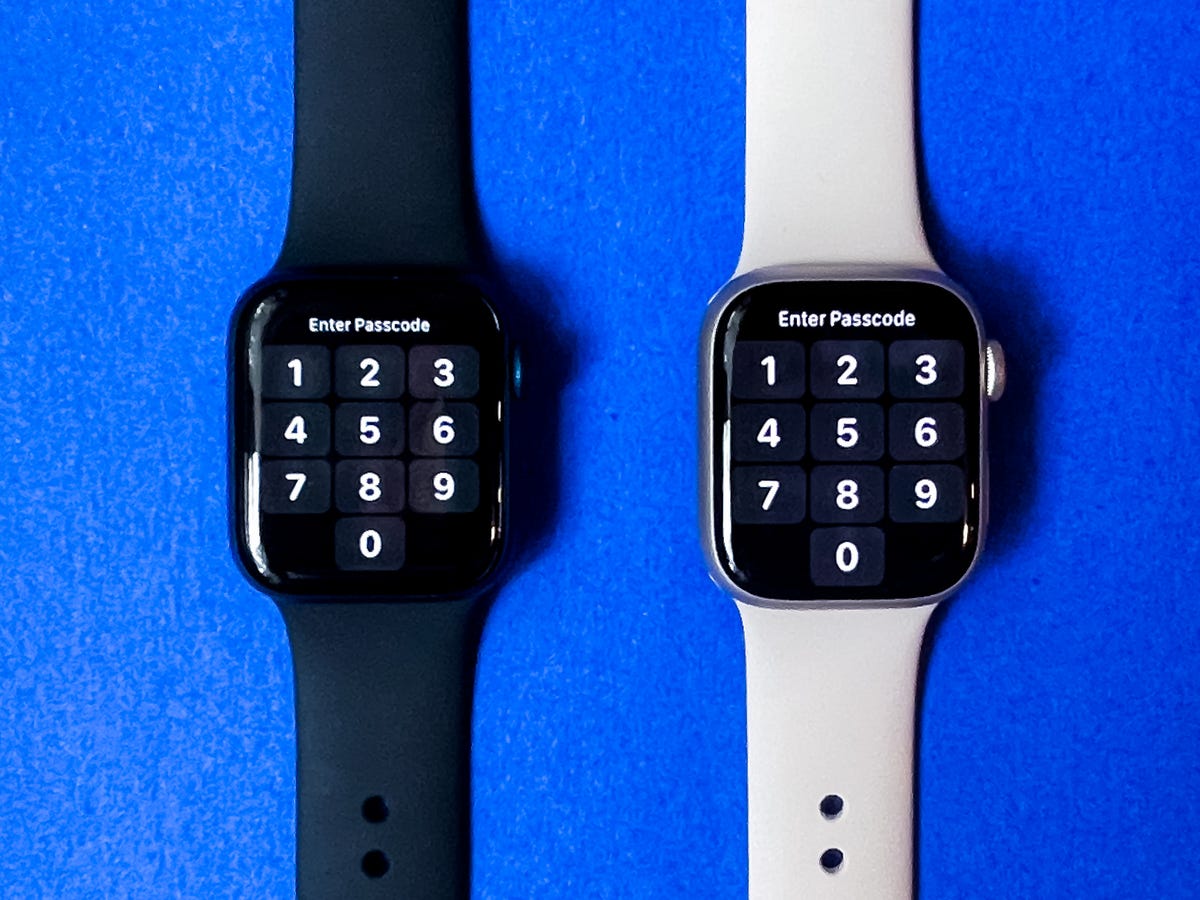
Unlock your Apple Watch with your iPhone
Typing in your passcode to unlock your Apple Watch can be a pain, but there's an easier way to do it. You can choose to have your Apple Watch unlock automatically when your iPhone is unlocked.
Tap the Digital Crown and navigate to the Apple Watch's Settings menu. Scroll down to Passcode, and make sure the switch next to Unlock with iPhone is toggled on. Your iPhone will now also display an alert saying that your iPhone is being used to unlock your Apple Watch whenever you put this into practice.
You usually have to type in your Apple Watch's passcode to unlock it.
Lisa Eadicicco/CNET
Make it easier to find your apps
The honeycomb app grid looks great in promotional photos and at first glance, but it can be difficult to find the app you want to launch, particularly if you have a lot of apps installed on your watch. Instead of in a grid, the watch can display all of your apps in an alphabetical list.
Either in the Watch app on your phone or in the Settings app on the Watch, tap App View > List View. Now, when you press the Digital Crown to leave your watch face, you'll see a list of apps that you can quickly scroll through and find what you're looking for.
See, doesn't the app list look better?
Sarah Tew/CNET
Control when you'll see Siri
There are three different ways to activate Siri on your Apple Watch. You can raise your wrist toward your mouth and start talking, long-press the Digital Crown or use the wake phrase, "Hey, Siri."
I've found that I often accidentally trigger Siri when trying to check the time or read a notification while I'm talking to someone else (but my watch thinks I'm trying to talk to Siri). It's annoying, but it can be changed.
Either in the Watch app on your phone or in the Settings app on the Watch, select Siri and there you'll find three buttons to control when you'll see Siri. Slide each button to the Off position for any of the options you don't want to use.
This is a hidden feature that you should memorize right now.
Jason Cipriani/CNET
Rearrange Control Center
Just like Control Center on your iPhone, Control Center on the Apple Watch is where you go to quickly adjust settings like do not disturb and airplane mode and to activate the flashlight.
You may find the default list of options in the Control Center isn't the best fit for how you use your watch, however, and you want to rearrange the list. For me, that means moving the Bedtime toggle from near the bottom of the list to the top. That way when I want to track my sleep over the weekend when I don't have sleep goals set, I can swipe up and tap the icon.
To access the Control Center on your watch, swipe up from the bottom of the watch face, or when in an app you can long-press on the bottom of the screen until you see Control Center start to slide up, after which you just need to slide your finger up to access it. The same trick works to view your notifications from anywhere.
Change the order, or hide some buttons in the Control Center by tapping the Edit button at the bottom of the list. The icons will begin to jiggle and show a red minus sign to hide an option. Drag and drop the icons into your preferred order, or tap the red minus button to remove the option altogether.
When you're done, tap Done or press the Digital Crown on the side of your watch to go back to the watch face.
There are plenty more Apple Watch features that are worth checking out. For example, the ECG app can help identify heartbeat irregularities, there are new workout options for Pilates and Tai Chi and you can even share your custom watch faces.
For more, check out CNET's list of the best Apple Watch bands and every iPhone setting you should change right now.
Lg c2 oled tv review early favorite for best high end tv on the market lg c2 oled tv review early favorite for best high end tv armoire lg c2 oled tv review early favorite for best high end tv for the money lg c2 oled tv review early favorite for best high school is the lg c2 oled tv worth it lg c2 oled tv best buy 42 inch lg c2 oled tv lg c2 oled oled65c2 lg c2 oled lg c2 review
LG C2 OLED TV Review: Early Favorite for Best High-End TV
LG C2 OLED TV Review: Early Favorite for Best High-End TV
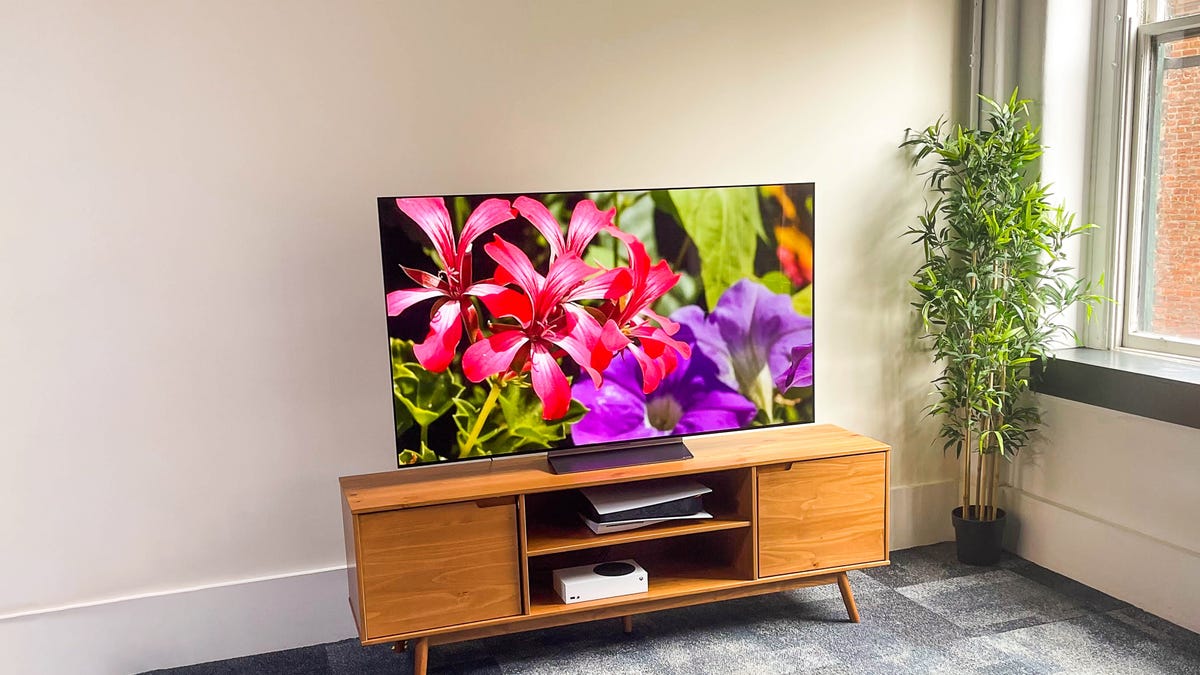
In the last few years LG's "C" series OLED models have risen to the top of my list as the best high-end TV for the money. The C2 is the first 2022 TV I've reviewed, so it's too early to award it that crown, but so far it's the favorite. The C2 offers image quality that's a clear step above any non-OLED TV I've seen, a bigger range of sizes than ever -- including a new 42-inch option -- and a price that's not too steep.
This year, however, the OLED TV competition is tougher than ever. LG's archrival Samsung has an OLED TV too, promising better color with an all-new QD-OLED panel. Sony offers two different kinds of OLED, including a QD-OLED of its own that looks pretty sweet in person. And in 2022 more TV-makers sell mini-LED models, which promise excellent image quality for much less money than OLED.
As is usual in the first half of the year, a new TV's stiffest competition comes from its older self. In my side-by-side comparisons, the C2 and last year's LG C1 OLED TV looked very similar despite the C2's new "Evo" panel, one of the 2022 upgrades LG touts. That's why, if you want a new high-end TV now, you should still get the C1.
Over the summer the C1 will sell out and the C2 will drop in price, making it more appealing. If you want the best price on a C2 you should hold off until fall, at which point I'll have a much better sense of how the C2 stacks up against its rivals. It's off to a good start though.
LG C2 sizes, series comparison
I performed a hands-on evaluation of the 65-inch OLED C2, but this review also applies to the other screen sizes in the series. All sizes have identical specs and, according to the manufacturer, should provide very similar picture quality. The exceptions are the 42- and 48-inch sizes, which lack the "Evo" panel and might be slightly dimmer than the others as a result (although the difference is minimal, if my comparisons to the non-Evo C1 are any indication).
The C2 series sits in the middle of LG's 2022 OLED TV lineup, with the widest range of screen sizes and all the features I expect from a high-end TV. Spending more for the G2 gets you a slightly brighter panel according to LG, as well as the wall-friendly "gallery" design. The less-expensive A2 lacks the HDMI 2.1 gaming features, 120Hz refresh rate and fancier processing found on the other 2022 LG OLEDs.
David Katzmaier/CNET
Lighter weight, nearly all picture
The C2 is a very nice-looking TV, with a minimalist appearance similar to past LG OLEDs, but the company made some changes for 2022. When a colleague and I set it up, we actually felt the first such change: it's lighter than the C1 by a noticeable amount, up to 47 percent lighter depending on size. The 65-inch version I reviewed weighs just 37 pounds with its stand, compared to 72 pounds for the 65-inch C1.
New carbon-fiber materials are responsible for the reduced weight, according to LG, and I noticed it on the TV's backside. The edges of the panel are slightly more squared-off as well. I also appreciated the narrower bezel, 6mm slimmer than the C1, leading to even more of an all-picture look, although if I didn't have the two TVs side-by-side I probably wouldn't have noticed. The stand has a much smaller footprint than last year and raises the panel a bit more over the table, both improvements in my book.
David Katzmaier/CNET
LG kept the same remote, unfortunately. In my old age I've grown easily annoyed by too many buttons, and I much prefer the streamlined, simple layout of Samsung and Roku/TCL remotes, for example. As always, you can wave LG's remote around to move the cursor, or scroll quickly through menus with the built-in wheel.
Smart TV, crowded menu
LG's WebOS menu system is not my favorite, in part because of the clutter. You'll see notes and notifications along the top, a box that displays the weather, a prompt to sign in to LG's system, a seemingly random collection of stuff labeled "Trending Now," then (finally) the list of apps below. Signing in unlocks a new 2022 feature, customized recommendations and additional user accounts. LG touts the fact that you can set up favorite sports teams, for example, but most people will just go straight to the app and skip the clutter. As usual, I prefer a simpler interface like Roku, and if you like customizations and options Google TV is a better bet. On a TV this expensive you should just attach a good streaming device instead.
David Katzmaier/CNET
Also new for 2022 is something LG calls "always ready." Instead of turning the screen off when you press power, the TV displays your choice of art wallpapers, a clock, "sound palette" art or your own custom photos. Designed for people who would rather have something on their big screens rather than a big black rectangle, it's similar to the ambient mode Samsung TVs have offered for the last few years. Personally I'd rather save the power, so I'd leave this feature (and my TV) turned off.
The elements of the always-ready feature and LG's screensaver move around so as not to risk burn-in. Here's where I remind you that, like all OLED TVs, the C2 is more subject to both temporary and permanent image retention, aka burn-in, than LCD TVs. The risk is small, which is why I don't consider burn-in a reason for most people to avoid buying an OLED TV. Check out our guide to OLED burn-in for more.
The new "always ready" feature puts something on the screen even after you turn it "off."
David Katzmaier/CNET
LG also added a new multiview feature that puts two sources side by side or picture-in-picture, but unfortunately it's quite limited. You can't show two HDMI inputs on-screen and the main thing you can do -- share a screen from your phone side-by-side with an input -- didn't work with Apple AirPlay. LIke most TVs, the C2 does support Apple's phone-mirroring feature, and it also lets you issue Google Assistant or Amazon Alexa voice commands by speaking into the remote or, new for 2022, hands-free when you say the wake word like "Alexa."
Well-connected, especially for gamers
LG continues to excel at connection options. All of LG's 2022 OLED models (aside from the A2) include the latest version of the HDMI standard: 2.1. That means their HDMI ports can handle 4K at 120 frames per second and variable refresh rate (including Nvidia G-Sync and AMD FreeSync), as well as enhanced audio return channel and automatic low latency mode (auto game mode). In other words, they can take advantage of the latest graphics features available from PlayStation 5 and Xbox Series X and S consoles as well as high-end graphics cards. The C2 is rare among high-end TVs in that all four of its HDMI ports support 4K/120 -- great for hard-core gamers with multiple next-gen devices.
Four HDMI inputs with HDMI 2.1, HDCP 2.2
Three USB 2.0 ports
Optical digital audio output
RF (antenna) input
RS-232 port (minijack, for service only)
Ethernet (LAN) port
All four of the C2's HDMI inputs support HDMI 2.1 features.
David Katzmaier/CNET
LG OLED C2 picture quality comparisons
My side-by-side comparisons involved the best TVs I had on-hand, but the only other OLED was the LG C1 from last year. Since it's early in 2022, the C2 was the only current model-year television in the group – I'll compare it to other 2022 TVs as soon as I get the chance. Here's the lineup:
TV and movies: The LG C2 has a spectacular picture but watching it next to the C1 from 2021, any improvements were really tough to see. And measurements backed up my initial impressions: Both TVs delivered essentially equal numbers, and both were extremely accurate in their best modes. Both outperformed the TCL TVs in my comparison overall, as expected.
The comparison lineup with the LG C2, center, on the gray TV stand and the C1 to its right.
David Katzmaier/CNET
I started my comparison with familiar (to me) high dynamic range material, namely the demo montage from the excellent Spears & Munsil HDR benchmark 4K Blu-ray. Both OLEDs showed equally pleasing images. The perfect black levels and lack of blooming (stray illumination) in areas like the honey dripper and cityscapes created superior punch to the LCD-based TCLs. And while the snowscapes, deserts and other full-screen bright scenes from the TCL TVs outshined the OLEDs, smaller highlights in areas like the ferris wheel at night were actually brighter on the LGs. Spot measurements using a light meter revealed the C2 as being slightly brighter than the C1 on the ferris wheel, but with the naked eye I couldn't really see the difference. I also saw more saturated, natural color on the LGs, in particular reds like the strawberries and flowers.
Switching to TV content, I put Severance from Apple TV Plus on all four sets and the results were similar. During Helly's brain surgery in Episode 2 the dark areas looked more true and realistic on the OLEDs, without the blooming -- in the letterbox bars near the operating lights, for example -- I saw on the TCLs. The brightness advantage of the LCDs in the office training scene later was obvious, but the faces of Mark and Helly looked flatter and less defined. Again, however, the C1 and C2 were very difficult to tell apart.
The new overlay for Game Optimizer shows vitals like frames per second and variable refresh rate, at a glance.
David Katzmaier/CNET
Gaming: As with nongaming content, the OLEDs looked better than the LCDs in my side-by-side comparisons, although the two LGs again looked very similar. The C1 was my favorite gaming TV last year, and the C2 improves it just a bit.
LG's Game Optimizer mode offers myriad adjustments and the updated overlay menu surfaces them in a more logical way, putting VRR next to FPS and offering a few more shortcuts on the bottom, including to the new Dark Room mode. That mode dims the image and is designed to reduce eyestrain, but even though I game in the dark a lot, I don't have much use for it. Playing Horizon Forbidden West in HDR on PS5, for example, Dark Mode made the moonlit forest less dazzling and the mountain snowscape duller, but if you're someone who's bothered by bright sequences in games it might be useful.
A new Sports mode joins the litany of picture modes, but as I found last year, I liked Standard best for most games with its balance of shadow detail and contrast. FPS is best if you want more visibility into shadows, or you can just crank the Black Stabilizer control up (at the expense of a washed-out image). I appreciate the separate adjustments just for gaming, which most other TV makers don't have.
The full Game Optimizer menu shows even more options.
David Katzmaier/CNET
Buried within Game Optimizer is another setting labeled "Reduce input delay (input lag)" with two options, Standard and Boost. The former, which is the default for any game, serves up an excellent input lag result similar to past LG OLED models: just 13.5ms for both 1080p and 4K HDR sources. Engaging Boost cuts lag even further, to just under 10ms for both. The catch is that Boost is only available for 60Hz sources, so you can't use it with 120Hz games or VRR. And no, I don't think many humans would notice the extra 3ms of lag.
Bright lighting: Although LG touts the C2 as 20% brighter than non-Evo OLED TVs like the C1, my measurements didn't back that claim up. Yes the C2 was a bit brighter, about seven percent on average, but the difference wasn't visible in just about anything I watched. In my experience those differences are slight enough to vary from sample to sample.
Below are my measurements in nits for select comparison TVs in their brightest and most accurate picture modes, using both standard dynamic range (SDR) and high dynamic range (HDR) test patterns.
Light output in nits
TV
Brightest mode (SDR)
Accurate mode (SDR)
Brightest mode (HDR)
Accurate mode (HDR)
Hisense 65U8G
1,619
1,612
2,288
2,288
Samsung QN65QN90A
1,622
1,283
2,596
1,597
TCL 65R635
1,114
792
1,292
1,102
Sony XR65X90J
951
815
945
847
LG OLED65C2
413
389
812
759
LG OLED65C1
409
333
790
719
The C2 is plenty bright enough for just about any viewing environment, but as usual it's not nearly as bright as competing LCD-based models. As with most TVs, the brightest mode for HDR and SDR (Vivid on the C2) is horribly inaccurate. For the accurate results listed above on the C2, I used ISF Expert Bright picture mode (Peak Brightness: High) for SDR and Filmmaker mode for HDR. I recommend C2 owners do the same to get good color in bright rooms. Note that with SDR, you'll need to disable the Auto Energy Saving setting (Support > Energy Saving > Energy Saving Step > Off) to get full brightness.
The screen of the C2 was excellent from off-angle but didn't seem to reduce reflections quite as well as the C1.
David Katzmaier/CNET
Like all OLED TVs, the C2 gets quite a bit dimmer than LCDs when showing full-screen white -- a snow field, for example -- but even in those situations it's hardly dim. The C2's screen finish was excellent at preserving black levels, better than the TCLs' more matte finishes, which beat both LG's at rejecting reflections. The screen of the C1 seemed slightly more reflective than the C2, but the difference was minimal.
Uniformity and viewing angle: Like all OLEDs I've tested the C2 was exemplary in this area compared to LCD-based TVs, with no significant brightness or color variations across the screen and nearly perfect image quality from off-angle. Comparing the C2 and C1 I saw a very slight color shift toward blue and magenta on the C2 that wasn't visible on the C1, something that could be caused by the new Evo panel structure. It was only visible from very extreme angles, however, and has no real impact.
The C2 has myriad picture settings, but if you just want to set it and forget it, use Filmmaker Mode.
David Katzmaier/CNET
Picture setting notes
The most accurate settings were Cinema and Filmmaker mode for both HDR and SDR, as well as the two ISF modes available in SDR. For SDR viewing I went with Cinema for dark rooms (because it was closer to my 2.2 gamma target) and ISF Bright for brighter environments, and for HDR I used Filmmaker (which was very slightly brighter than Cinema HDR). Game Optimizer is best for gaming, thanks to its processing, but quite blue; for the best color accuracy for gaming you should adjust the color temperature control all the way toward red (Picture > Advanced Settings > Color > White Balance > Color temperature > Warm50).
Like most TVs the C2 offers settings that engage smoothing, aka the soap opera effect, as I prefer to turn it off for TV shows and movies (and it's off in Game Optimizer mode because it increases input lag). You can experiment with the settings (Picture > Advanced Settings > Clarity > TruMotion) and it's off by default in the Cinema and Filmmaker modes.
Geek box
SDR
Result
Score
Black luminance (0%)
0.000
Good
Peak white luminance (10% win)
389
Average
Avg. gamma (10-100%)
2.16
Good
Avg. grayscale error (10-100%)
1.34
Good
Dark gray error (30%)
0.67
Good
Bright gray error (80%)
1.66
Good
Avg. color checker error
0.95
Good
Avg. saturation sweeps error
1.00
Good
Avg. color error
0.81
Good
Input lag (Game mode)
13.47
Good
HDR10
Black luminance (0%)
0.000
Good
Peak white luminance (10% win)
759
Average
Gamut % UHDA/P3 (CIE 1976)
99.62
Good
ColorMatch HDR error
5.93
Poor
Avg. color checker error
2.94
Good
Input lag (Game mode, 4K HDR)
13.47
Good
See How We Test TVs for more details.
Portrait Displays Calman calibration software was used in this review.