DJI Phantom 3

See How Easy The Gopro App

Embark on a Quest with See How Easy The Gopro App

Step into a world where the focus is keenly set on See How Easy The Gopro App. Within the confines of this article, a tapestry of references to See How Easy The Gopro App awaits your exploration. If your pursuit involves unraveling the depths of See How Easy The Gopro App, you've arrived at the perfect destination.

Our narrative unfolds with a wealth of insights surrounding See How Easy The Gopro App. This is not just a standard article; it's a curated journey into the facets and intricacies of See How Easy The Gopro App. Whether you're thirsting for comprehensive knowledge or just a glimpse into the universe of See How Easy The Gopro App, this promises to be an enriching experience.

The spotlight is firmly on See How Easy The Gopro App, and as you navigate through the text on these digital pages, you'll discover an extensive array of information centered around See How Easy The Gopro App. This is more than mere information; it's an invitation to immerse yourself in the enthralling world of See How Easy The Gopro App.

So, if you're eager to satisfy your curiosity about See How Easy The Gopro App, your journey commences here. Let's embark together on a captivating odyssey through the myriad dimensions of See How Easy The Gopro App.

Showing posts sorted by relevance for query See How Easy The Gopro App. Sort by date Show all posts

See How Easy The GoPro Omni Makes Shooting 360 VR Video


See how easy the GoPro Omni makes shooting 360 VR video


See how easy the GoPro Omni makes shooting 360 VR video

GoPro wants to make professional 360 VR easy enough for anyone to give it a go.

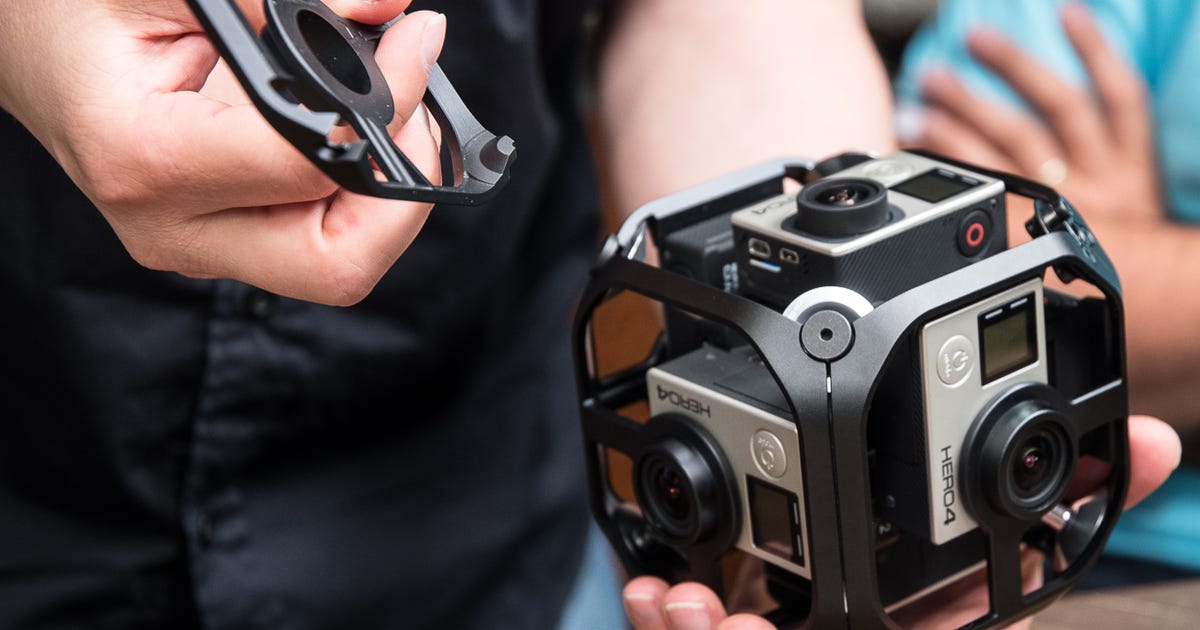
The Omni is a synchronized six camera array. Because it's a GoPro device, naturally it uses six Hero4 Black cameras.

For those willing to hand over $5,000 (around £4,060 or AU$6,530 converted) you get the complete Omni kit. This includes six Hero4 cameras, microSD cards, batteries, an external battery pack, stitching software and more. It costs $1,500 to buy the cage rig separately and bring your own Hero4 cameras. You might think that this is expensive, but other systems like Nokia's Ozo cost upwards of $45,000.

With one button you can start and stop recording on the Omni. There's no need to worry about synchronizing footage using a clap or audio track as the rig automatically does this for you.

Once you capture footage, the Omni Importer software gives a quick preview stitch, plus options for color correction and stabilization.

We took the Omni on several shoots, varying the lighting conditions and motion each time. From the inside of a robot pizza factory to a trip down San Francisco's famous Lombard Street, the Omni's compact size and sturdy frame worked to its advantage.

The rig would greatly benefit from a lock switch, however, as it's really easy to press buttons and turn on cameras by accident when placing it in a bag or back in the protective case.

We even threw it around like a ball, which you can watch in all its nauseating glory in flattened 2D in the video at the top of the page.

Then we took it for a spin at Church of 8 Wheels, watching roller skaters weave their way around the dance floor.

All these videos were shot on default exposure settings at 2.7K resolution on each camera, then exported to a 4K file. Watch the footage either in 360 degrees by moving your mouse around the scene to change the viewpoint, or in a VR headset.

Unlike the Nokia Ozo, you don't need an incredibly powerful computer to process the footage. Processing time will depend on the resolution you choose to export, the file size and the computer itself, but a 2-minute clip (4GB of footage) took approximately 15 minutes using Omni Importer on a midrange iMac.

Parallax can still present an issue when you leave the stitching entirely to the Importer software, as well as ghosting, but fine tweaks can be made in software such as Kolor's Autopano Video -- which is included with the complete Omni package.

Plus you'll probably want to think about an external mic when recording with the Omni. You can use the 3.5 mm GoPro adapter to connect one.


Source

Tags:

DJI Phantom 3 Advanced Review: The Sweet Spot For Features, Performance And Price


Dji phantom 3 advanced review the sweet spot for intermittent dji phantom 3 advanced review the sweet spot for achievement dji phantom 3 advanced review the lincoln dji phantom 3 advanced manual dji phantom 3 advanced vs professional dji phantom 3 standard dji phantom 3 firmware update dji phantom 3 advanced
DJI Phantom 3 Advanced review: The sweet spot for features, performance and price


DJI Phantom 3 Advanced review: The sweet spot for features, performance and price

DJI currently has three versions of its Phantom 3 drone: the Standard , Advanced and Professional . While there are several important differences between the entry-level Phantom 3 Standard ($799, £649 or AU$1,299) and its two linemates, the feature gap between the Professional and Advanced amounts to two things.

The Phantom 3 Professional shoots video in 4K (3,820x2,160-pixel) resolution and has a 100-watt battery charger. It retails for $1,259, £1,159 or AU$1,950. The Advanced captures video in 1080p (1,920x1,080) and has a slower 57-watt charger, but costs $999, £899 or AU$1,550. That's it.

The 4K video from the Professional is a step up from the Advanced's full-HD results. But it's not a big step up, and unless you want or need the extra resolution and have a computer powerful enough to play and edit 4K video, the Advanced's 1080p video doesn't disappoint. And since the drones' features and controllers are the same, the Phantom 3 Advanced is as easy to recommended as it is to fly. Which is to say it's really easy.

Joshua Goldman/CNET

Design and features

The quadcopter itself is, for the most part, unchanged from its predecessor, the Phantom 2 Vision+. You'll find all the same convenience features like color-coded, self-tightening propellers for easy installation and replacement, and a slot-loading battery pack, though it's a newly designed battery making the Phantom 2's batteries incompatible with the 3.

The three-axis gimbal on its belly stabilizes the camera in roll, pitch and yaw directions keeping the video looking smooth even with sudden stick movements or wind gusts. Plus, the camera can do a 90-degree tilt, letting you shoot straight down, straight ahead and anywhere in between. The camera is permanently attached to the gimbal, so if you irreparably damage one or the other, you'll have to replace the entire gimbal-and-camera assembly. It also means you don't have the option of using the camera for anything else, unlike models that use GoPro or other small cameras such as 3D Robotic's Solo or EHang's Ghost.

The Advanced's camera features a Sony-made 12-megapixel 1/2.3-inch CMOS sensor behind a new f2.8 20mm lens (35mm equivalent), which gives you a 94-degree field of view. That's much narrower than the Vision+ camera's 140-degree field of view resulting in far less distortion.

Joshua Goldman/CNET

Sitting to the back of the gimbal is the new Vision Positioning System, a set of sensors to help the Phantom 3 hover while indoors when GPS isn't available. There are many caveats for it to work properly, however, such as not flying over sound-absorbing materials, water or highly reflective surfaces. It's also only effective up to about 10 feet (3 meters). If you're thinking of getting the Advanced to fly above crowds in an arena or auditorium, you better up your piloting skills first.

When you're outside, GPS is used to help the drone determine its position and yours and is what makes it possible for the drone to stop and hover in place when you release the controller's sticks as well as delivering accurate location data for safety features like automatically returning to a home position. The more satellites it can lock onto, the better off you are, so DJI added the Russian navigational system, GLONASS, which lets it tap into more satellites than GPS alone.

Satellite acquisition speeds are noticeably faster compared to the Phantom 2 Vision+, so you can lock on and start flying more quickly. Also, with the Vision+ there were times I would struggle to get a solid lock on six satellites (the minimum for GPS-assisted flight). The Advanced never had a problem grabbing onto 10 satellites or more in a matter of seconds and regularly had upward of 15 in my testing. This makes a huge difference when it comes to putting the drone in the exact position you want for photos and video.

Joshua Goldman/CNET

The controller and DJI Go mobile app (formerly called Pilot) are important, too, of course. The Advanced and its controller have DJI's Lightbridge technology for better image transmission between the sky and ground. Lightbridge allows for a continuous connection back and forth between the two and increases flight range over the wireless range extender used for the Phantom 2 and the entry-level Phantom 3 Standard. This does mean you'll need your iOS or Android device's charging cable to use it, but the performance improvement is well worth it.

On each of the top corners you'll find discrete camera controls for starting and stopping recordings, taking pictures, reviewing your shots and two wheels, one for adjusting exposure compensation, ISO and shutter speed and the other for the gimbal's tilt. Two customizable buttons are on the bottom as well that can be used for a handful of gimbal or camera functions. Overall it's a great setup, but more than a few times I accidentally switched to playback mode while trying to snap a photo.

DJI also included a Return-to-Home button for those times when panic starts to set in and you just want to bring it on back. The controller's battery is built in and will last through several flights before you'll need to recharge it. DJI simplified charging, too, using one power supply with two cables attached: one for the controller's battery and one for the drone's.

Andrew Hoyle/CNET

Connecting your iOS or Android smartphone or tablet is as simple as plugging in your device's charging cable into the USB port on the Advanced's controller. (It'll keep your device charged while you use it for flying, too.) Then, with the controller and drone turned on, you just open the DJI Go app and tap to get the camera view.

The controller's device mount can handle phones and tablets big and small, however the app is optimized for use with the iPhone 5S, 6 and 6 Plus. Android device support is thin, with just the Samsung Galaxy S5 and Note 3, Sony Xperia Z3, Google Nexus 7 II, Google Nexus 9, Xiaomi Mi 3 and ZTE Nubia Z7 Mini listed. I tested with both a 6 Plus and a Galaxy S5 and the app performance was clearly stronger on the iOS device with the S5 occasionally freezing up forcing me midflight to restart the app.

In addition to a first-person view from the camera, you get complete camera controls, meters for signal strengths, GPS and battery life and access to settings for the whole system. It will also notify you if a firmware update is necessary (which occur with some regularity) and, eventually, you'll be able to do the updates through the app; currently they're done by downloading a file to a microSD card and popping the card into the drone's camera.

The app can also be used for automated take-offs and landings, if you don't want to handle them with stick commands, and triggering the Return-to-Home safety function. Another new safety feature of sorts is the Beginner Mode. This sets up virtual barriers called a geofence with a maximum altitude and flight distance of 30 meters (98 feet), giving you a safe way to limit where the drone can travel. It's pretty amazing to see in action as you send the Phantom full throttle toward its limit and the drone stops as if it's been snagged in an invisible net.

As for the camera settings, video recording options include full HD (1,920x1,080-pixel) and HD (1,280x720-pixel) resolutions at 24, 25, 30, 48, 50, 60 frames per second and you can choose between MOV or MP4 formats. Thanks to the Lightbridge technology, you can even use it to live-stream video straight to YouTube and uses your mobile device's mic for capturing audio.

Joshua Goldman/CNET

For photos, you can capture in JPEG, DNG raw format or both simultaneously. Shooting modes include single shots or bursts of three, five or seven; HDR and auto exposure bracketing (0.7EV bias) of three or five pictures; and time-lapse continuous shooting at 5-, 7-, 10-, 20- and 30-second intervals. You can also control ISO, exposure compensation and white balance.

At the time of this review the Phantom 3 Advanced (and Professional) didn't have DJI's Intelligent Flight features including waypoint navigation, point of interest (POI) flight planning or Follow Me function, but these are now available.

Waypoint navigation lets you set up a multipoint path for the drone to follow while you control the camera, while POI flight planning allows you to autonomously fly a circle around a subject, keeping it centered. Follow Me sets the drone to track your movement based on your orientation. Support for SDK apps already created by third-party DJI developers is available as well, giving the Advanced more features and future potential.

Joshua Goldman/CNET

Flying

If you're reading this review, you probably already know that DJI's Phantom quadcopters have a reputation of being extremely easy to fly (and fly away, but it's something I've never experienced). With the Phantom 3 the experience has only improved.

DJI has added a flight simulator to the mobile app (iOS only) that you can use to learn your way around the app and controls. I found it to be a little frustrating because the actual drone performs so much better in real life. Regardless of safety features and how stable the Phantom 3 is, I highly recommend taking your first flights out in an open area where there are no people or distractions.

Again, if you don't want to use stick commands, you can takeoff and land with a tap and a swipe on your screen. With GPS, the drone will just sit and hover wherever you leave it. Start flying a bit too close to a tree and you can just let go of the sticks and it will stop while you regroup and steer away. You can fly without GPS, but if you release the sticks the Phantom won't stop but instead continues to drift in the direction it was last headed. It's a gut-wrenching experience watching $1,000 float away seemingly uncontrollably, so it's best to fly with GPS until you fully understand the controls.

Joshua Goldman/CNET

The app is well laid out and at a glance you can see all the information you need. There's even a battery timeline meter giving you estimates on everything from remaining flight time to the power required to return home or land.

Speaking of battery life, DJI says you'll be able to get up to 23 minutes of flight time. I was able to get to just under 21 minutes of flying -- nothing too aggressive, mostly hovering in place and in light wind -- before it took over and landed itself. That flight time is very good when you factor in all that it's doing to stay in the air while recording video. It does feel short, though, especially if you're trying to get out some distance for a picture and still make it back. And extras are pricey at around $149, £125 or AU$205 each.

Video and photo quality

Closely examining the 4K video of the Phantom 3 Professional or DJI's higher-end Inspire 1 straight from the camera against the 1080p clips from the Advanced, there are noticeable differences, mainly in the level of fine detail and sharpness of subjects. There is better detail from the 4K and it's especially visible if you're viewing on a large TV or monitor. So, if it's necessary for you to capture the highest quality video without ponying up a ton more cash, the Phantom 3 Professional is the better choice.

Frankly, though, the full-HD clips from the Advanced look pretty great as do its photos, and they're more than suitable for sharing online and/or viewing on a phone, tablet or laptop. It's also a huge jump in quality from the Phantom 2 Vision+. For those considering an upgrade from that model to the Professional, your needs might be met with the less expensive Advanced.

Joshua Goldman/CNET

The live-streaming quality to YouTube is just OK. You have to have a pretty strong wireless connection to keep the video moving smoothly and even then the results were a bit glitchy and compressed. Still, it's sort of amazing it can do it at all and could be helpful for professional uses.

Lastly, whenever you record a video, a compressed 720p version is stored to your mobile device. To help make the most of these clips, DJI built in a basic video editor to the Go app. You can use it to cut up your clips, gather them up and then combine them into one movie. DJI also included some style templates with music you can apply before you save. Then you can just share away.

Joshua Goldman/CNET

Conclusion

The DJI Phantom 3 Advanced is a great little aerial photo and video machine, however it's the whole system -- the drone, the controller and the app -- that make it so easy to pick up and just start flying. It's not inexpensive, but compared with the $900 Parrot Bebop with its Skycontroller , you won't regret spending the extra money. And if you don't need the Professional's 4K video, you can put your money toward a spare battery or two so the good times don't come to an end after 20 minutes.


Source

https://nichols.my.id/how-to-download-draft-tiktok.html

.

DJI Phantom 3 Advanced Review: The Sweet Spot For Features, Performance And Price


Dji phantom 3 advanced review the sweet spot for those big dji phantom 3 advanced review thesaurus dji phantom 3 advanced review the lincoln dji phantom 3 advanced review the midnight dji phantom 3 advanced review the ordinary dji phantom 3 advanced review the batman dji phantom 3 advanced drone review dji phantom 3 advanced downloads dji phantom 3 advanced quadcopter drone dji phantom 3 professional dji phantom 3 standard manual pdf dji phantom 2

DJI Phantom 3 Advanced review: The sweet spot for features, performance and price


DJI Phantom 3 Advanced review: The sweet spot for features, performance and price

DJI currently has three versions of its Phantom 3 drone: the Standard , Advanced and Professional . While there are several important differences between the entry-level Phantom 3 Standard ($799, £649 or AU$1,299) and its two linemates, the feature gap between the Professional and Advanced amounts to two things.

The Phantom 3 Professional shoots video in 4K (3,820x2,160-pixel) resolution and has a 100-watt battery charger. It retails for $1,259, £1,159 or AU$1,950. The Advanced captures video in 1080p (1,920x1,080) and has a slower 57-watt charger, but costs $999, £899 or AU$1,550. That's it.

The 4K video from the Professional is a step up from the Advanced's full-HD results. But it's not a big step up, and unless you want or need the extra resolution and have a computer powerful enough to play and edit 4K video, the Advanced's 1080p video doesn't disappoint. And since the drones' features and controllers are the same, the Phantom 3 Advanced is as easy to recommended as it is to fly. Which is to say it's really easy.

Joshua Goldman/CNET

Design and features

The quadcopter itself is, for the most part, unchanged from its predecessor, the Phantom 2 Vision+. You'll find all the same convenience features like color-coded, self-tightening propellers for easy installation and replacement, and a slot-loading battery pack, though it's a newly designed battery making the Phantom 2's batteries incompatible with the 3.

The three-axis gimbal on its belly stabilizes the camera in roll, pitch and yaw directions keeping the video looking smooth even with sudden stick movements or wind gusts. Plus, the camera can do a 90-degree tilt, letting you shoot straight down, straight ahead and anywhere in between. The camera is permanently attached to the gimbal, so if you irreparably damage one or the other, you'll have to replace the entire gimbal-and-camera assembly. It also means you don't have the option of using the camera for anything else, unlike models that use GoPro or other small cameras such as 3D Robotic's Solo or EHang's Ghost.

The Advanced's camera features a Sony-made 12-megapixel 1/2.3-inch CMOS sensor behind a new f2.8 20mm lens (35mm equivalent), which gives you a 94-degree field of view. That's much narrower than the Vision+ camera's 140-degree field of view resulting in far less distortion.

Joshua Goldman/CNET

Sitting to the back of the gimbal is the new Vision Positioning System, a set of sensors to help the Phantom 3 hover while indoors when GPS isn't available. There are many caveats for it to work properly, however, such as not flying over sound-absorbing materials, water or highly reflective surfaces. It's also only effective up to about 10 feet (3 meters). If you're thinking of getting the Advanced to fly above crowds in an arena or auditorium, you better up your piloting skills first.

When you're outside, GPS is used to help the drone determine its position and yours and is what makes it possible for the drone to stop and hover in place when you release the controller's sticks as well as delivering accurate location data for safety features like automatically returning to a home position. The more satellites it can lock onto, the better off you are, so DJI added the Russian navigational system, GLONASS, which lets it tap into more satellites than GPS alone.

Satellite acquisition speeds are noticeably faster compared to the Phantom 2 Vision+, so you can lock on and start flying more quickly. Also, with the Vision+ there were times I would struggle to get a solid lock on six satellites (the minimum for GPS-assisted flight). The Advanced never had a problem grabbing onto 10 satellites or more in a matter of seconds and regularly had upward of 15 in my testing. This makes a huge difference when it comes to putting the drone in the exact position you want for photos and video.

Joshua Goldman/CNET

The controller and DJI Go mobile app (formerly called Pilot) are important, too, of course. The Advanced and its controller have DJI's Lightbridge technology for better image transmission between the sky and ground. Lightbridge allows for a continuous connection back and forth between the two and increases flight range over the wireless range extender used for the Phantom 2 and the entry-level Phantom 3 Standard. This does mean you'll need your iOS or Android device's charging cable to use it, but the performance improvement is well worth it.

On each of the top corners you'll find discrete camera controls for starting and stopping recordings, taking pictures, reviewing your shots and two wheels, one for adjusting exposure compensation, ISO and shutter speed and the other for the gimbal's tilt. Two customizable buttons are on the bottom as well that can be used for a handful of gimbal or camera functions. Overall it's a great setup, but more than a few times I accidentally switched to playback mode while trying to snap a photo.

DJI also included a Return-to-Home button for those times when panic starts to set in and you just want to bring it on back. The controller's battery is built in and will last through several flights before you'll need to recharge it. DJI simplified charging, too, using one power supply with two cables attached: one for the controller's battery and one for the drone's.

Andrew Hoyle/CNET

Connecting your iOS or Android smartphone or tablet is as simple as plugging in your device's charging cable into the USB port on the Advanced's controller. (It'll keep your device charged while you use it for flying, too.) Then, with the controller and drone turned on, you just open the DJI Go app and tap to get the camera view.

The controller's device mount can handle phones and tablets big and small, however the app is optimized for use with the iPhone 5S, 6 and 6 Plus. Android device support is thin, with just the Samsung Galaxy S5 and Note 3, Sony Xperia Z3, Google Nexus 7 II, Google Nexus 9, Xiaomi Mi 3 and ZTE Nubia Z7 Mini listed. I tested with both a 6 Plus and a Galaxy S5 and the app performance was clearly stronger on the iOS device with the S5 occasionally freezing up forcing me midflight to restart the app.

In addition to a first-person view from the camera, you get complete camera controls, meters for signal strengths, GPS and battery life and access to settings for the whole system. It will also notify you if a firmware update is necessary (which occur with some regularity) and, eventually, you'll be able to do the updates through the app; currently they're done by downloading a file to a microSD card and popping the card into the drone's camera.

The app can also be used for automated take-offs and landings, if you don't want to handle them with stick commands, and triggering the Return-to-Home safety function. Another new safety feature of sorts is the Beginner Mode. This sets up virtual barriers called a geofence with a maximum altitude and flight distance of 30 meters (98 feet), giving you a safe way to limit where the drone can travel. It's pretty amazing to see in action as you send the Phantom full throttle toward its limit and the drone stops as if it's been snagged in an invisible net.

As for the camera settings, video recording options include full HD (1,920x1,080-pixel) and HD (1,280x720-pixel) resolutions at 24, 25, 30, 48, 50, 60 frames per second and you can choose between MOV or MP4 formats. Thanks to the Lightbridge technology, you can even use it to live-stream video straight to YouTube and uses your mobile device's mic for capturing audio.

Joshua Goldman/CNET

For photos, you can capture in JPEG, DNG raw format or both simultaneously. Shooting modes include single shots or bursts of three, five or seven; HDR and auto exposure bracketing (0.7EV bias) of three or five pictures; and time-lapse continuous shooting at 5-, 7-, 10-, 20- and 30-second intervals. You can also control ISO, exposure compensation and white balance.

At the time of this review the Phantom 3 Advanced (and Professional) didn't have DJI's Intelligent Flight features including waypoint navigation, point of interest (POI) flight planning or Follow Me function, but these are now available.

Waypoint navigation lets you set up a multipoint path for the drone to follow while you control the camera, while POI flight planning allows you to autonomously fly a circle around a subject, keeping it centered. Follow Me sets the drone to track your movement based on your orientation. Support for SDK apps already created by third-party DJI developers is available as well, giving the Advanced more features and future potential.

Joshua Goldman/CNET

Flying

If you're reading this review, you probably already know that DJI's Phantom quadcopters have a reputation of being extremely easy to fly (and fly away, but it's something I've never experienced). With the Phantom 3 the experience has only improved.

DJI has added a flight simulator to the mobile app (iOS only) that you can use to learn your way around the app and controls. I found it to be a little frustrating because the actual drone performs so much better in real life. Regardless of safety features and how stable the Phantom 3 is, I highly recommend taking your first flights out in an open area where there are no people or distractions.

Again, if you don't want to use stick commands, you can takeoff and land with a tap and a swipe on your screen. With GPS, the drone will just sit and hover wherever you leave it. Start flying a bit too close to a tree and you can just let go of the sticks and it will stop while you regroup and steer away. You can fly without GPS, but if you release the sticks the Phantom won't stop but instead continues to drift in the direction it was last headed. It's a gut-wrenching experience watching $1,000 float away seemingly uncontrollably, so it's best to fly with GPS until you fully understand the controls.

Joshua Goldman/CNET

The app is well laid out and at a glance you can see all the information you need. There's even a battery timeline meter giving you estimates on everything from remaining flight time to the power required to return home or land.

Speaking of battery life, DJI says you'll be able to get up to 23 minutes of flight time. I was able to get to just under 21 minutes of flying -- nothing too aggressive, mostly hovering in place and in light wind -- before it took over and landed itself. That flight time is very good when you factor in all that it's doing to stay in the air while recording video. It does feel short, though, especially if you're trying to get out some distance for a picture and still make it back. And extras are pricey at around $149, £125 or AU$205 each.

Video and photo quality

Closely examining the 4K video of the Phantom 3 Professional or DJI's higher-end Inspire 1 straight from the camera against the 1080p clips from the Advanced, there are noticeable differences, mainly in the level of fine detail and sharpness of subjects. There is better detail from the 4K and it's especially visible if you're viewing on a large TV or monitor. So, if it's necessary for you to capture the highest quality video without ponying up a ton more cash, the Phantom 3 Professional is the better choice.

Frankly, though, the full-HD clips from the Advanced look pretty great as do its photos, and they're more than suitable for sharing online and/or viewing on a phone, tablet or laptop. It's also a huge jump in quality from the Phantom 2 Vision+. For those considering an upgrade from that model to the Professional, your needs might be met with the less expensive Advanced.

Joshua Goldman/CNET

The live-streaming quality to YouTube is just OK. You have to have a pretty strong wireless connection to keep the video moving smoothly and even then the results were a bit glitchy and compressed. Still, it's sort of amazing it can do it at all and could be helpful for professional uses.

Lastly, whenever you record a video, a compressed 720p version is stored to your mobile device. To help make the most of these clips, DJI built in a basic video editor to the Go app. You can use it to cut up your clips, gather them up and then combine them into one movie. DJI also included some style templates with music you can apply before you save. Then you can just share away.

Joshua Goldman/CNET

Conclusion

The DJI Phantom 3 Advanced is a great little aerial photo and video machine, however it's the whole system -- the drone, the controller and the app -- that make it so easy to pick up and just start flying. It's not inexpensive, but compared with the $900 Parrot Bebop with its Skycontroller , you won't regret spending the extra money. And if you don't need the Professional's 4K video, you can put your money toward a spare battery or two so the good times don't come to an end after 20 minutes.


Source

IronX By DXG 5G9V HD Action Cam Review: Good Bang-for-your-buck Action Cam


IronX by DXG 5G9V HD action cam review: Good bang-for-your-buck action cam


IronX by DXG 5G9V HD action cam review: Good bang-for-your-buck action cam

DXG might not have the name recognition of GoPro or Sony, but it's no stranger to camcorders. The manufacturer has been around for more than 20 years as a camera OEM/ODM and basically specializes in making inexpensive camcorders with attention-grabbing specs for the money. And that's pretty much what it delivers with its first action cam, the IronX 5G9V HD.

For $250 (and you can actually find it for less than $200) you get a nice action cam setup that shoots at resolutions up to 1080p at 30 frames per second as well as 720p at 60fps, has built-in Wi-Fi, and comes with just about every accessory you'd need to start shooting out of the box.

Now, specs aren't everything, and its video, like that of other DXG camcorders we've tested in the past, won't blow you away. But if you're looking for a way to capture your adventures without investing a lot of money up front, this is a good way to go.

In the box
Accessories are an easy way to add value with action cams, and DXG didn't skimp. For starters, you get a waterproof housing that's good down to nearly 200 feet (60 meters) with both closed and vented backs, so audio isn't always muffled when you're shooting out of the water. The housing's bottom has a T-tip adapter on it that slides onto the included T-tip swivel plate. This plate can be slid into the curved or flat adhesive mounts that are included for mounting and dismounting the camera (see the slideshow below to take a closer look).

Joshua Goldman/CNET

The T-tip adapter also has slots that you can feed a Velcro strap (included as well) through for attaching the camera to a vented helmet. There are antifog strips to help prevent, um, fogging when sealed up in the housing; Micro-USB and Micro-HDMI cables; a USB power adapter for charging the camera; a security tether; and a lens cap. And to top it all off, DXG includes a simple RF wrist remote that lets you start and stop recordings and take pictures.

If you're worried that because this isn't a GoPro there will be a shortage of mounts, don't be. DXG has several mounts that use the T-tip adapter (head, chest, handbar, rollbar, rail, and suction cup) as well as a 1/4-20-threaded adapter for tripod mounts and a T-tip connector that works with mounts for GoPro's housings.

Design and features
The IronX is similar in design to a GoPro camera: a small box with a lens that requires a housing of some sort for mounting. It has an f2.6 15mm lens (35mm equivalent), which gives you an ultrawide 170 degree angle of view. The camera alone is fairly lightweight, with most of its heft coming from its removable rechargeable battery pack. The plastic body doesn't feel like it can take much abuse on its own, though, so you'll want to be careful handling it outside of its housing.

On the left side you'll find a Micro-USB port that's used for charging as well as transferring videos and photos off the camera. There's also a mic jack for use with an external mic (not included) for better audio than you'll get with the built-in mono mic. However, the included housing doesn't allow access to the jack, but DXG does sell a simple camera holder that gives you access while mounting the camera.

The camera's right side has a Mini-HDMI port for direct playback on an external display and a microSDHC card slot that supports cards up to 32GB. Given all that the camera does come with, it's a bit of a surprise that no memory card is included, which is really the only thing preventing the IronX from being ready to go out of the box.

The waterproof housing seems like it can take some abuse and stood up to me dropping it a couple times, including a short fall from a moving bike onto pavement. The neon yellow and orange accents make it look a bit like a toy, but at least it didn't perform like one.

Joshua Goldman/CNET

A highlight of the camera is its onboard OLED display. It's very bright and easy to read even in direct sun. The menu system is relatively simple to navigate, too, with only the two buttons on top of the camera. There's also a setting that lets you flip the display, so it's easier to read regardless of how the camera is mounted.

Diving further into the settings, you can set the camera to record at three resolutions: 1080p at 30fps, 960p at 30fps, and 720p at 60fps. Also, the camera supports dual-stream recording, which simultaneously saves your full-resolution video along with a low-res thumbnail version for playback on mobile devices and faster uploads.

Photos are shot at 5-megapixel resolution and can be taken one at a time, in a burst of 10, or as a time-lapse video, snapping shots at 1, 3, 5, 10, 30, or 60 seconds.

Joshua Goldman/CNET

The IronX also has built-in Wi-Fi. Download the free iOS or Android app and you can use it to connect directly to the camera so you can see just what you're shooting. It can be used to control the camera, too, including changing resolution settings. And, if you shoot something you want on your mobile device for viewing and sharing, you can use it to transfer them as well. The app works well, although switching between recording and playback required me to reconnect to the camera in between. (That's likely a bug that can be fixed, though.)

Video quality


Source

Tags:

Search This Blog

Menu Halaman Statis

close