Step into a world where the focus is keenly set on Photo Shoot At Home. Within the confines of this article, a tapestry of references to Photo Shoot At Home awaits your exploration. If your pursuit involves unraveling the depths of Photo Shoot At Home, you've arrived at the perfect destination.
Our narrative unfolds with a wealth of insights surrounding Photo Shoot At Home. This is not just a standard article; it's a curated journey into the facets and intricacies of Photo Shoot At Home. Whether you're thirsting for comprehensive knowledge or just a glimpse into the universe of Photo Shoot At Home, this promises to be an enriching experience.
The spotlight is firmly on Photo Shoot At Home, and as you navigate through the text on these digital pages, you'll discover an extensive array of information centered around Photo Shoot At Home. This is more than mere information; it's an invitation to immerse yourself in the enthralling world of Photo Shoot At Home.
So, if you're eager to satisfy your curiosity about Photo Shoot At Home, your journey commences here. Let's embark together on a captivating odyssey through the myriad dimensions of Photo Shoot At Home.
Shoot amazing photos with this DIY filter for your phone's camera
Shoot amazing photos with this DIY filter for your phone's camera
1 of 11 Alina Bradford/CNET
Professional photographers use filters that attach to their camera lens to create various effects in their photos. You can do the same by making detachable filters for your phone's camera. It's easy and inexpensive.
2 of 11 Alina Bradford/CNET
What you need to make a DIY camera filter
To make your homemade filters you need scissors, markers, tape, a phone case, a piece of cardboard or thick paper, and adhesive Velcro.
3 of 11 Alina Bradford/CNET
Trace your phone case
Start by laying your phone case on the paper or cardboard and tracing around the camera hole with a marker.
4 of 11 Alina Bradford/CNET
Draw a circle
Draw a circle around the the circle or square you just made. The second circle should be around 1/4 inch (0.63 centimeters) away from the first. This will be the base of your filter.
5 of 11 Alina Bradford/CNET
Cut the circle
Now, cut out the circles so that you have a donut shape.
6 of 11 Alina Bradford/CNET
Add Velcro
Cut a small strip of Velcro. Stick one side to the phone case right beside the camera hole and stick the other side on the filter.
7 of 11 Alina Bradford/CNET
Choose your filter
Now comes the fun part. You can experiment with a wide range of materials to add to your filter base. Each material will make your photos look different. Some materials I've tried are colored nylons, latex gloves and colored celophane.
8 of 11 Alina Bradford/CNET
Add your filter material to the base
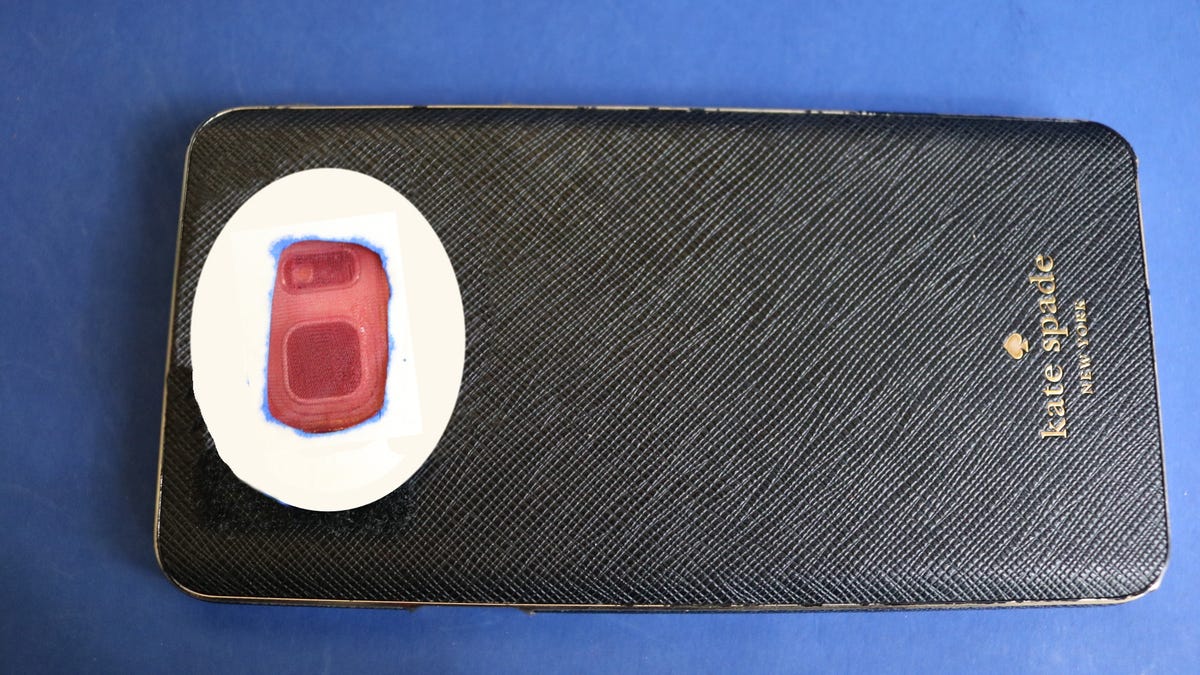
For this filter, I chose red nylon. To add the material to the base, just cut a small swatch and tape it to the base with clear tape. Make sure the material is taped so that it covers the entire hole in the center of the base.
Now attach the Velcro on the filter to the Velcro on the phone case. Slip your phone into the case and try out your filter.
9 of 11 Alina Bradford/CNET
Red nylon filter
Here's what my red nylon photo looked like.
11 of 11 Alina Bradford/CNET
Cellophane filter
To make colorful cellophane filters, tape a piece of clear cellophane from a food wrapper to a filter base. Then, color it with a marker. You can make the filter a solid color or several different colors.
Samsung galaxy s ii at amp t review samsung galaxy s ii at t samsung galaxy s ii at amp t review samsung galaxy s iii samsung galaxy s ii at amp t review samsung galaxy s ii leather samsung galaxy s ii at amp t review samsung a32 samsung galaxy s ii at amp t customer service samsung galaxy s ii at amp t wireless cell phone samsung galaxy s ii at amp t yahoo home page samsung galaxy s ii at amp t wireless my account samsung galaxy s ii at amp t stock price today nasdaq samsung galaxy s ii at amp t store near me samsung galaxy s iii samsung galaxy s ii epic 4g touch samsung galaxy s iii mini samsung galaxy s ii serial number samsung galaxy s21 samsung galaxy s7 samsung galaxy s22 samsung galaxy a13
Samsung Galaxy S II (AT&T) review: Samsung Galaxy S II (AT&T)
Samsung Galaxy S II (AT&T) review: Samsung Galaxy S II (AT&T)
Editors' note: Portions of this review were taken from our evaluation of the unlocked Samsung Galaxy S II and the Samsung Epic 4G Touch, since the devices share a number of similarities.
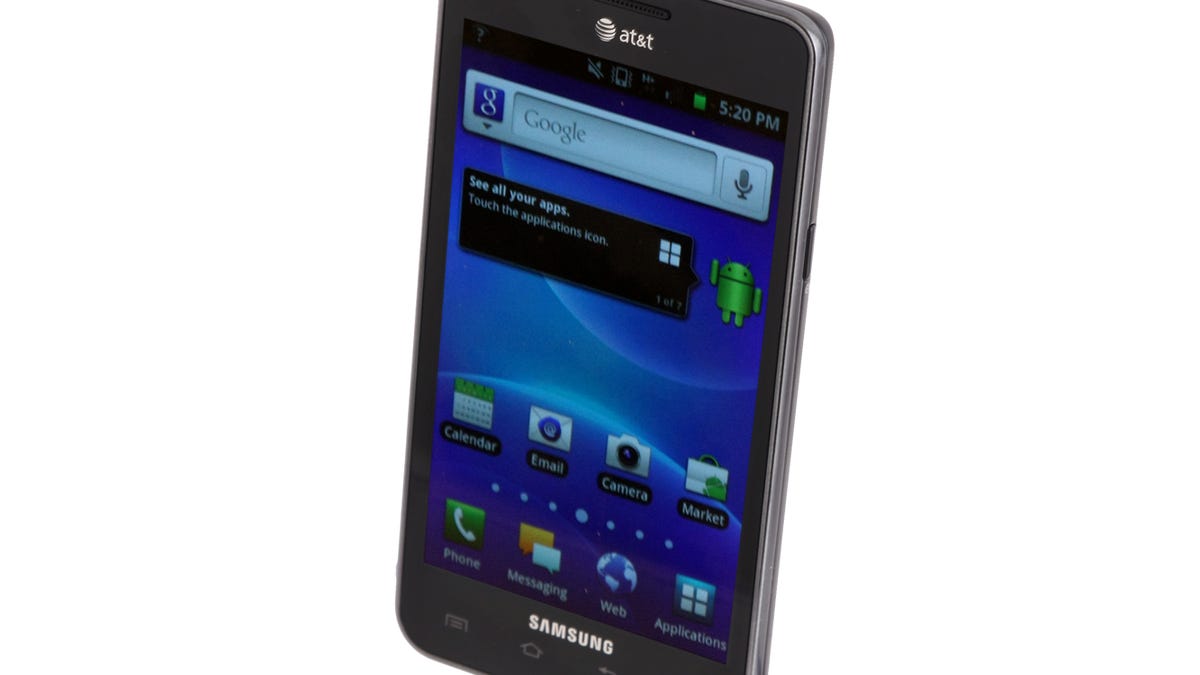
The Samsung Galaxy S II is making the carrier rounds, and its next stop is AT&T. Available on October 2 for $199.99 with a two-year contract, the Samsung Captivate successor boasts a faster dual-core processor, sharper display, and better cameras. It more closely resembles the unlocked Galaxy S II than the T-Mobile and Sprint versions, since it features a smaller 4.3-inch touch screen (versus 4.5 inches), but we actually think that's a good thing since it offers a more appealing design. More importantly, the Android Gingerbread device delivers great performance in almost all aspects and earns itself our Editors' Choice Award. If you're an AT&T customer looking for an Android smartphone, the Samsung Galaxy S II would certainly be our top choice.
Design The Samsung Galaxy S II joins AT&T's lineup as the carrier's thinnest (oh, if only we got a dollar for every time we heard that superlative) 4G smartphone. The handset measures 4.96 inches tall by 2.6 inches wide by 0.35 inch thick--a whole 0.1mm thinner than the Infuse 4G, if you're counting. The difference in thickness is negligible, but still, the Galaxy S II is much easier to hold and pocket since it's not as wide or as tall as the Infuse or the Sprint and T-Mobile versions of the phone.
This is because the AT&T Galaxy S II has a smaller 4.3-inch (versus 4.5 inches) touch screen. Screen size is certainly a personal thing, but we found 4.3 inches to be enough to comfortably view Web pages, video, and messages. Plus, the AMOLED Plus, 800x480-pixel display shows off deep colors and sharp images and text.
The touch screen is responsive. The smartphone offers several virtual keyboards, including Android, Samsung, and Swype. It registered all our taps, and we were able to easily navigate through the menus. In addition to using the standard touch interface, you can also use motion gestures. With the settings turned on, you can flip the phone to mute it. With two fingers on the screen, you can tilt to zoom in and out in the photo gallery and browser. Flicking your wrist left or right (panning) can move a home screen icon when you're holding it. However, panning and zooming weren't as responsive as we'd like. While most of the motion controls may not figure into your daily use, this type of gesture functionality adds welcome options in general. You can also perform certain tasks, such as composing and sending a message, calling a contact, and launching the music player, using voice commands with the Vlingo-powered Voice Talk app.
Below the screen, you'll find the menu, home, back, and search buttons. On the left side, there's a volume rocker and a power/lock button on the right. The top of the device houses a 3.5mm headphone jack, and the bottom features a Micro-USB port.
Just above the screen in the left-hand corner is a 2-megapixel camera for video calls; the main 8-megapixel camera and flash sit on back. The microSD expansion slot is located behind the very flimsy plastic battery door. The latter aside, the Galaxy S II feels nice in the hand, and because of its more manageable size, we think it will be an attractive option for a wider audience than the Infuse 4G or other Galaxy S II models.
AT&T packages the Samsung Galaxy S II with just the basics: an AC adapter, a USB cable, and reference material.
User interface The Samsung Galaxy S II runs Android 2.3.4 Gingerbread along with Samsung's latest TouchWiz 4.0 user interface. We're often less enthusiastic about custom interfaces; they sometimes add unwanted complexity and unremovable apps, and are usually slower to update to new OS versions. However, TouchWiz 4.0 has a few things going for it: some carryovers from previous versions of TouchWiz. There are seven home screens, for example, and the notification pull-down menu has icons for easily turning on Wi-Fi, Bluetooth, GPS, flight mode, and screen rotation.
Customizing the home screens is made easier with a carousel-like setup that lets you move through the various panels to add and remove shortcuts and widgets at the same time. Previously, you had to do a long-press on one screen to change it and then repeat the process if you wanted to change another page. You can also now resize Samsung Live Panel widgets, and there's a more fluid motion when scrolling through widget lists and home pages.
Some of the changes are purely cosmetic, but they certainly add some polish to the UI. There are also some useful additions as well, such as an integrated task manager that displays all your active applications, downloaded apps with the option to uninstall, RAM status, and system storage. Also great: the ability to now capture screenshots by simply pressing the power button and home key simultaneously.
Features The quad-band Samsung Galaxy S II offers a speakerphone, conference calling, voice dialing, video calling, and text and multimedia messaging. The smartphone is compatible with AT&T's HSPA+ network and can be used as a mobile hot spot for up to five devices. Bluetooth 3.0, Wi-Fi (802.11a/b/g/n), and GPS are also onboard.
As we noted earlier, it is running Gingerbread and all of Google's services are accounted for: e-mail, maps, voice navigation, search, chat, Places, Latitude, and YouTube, plus basic tools like a calendar, a calculator, an alarm clock, a world clock, a stopwatch, and a timer. In addition, Samsung and AT&T have preloaded the phone with a number of extras, including the Quickoffice suite, Kies Air (a Wi-Fi-based PC-to-phone sync manager), AT&T Navigator, AT&T Code Scanner, and Yellow Pages Mobile. We're not a fan of having so much bloatware on the phone, but thankfully, AT&T now gives you the option to uninstall some of its apps, such as AT&T FamilyMap and Live TV.
There is no shortage of entertainment options on the Galaxy S II. In addition to the built-in music and video player, the smartphone offers Samsung's Media Hub where you can download movies and TV shows to rent or own. You can also shoot your owns videos and photos with the handset's 8-megapixel camera, which is capable of 1080p HD video capture. The camera app has plenty of tools, such as effects, white-balance controls, ISO settings, and more. Samsung also throws in a photo and video editor, which we appreciate. The video editor is particularly great, since it makes it easy to piece together clips with different effects and music, all from right on your phone.
Picture quality was impressive. Even under less-than-ideal lighting conditions, the camera produced bright, detailed, and clear images, and camera performance was fast. Video quality was also very good. Again, colors looked vibrant and there was very little blurring and pixelation, even during action sequences. Once you're done capturing media, you can store files to the Galaxy S II's 16GB of internal memory or to an SD card (expansion slot accepts up to 32GB). You can also share via the usual social network channels or to your HDTV using DLNA or with an HDMI adapter.
Performance We tested the quad-band Samsung Galaxy S II in New York using AT&T service and call quality was excellent. We enjoyed clear audio with very little to no background noise. Occasionally, callers sounded a bit muffled, but overall, the voices sounded true to life without any kind of distortion. Friends were also impressed with the sound quality and didn't have any major complaints.
Samsung Galaxy S II call quality sampleListen now:
Speakerphone quality wasn't quite as good. Callers said they could hear a bit of an echo, and on our end, they sounded far away and there was barely enough volume to hear them in noisier environments. We were able to pair the smartphone with the Logitech Mobile Traveller Bluetooth headset and Mobile S9 Bluetooth Active Headphones and make calls and listen to music without any problems.
We didn't experience any dropped calls during our review period. Data speeds on AT&T's HSPA+ network, which the carrier calls 4G, were OK, but not a standout compared with competing carriers' 4G networks. Using Ookla's Speedtest.net app, we averaged download speeds of 2.36Mbps and 1.12Mbps up. With such speeds, CNET's full site loaded in 20 seconds, and the mobile sites for CNN and ESPN came up in 5 seconds and 7 seconds, respectively. The phone was able to load and play high-quality YouTube videos in a couple of seconds, and playback was smooth and continuous.
Equipped with Samsung's 1.2GHz dual-core Exnyos processor, general performance on the Galaxy S II was fast and powerful. Navigating the phone was zippy, and we were able to launch apps and switch between tasks with ease. Whether it was playing games or viewing Flash content, the smartphone was up to the challenge.
The Samsung Galaxy S II ships with a 1,650mAh lithium ion battery with a rated talk time of 8 hours and up to 16 days of standby time. The Galaxy S II provided an impressive 10 hours of continuous talk time in ourbattery drain tests. According to FCC radiation tests, the Galaxy S II has a digital SAR rating of 0.36W/kg and a Hearing Aid Compatibility rating of M3.
Conclusion As we've already seen from the other series models, the Samsung Galaxy S II is an excellent Android smartphone, and it makes for a great addition to AT&T's lineup. The carrier already has a number of other great Android devices, such as the Samsung Infuse 4G, Motorola Atrix 4G, and HTC Inspire 4G, but the Galaxy S II brings the total package of an attractive design, great set of features, and solid performance to make it the top pick and Editors' Choice winner.
Xiaomi yi review a higher end action cam with auto xiaomi yi review a higher end bourbons xiaomi yi review a higher end meaning xiaomi yi review a higher end appliances xiaomi yi review a higher grade xiaomi yi review article xiaomi yi review atlas xiaomi yi camera review xiaomi yi 4k xiaomi yi action camera xiaomi yi home xiaomi yi windows
Xiaomi Yi review: A higher-end action cam with an entry-level price
Xiaomi Yi review: A higher-end action cam with an entry-level price
Editors' note:The Yi is now available in a US version exclusively through Amazon for $99.95 . This review is for the Chinese version of the Xiaomi Yi. The cameras are identical, but with the US version, the packaging inserts are in English as is a new version of the mobile app to use with the camera.
Among all of the smartphone and wearable tech news that came out of 2015's Mobile World Congress was a surprise from Chinese electronics brand Xiaomi -- the tiny Yi action cam.
Outside of China the company is best known for its smartphones, but it has a growing lineup of related devices such as the Mi Band fitness tracker and headphones that it's been putting the Xiaomi name on.
The Yi is one of those, continuing its expansion into other categories beyond smartphones (not unlike what HTC did last year with the Re camera ) and further building its reputation for offering products with high-end features at budget-friendly prices.
Though it's primarily available in China for 399 yuan, you can buy one for just under $100 (about £65 and AU$120) from online retailers like GearBest.com, which is where we got ours. That price isn't quite as good as the converted price of about $65, but is still excellent for what you're getting.
Sarah Tew/CNET
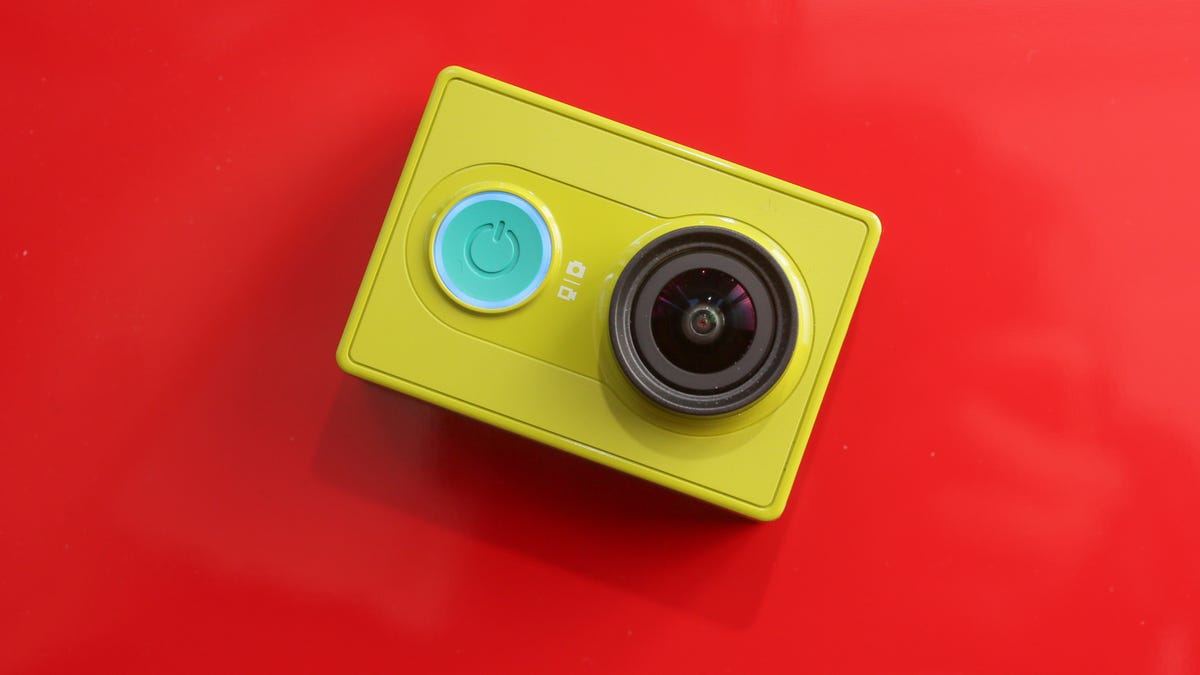
Out in front of the little lime-green and teal box (it's available in all white, too) is a nice f2.8 wide-angle lens with a 155-degree angle of view, while inside is a Sony-made 16-megapixel backside-illuminated CMOS sensor, a Broadcom wireless module and an Ambarella A7LS system on a chip (SoC) running the show.
To give you some perspective, Ambarella's chips can be found in many POV cameras and DJI's quadcopters and, more specifically, the GoPro Hero3+ Silver, Ion Air Pro 3 and Drift Innovation Ghost-S use the A7LS chip family. Aside from the SoC, those cameras all have one other thing in common: prices of $300 or more.
Now, those cameras do offer things that the Yi doesn't, but the Yi can do more than others at its price such as the Polaroid Cube and Monoprice MHD 2.0. Also, although the slightly more expensive entry-level GoPro Hero has very good video quality, the Yi still beats it there and on features and, depending on your needs, design.
Sarah Tew/CNET
Features and design
For starters, the higher-end specs mean it can capture 1080p video at 60, 48, 30 or 24 frames per second (fps); 960p (also called tall HD) at 60 or 48fps; 720p at 120, 60 or 48fps; and 480p at 240fps. It can also snap pictures at resolutions up to 16 megapixels one at a time; in bursts at 3, 5 or 7fps or 7 frames over 2 seconds; or at time intervals of 0.5, 1, 2, 5, 10, 30 or 60 seconds. You can also set up a self-timer for 3, 5, 10 or 15 seconds. There's also a Snapshot mode that captures 10 seconds of VGA-quality video for quick social sharing.
Other cameras at the Yi's price offer a fraction of those options and typically record video at a maximum of just 1080p at 30fps and 720p at 60fps. However, unless you read Chinese, using the camera to do all that it can do is a little tricky at first.
Again, this camera is made for the Chinese market, so the instructions that come with it are in Chinese (a US version of the camera is now available on Amazon). If you've used a similar action cam or aren't afraid to press buttons, the Yi is simple to figure out. If you haven't or are afraid, well, it's still easy.
Sarah Tew/CNET
The camera has three buttons. The one on front is for power and switching between capturing stills and video. (The defaults, by the way, are single, 16-megapixel photos and 1080p at 30fps.) A button on top is the shutter release and for starting and stopping recordings. On the left is a small button for turning on and off the camera's wireless. There are record lights on the top, back and bottom and a light around the power button gives you a battery status by changing color.
On back you'll find a door for the battery compartment and another covering the microSDXC card slot, Micro-USB port and Micro-HDMI output. A battery and short Micro-USB cable are included for charging and transfers, but you're on your own for storage; it supports cards up to 128GB.
If you're looking for the cut corners that got the price so low, the lack of included accessories is one of them. There is no polycarbonate waterproof housing and the camera isn't waterproof without one.
Sarah Tew/CNET
Also, unlike almost every other action cam I've reviewed, not one mount is included. Xiaomi has accessories coming in April such as a 40-meter (131-feet) waterproof housing, but that will of course cost you more. It has a standard 1/4-20 tripod mount on the bottom, so you do have a lot of available third-party mounts to choose from and an inexpensive adapter for GoPro mounts opens you up to even more. But, again, out of the box you have nothing.
There is also no screen of any kind, so to change camera settings you'll need to use the camera's Wi-Fi to connect to an Android or iOS device running the Yi app. Fortunately, much of the app is in English, so getting around in it even if you can't read Chinese shouldn't be much of an issue. (A US version of the camera is now available on Amazon.)
Press the camera's Wi-Fi button for a second to start up the wireless and after a few more seconds it will begin to blink, which is your signal to connect. Launch the app, tap a camera icon at the bottom of the screen and it should start the direct connection to the Yi. If it doesn't you may have to select the camera from your available networks listed under Wi-Fi settings on your mobile device. After the first time, though, it will automatically connect when you launch the app and tap the icon.
Screenshot by Josh Goldman/CNET
With the app you get a live preview of what the camera sees as well as a live stream while recording. I tested with a Samsung Galaxy S5 and it worked near flawlessly and held onto the connection very well. The app can be used to start and stop recordings, snap photos, change all of the camera's settings and view your photos and videos and download them to your device, too.
Along with changing what resolution and frame rate you record at and selecting other photo modes, you can set the camera for loop recording -- perfect for using it as a dashcam -- as well as correcting the wide-angle distortion from the lens (assuming you don't want it), turning on an auto low-light option to improve exposure indoors or at night and other miscellaneous settings.
Battery life and video quality
Small battery packs typically don't equal long continuous recording times on action cams, and that's certainly the case with the Yi. Set to record at the default 1080p at 30fps with the Wi-Fi off, the camera continuously captured video for an average of 1 hour and 45 minutes. Bumped up to 60fps, the average time dropped to just less than an hour.
Sarah Tew/CNET
By comparison, the similarly featured GoPro Hero3+ Silver gets about 2 hours of continuous 1080p recording at 60fps and 3 hours at 1080p at 30fps with Wi-Fi off. Granted it uses a 1,180mAh battery compared with the Yi's 1,010mAh pack, but the Yi's battery life is certainly something to consider. The positive here is that it is easily swapped out if you're OK with buying and carrying extras.
Picking high-end parts doesn't guarantee good results, but that is what you get with the Yi. Excellent results actually, especially given the low price. Color and exposure are very good, and the camera recovers quickly and smoothly under abrupt lighting condition changes.
As with most action cams, the larger you view the video and the closer you are to the screen, the more artifacts you'll see. Still, when recording at 1080p at 60fps video looks sharp and smooth and with a bit rate of about 25Mbps, details don't turn to complete mush, even when moving at high speeds.
Low-light video is noticeably softer with more visible artifacts and some color noise, but far better than from any other sub-$100 action cam I've reviewed. Note that you may notice some glitches in the clips following the initial driving scenes in the video above. Those were caused by a faulty microSD card, not the camera.
The Micro-HDMI port does support live video output while recording to a microSD card in the camera. There is an overlay of recording time, battery and Wi-Fi status shown on the display you're attached to, but it's not visible in the final recording.
Photo quality is good, too, however you can only shoot in 4:3 formats, so you might want to crop photos to 16:9 if you want to drop them into your videos. Otherwise, they're not unlike what you get with video: sharp, well-exposed images with good fine detail in daylight, but softer, noisier images in dimly lit conditions.
Conclusion
The Xiaomi Yi Action Cam's video quality and shooting options are well above those of other cameras in its class, but you'll need to bring your own accessories.
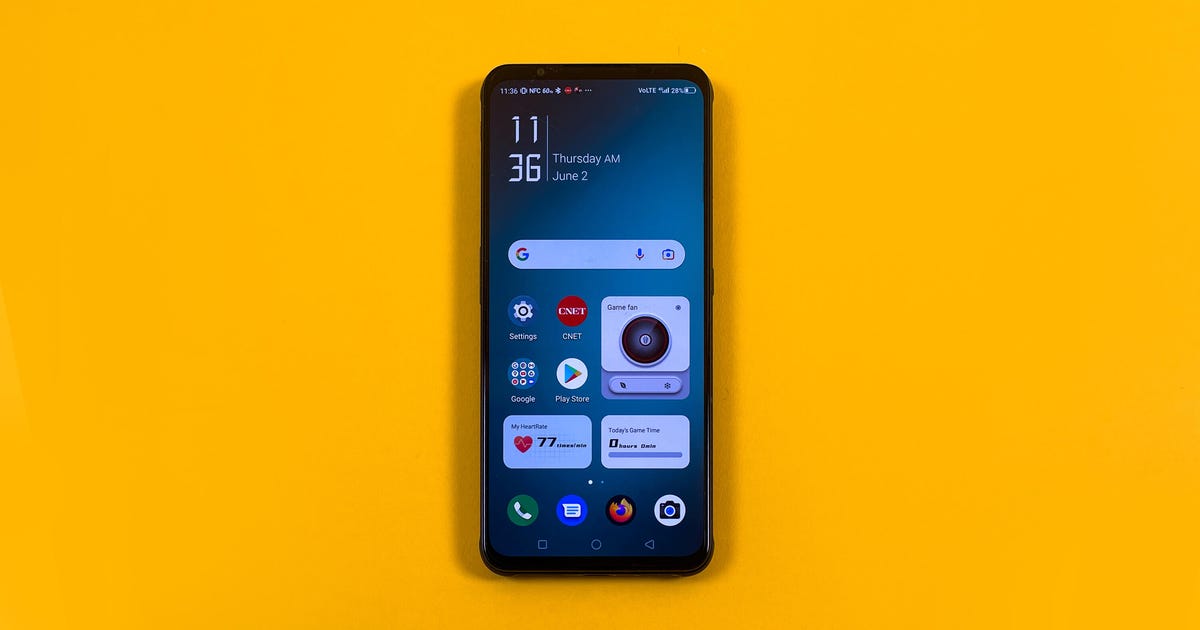
Gaming phones like the Nubia RedMagic 7 aren't trying to compete with Samsung Galaxy devices or Google Pixel phones. They instead crank up the Android gaming experience with specs that sound like they belong in a PC. The RedMagic 7 allows you to max out games for excellent responsiveness and performance.
Features like the 6.8-inch 165Hz refresh rate AMOLED screen, 12GB of RAM and 65-watt charging speeds also have a benefit beyond just being big numbers. They give us a glimpse at features that will likely make their way over to more mainstream phones in coming years.
For the price -- $629 (£529, which is roughly AU$940) -- all of these features might sound like a steal, but there are plenty of reasons why this phone isn't for most people, stemming primarily from tweaks to Android 12 that prioritize gaming performance over user experience. The RedMagic also has a shorter software update cycle than other phones at this price. And while a cooling fan is a common feature on many gaming phones, the RedMagic 7 includes an internal one, which is vital to keep the phone from overheating during intensive gameplay.
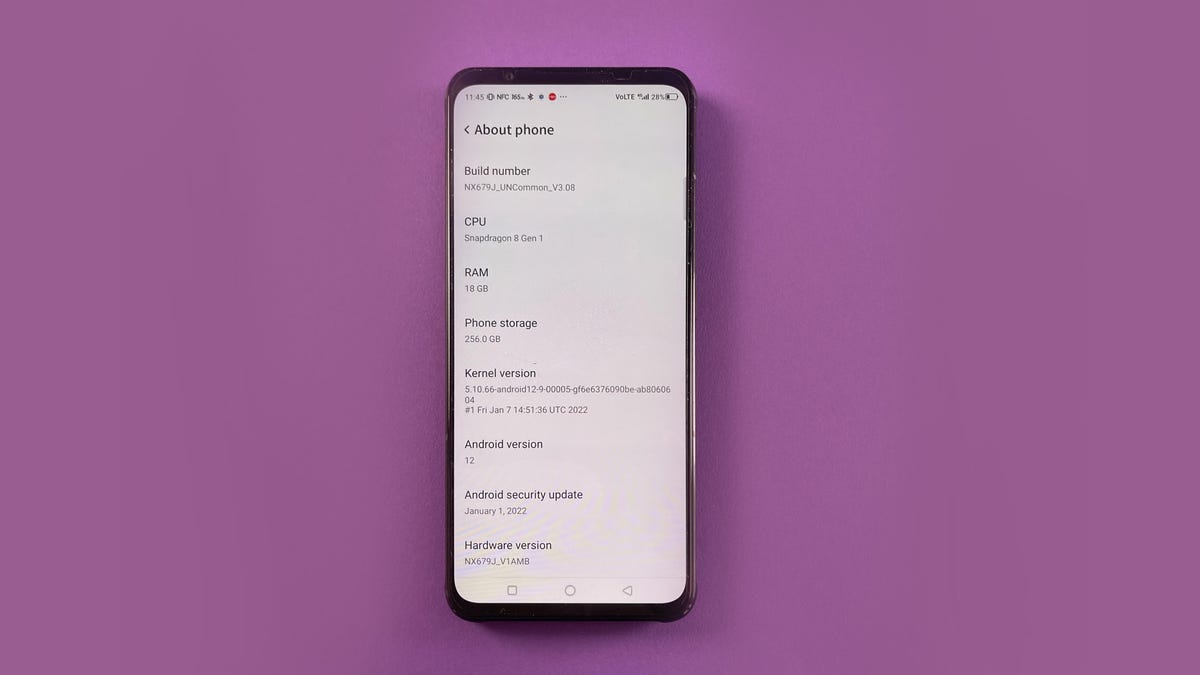
The RedMagic 7's $629 starting price includes 128GB of storage and 12GB of memory -- the latter already being a ridiculous amount for a phone. The review unit I tested is $799 and has 256GB of storage and an absurd 18GB of RAM. For perspective, the $800 Galaxy S22 has 8GB of RAM.
The RedMagic 7 comes with a 65-watt GaN charger.
Mike Sorrentino/CNET
A little bit Android, a little bit Switch
At first glance, the RedMagic 7 seems like any other Android 12 phone. You unlock it with an in-screen fingerprint sensor and are greeted with a skinned version of Android 12 that includes themed widgets like a switch for the internal cooling fan and a toggle for quickly cranking the display's refresh rate from 60Hz up to 165Hz.
However, this RedMagic OS customization makes a number of annoying default choices that aren't great for casual users. Luckily, they can be switched off pretty easily. Apps are organized into multiple home screens like on iOS. To find the app drawer, you have to turn it on in settings. Once you set it up, you can keep most apps there and organize the ones you want onto the home screens.
The default internet browser is NextWord, which is easy to switch to Chrome or Firefox. And I hope you figure this out faster than I did, but the phone puts a RedMagic watermark on all your photos. After another frustrating trip to Settings I was able to turn that off as well.
You may find yourself visiting the Settings menu a lot to change some of the defaults in the RedMagic 7.
Mike Sorrentino/CNET
OS annoyances aside, this phone is clearly aimed at gamers. A red physical switch on the top-left of the phone's transparent body boots it into a game launcher. The aptly named Game Space looks more like the menus you find on the Nintendo Switch and automatically adds games from your app library.
Gaming mode makes several tweaks to the phone's settings: It disables notifications, turns on the fan and adds menus for quick access to display refresh rates and processor performance. I set it up to show the frames per second as I played which helped determine which games supported higher refresh rates.
On the right side of the phone there's a fan exhaust and touch-sensitive areas that emulate shoulder buttons on a game controller. You can set up the "buttons" to tap specific areas of the screen during gameplay -- for instance I coupled them to the shoot button in Apex Legends Mobile and on the Use and Report buttons in Among Us.
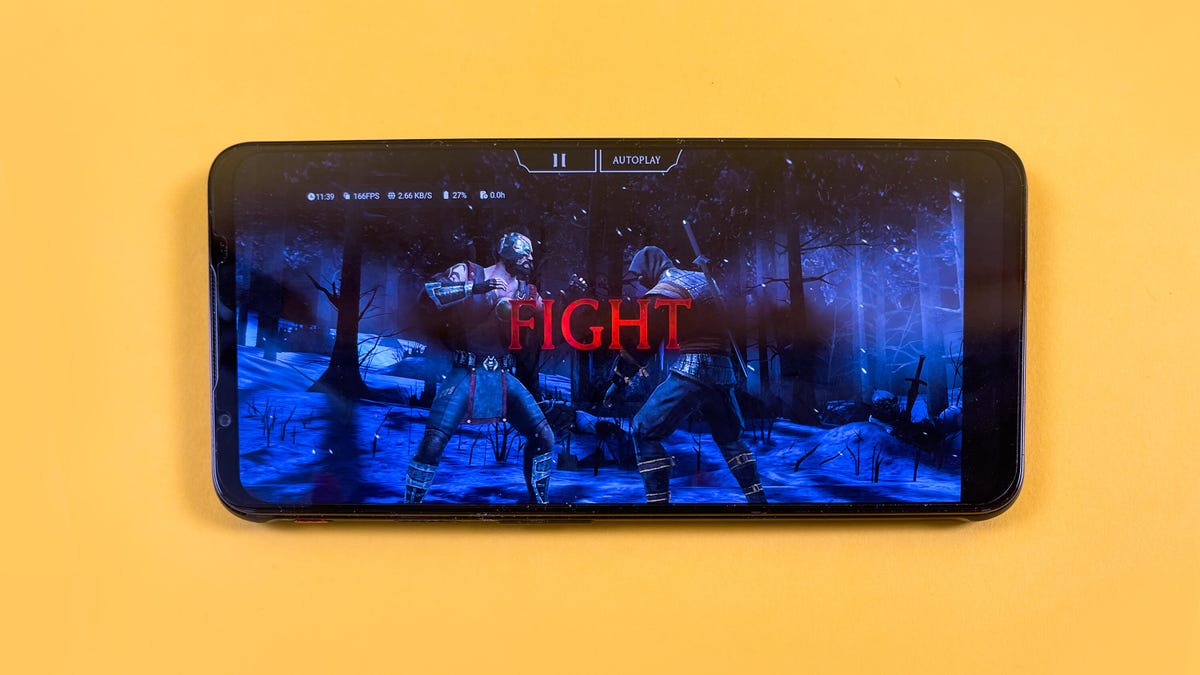
Mortal Kombat Mobile supports the 165Hz refresh rate allowed by the RedMagic 7's screen.
Mike Sorrentino/CNET
Gaming runs fast and sometimes hot
Along with the 165Hz display refresh rate, the RedMagic 7 touts a "720Hz Multi-Finger Touch Sampling Rate" -- their words. This refers to how responsive screen taps are while playing games. In lieu of having physical buttons, having a cranked-up touch rate for the screen makes a lot of sense. I found it particularly helpful for games streamed from the Google Stadia cloud service.
Cloud gaming in general is notorious for lag under even the fastest of internet connections, but with the RedMagic's 720Hz touch rate screen I was almost able to create combos in Mortal Kombat 11. It also made it possible to play Marvel's Avengers using the touchscreen over the Stadia cloud. These games are made for a physical controller, so while it's not an ideal or competitive way to play, it works fine for a quick game over good Wi-Fi.
The Game Space launcher on the RedMagic 7, which puts Android games into a more console-like menu.
Mike Sorrentino/CNET
What was more interesting were the handful of games that supported the 165Hz screen refresh rate. Mortal Kombat Mobile (separate from Mortal Kombat 11) cranks all the way up to 165Hz, making all the punches and battles look super smooth. On the other hand, Rayman Adventures, which supports 165Hz, runs at double or triple speed. I had to turn the screen refresh rate down to 60Hz to run at a normal speed.
Most games however ran at 60 frames per second regardless of what I set. While Apex Legends Mobile appeared to top out at 60fps, the game did let me max all of its settings out. Performance remained super smooth throughout a 20-minute match, but I definitely noticed the phone was physically hot to touch. The RedMagic comes with a case that makes the heat from gaming substantially more tolerable.
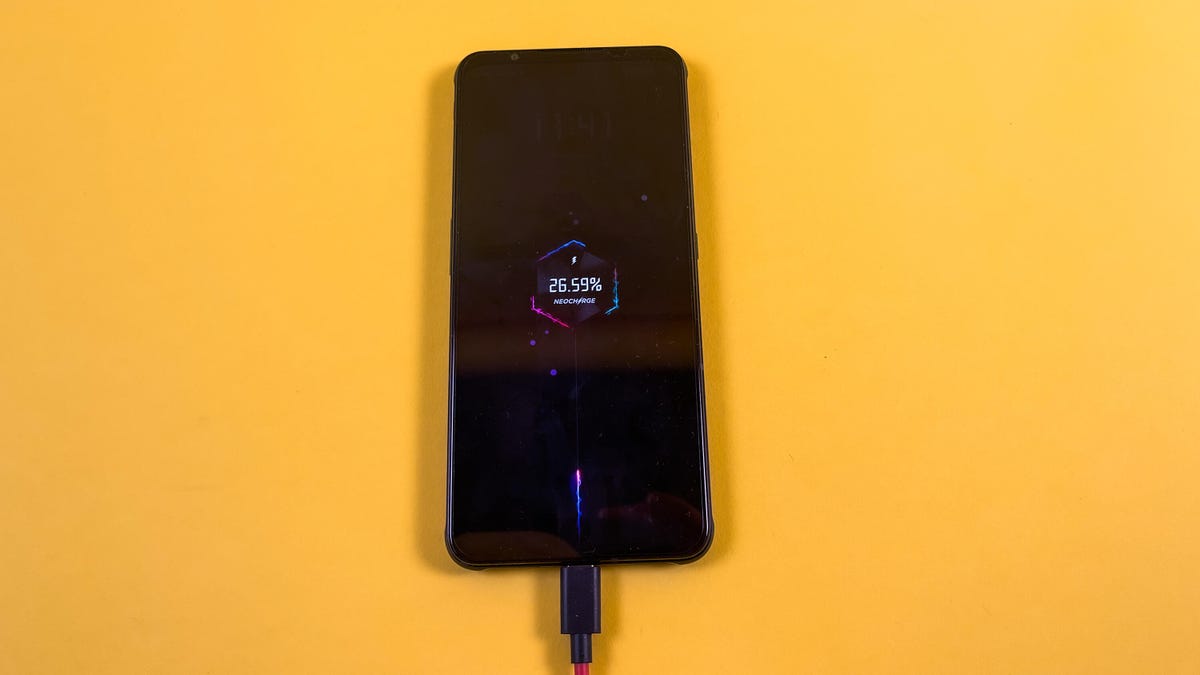
The RedMagic 7 can charge from 0% to 100% in roughly 30 minutes.
Mike Sorrentino/CNET
Fast charging that I want to see in more phones
The 65-watt GaN charger that's included with the phone is a serious perk. The dual 4,500-mAh double-cell battery can recharge from 0% to 98% in just over 30 minutes. This is a phone you definitely won't need to charge overnight. Interestingly enough when charging, an onscreen graphic shows the percentage, and the cooling fan turns on to dissipate any heat.
Battery life was great: I consistently got through an entire day, even when I kept the screen at 165Hz. Even on days where I played games for an hour or so, I had 20% to 30% left by the evening.
Another neat trick is you can power the phone straight from the power adapter, skipping the battery. This should help the battery ultimately last longer, since when available the phone won't need to draw power directly from it at all times. And during gaming, this will reduce the amount of heat the phone gives off.
I hope other phones adopt these power-charging features. A 30-minute charging time means the phone can fully charge up while you shower and get dressed in the morning.
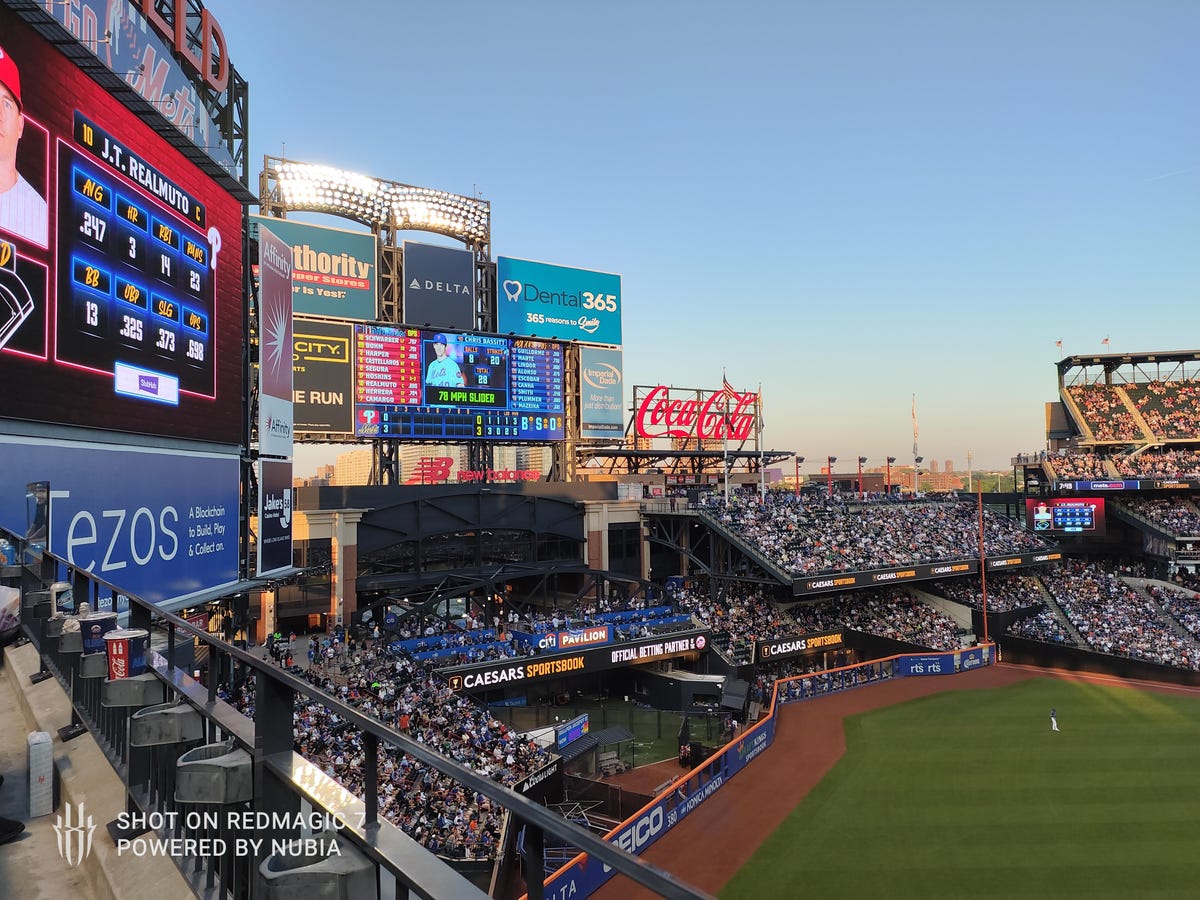
Citi Field in New York. The RedMagic 7 applies a watermark by default that can be turned off in the settings menu.
Mike Sorrentino/CNET
Photography and software support take a back seat
The phone has a 64-megapixel main camera, an 8-megapixel ultrawide camera and 2-megapixel depth sensor. The RedMagic can handle most daytime photography situations, but it isn't going to win any awards for its photos.
Crowds inside of Citi Field, taken on the RedMagic 7.
Mike Sorrentino/CNET
In terms of image quality, photos I took at a New York Mets game were on par with lower priced phones like the Moto G Stylus 5G. Photos taken outdoors in sunlight generally looked good, while lower light situations were more difficult.
RedMagic 7's Night mode photo at New York's Citi Field.
Mike Sorrentino/CNET
The phone's Night mode helps bring out a few more additional details, focusing on subjects like the signs at the Mets' stadium, but it's not quite as detailed as other phones in this price range. If you want a phone that takes great photos, I recommend looking at the $599 Pixel 6 or the $700 Galaxy S21 FE.
The RedMagic 7 has an 8-megapixel front-facing camera.
Mike Sorrentino/CNET
The 8-megapixel front-facing camera is disappointing, even for livestreaming. Selfie photos are just OK. The front-facing camera isn't something I'd use to broadcast on Twitch. With gaming and livestreaming so interconnected, it'd be nice if the RedMagic 7 could function as a starter device towards that.
Software support on the RedMagic 7 isn't great. RedMagic says that its products tend to get one major update with a "maintenance period" that lasts between one and a half to two years.
Geekbench v.5.0 single-core
Asus ROG Phone 5 Ultimate
Note:
Longer bars indicate better performance
Geekbench v.5.0 multicore
Asus ROG Phone 5 Ultimate
Note:
Longer bars indicate better performance
Serious Android gamers only
The RedMagic 7 isn't for most people, nor is it intended to be. If you are a competitive gamer who really wants an absolutely screaming refresh rate, and doesn't mind a built-in cooling fan, then this phone is certainly an option for you. Just understand the software update tradeoffs and all the defaults you'll probably want to change out of the box.
But most other people should look elsewhere for a daily driver phone. Families considering the RedMagic as an alternative to a Switch would be better off buying a Nintendo Switch and a cheaper phone.
Nubia RedMagic 7 vs. Nubia RedMagic 6 vs. Samsung Galaxy S22 vs. Google Pixel 6
5G sub 6 (some carrier models also have 5G mmWave) support, Wi-Fi 6E, 30W fast charging, Magic Eraser, Motion mode, Real Tone, Face Unblur, Cinematic Pan, 5 years OS and security updates, IP68 rating for dust and water resistance, Gorilla Glass Victus (front), Gorilla Glass 6 (back)
Dji phantom 3 advanced review the sweet spot for intermittent dji phantom 3 advanced review the sweet spot for achievement dji phantom 3 advanced review the lincoln dji phantom 3 advanced manual dji phantom 3 advanced vs professional dji phantom 3 standard dji phantom 3 firmware update dji phantom 3 advanced
DJI Phantom 3 Advanced review: The sweet spot for features, performance and price
DJI Phantom 3 Advanced review: The sweet spot for features, performance and price
DJI currently has three versions of its Phantom 3 drone: the Standard , Advanced and Professional . While there are several important differences between the entry-level Phantom 3 Standard ($799, £649 or AU$1,299) and its two linemates, the feature gap between the Professional and Advanced amounts to two things.
The Phantom 3 Professional shoots video in 4K (3,820x2,160-pixel) resolution and has a 100-watt battery charger. It retails for $1,259, £1,159 or AU$1,950. The Advanced captures video in 1080p (1,920x1,080) and has a slower 57-watt charger, but costs $999, £899 or AU$1,550. That's it.
The 4K video from the Professional is a step up from the Advanced's full-HD results. But it's not a big step up, and unless you want or need the extra resolution and have a computer powerful enough to play and edit 4K video, the Advanced's 1080p video doesn't disappoint. And since the drones' features and controllers are the same, the Phantom 3 Advanced is as easy to recommended as it is to fly. Which is to say it's really easy.
Joshua Goldman/CNET
Design and features
The quadcopter itself is, for the most part, unchanged from its predecessor, the Phantom 2 Vision+. You'll find all the same convenience features like color-coded, self-tightening propellers for easy installation and replacement, and a slot-loading battery pack, though it's a newly designed battery making the Phantom 2's batteries incompatible with the 3.
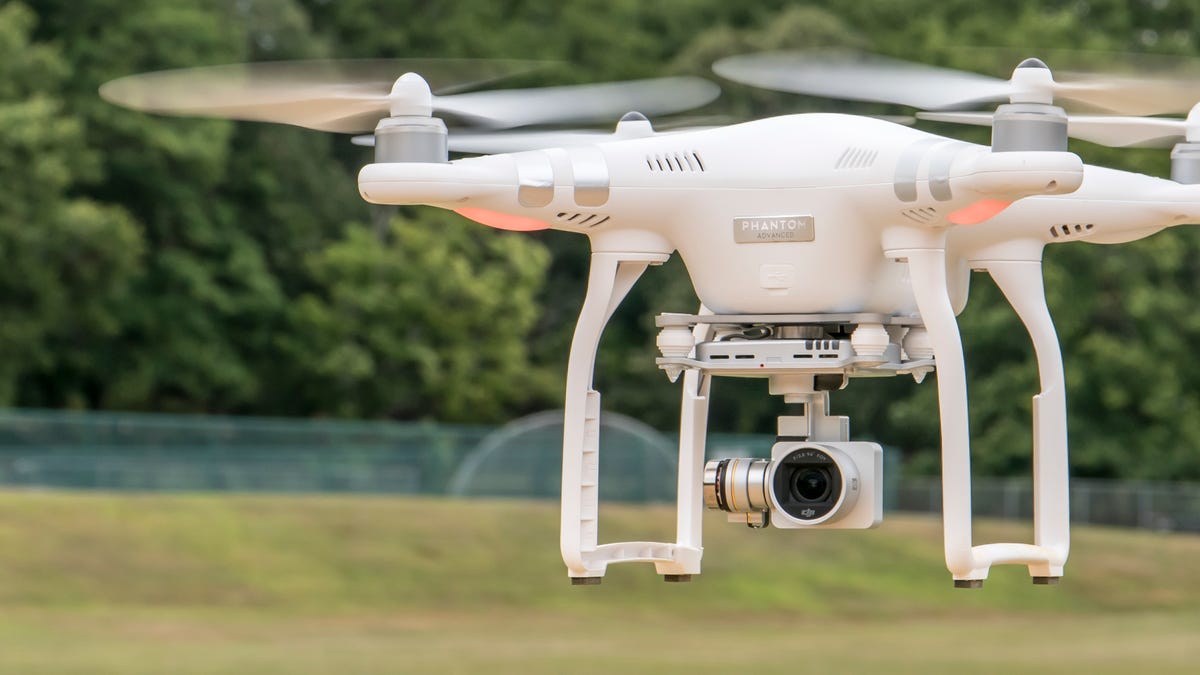
The three-axis gimbal on its belly stabilizes the camera in roll, pitch and yaw directions keeping the video looking smooth even with sudden stick movements or wind gusts. Plus, the camera can do a 90-degree tilt, letting you shoot straight down, straight ahead and anywhere in between. The camera is permanently attached to the gimbal, so if you irreparably damage one or the other, you'll have to replace the entire gimbal-and-camera assembly. It also means you don't have the option of using the camera for anything else, unlike models that use GoPro or other small cameras such as 3D Robotic's Solo or EHang's Ghost.
The Advanced's camera features a Sony-made 12-megapixel 1/2.3-inch CMOS sensor behind a new f2.8 20mm lens (35mm equivalent), which gives you a 94-degree field of view. That's much narrower than the Vision+ camera's 140-degree field of view resulting in far less distortion.
Joshua Goldman/CNET
Sitting to the back of the gimbal is the new Vision Positioning System, a set of sensors to help the Phantom 3 hover while indoors when GPS isn't available. There are many caveats for it to work properly, however, such as not flying over sound-absorbing materials, water or highly reflective surfaces. It's also only effective up to about 10 feet (3 meters). If you're thinking of getting the Advanced to fly above crowds in an arena or auditorium, you better up your piloting skills first.
When you're outside, GPS is used to help the drone determine its position and yours and is what makes it possible for the drone to stop and hover in place when you release the controller's sticks as well as delivering accurate location data for safety features like automatically returning to a home position. The more satellites it can lock onto, the better off you are, so DJI added the Russian navigational system, GLONASS, which lets it tap into more satellites than GPS alone.
Satellite acquisition speeds are noticeably faster compared to the Phantom 2 Vision+, so you can lock on and start flying more quickly. Also, with the Vision+ there were times I would struggle to get a solid lock on six satellites (the minimum for GPS-assisted flight). The Advanced never had a problem grabbing onto 10 satellites or more in a matter of seconds and regularly had upward of 15 in my testing. This makes a huge difference when it comes to putting the drone in the exact position you want for photos and video.
Joshua Goldman/CNET
The controller and DJI Go mobile app (formerly called Pilot) are important, too, of course. The Advanced and its controller have DJI's Lightbridge technology for better image transmission between the sky and ground. Lightbridge allows for a continuous connection back and forth between the two and increases flight range over the wireless range extender used for the Phantom 2 and the entry-level Phantom 3 Standard. This does mean you'll need your iOS or Android device's charging cable to use it, but the performance improvement is well worth it.
On each of the top corners you'll find discrete camera controls for starting and stopping recordings, taking pictures, reviewing your shots and two wheels, one for adjusting exposure compensation, ISO and shutter speed and the other for the gimbal's tilt. Two customizable buttons are on the bottom as well that can be used for a handful of gimbal or camera functions. Overall it's a great setup, but more than a few times I accidentally switched to playback mode while trying to snap a photo.
DJI also included a Return-to-Home button for those times when panic starts to set in and you just want to bring it on back. The controller's battery is built in and will last through several flights before you'll need to recharge it. DJI simplified charging, too, using one power supply with two cables attached: one for the controller's battery and one for the drone's.
Andrew Hoyle/CNET
Connecting your iOS or Android smartphone or tablet is as simple as plugging in your device's charging cable into the USB port on the Advanced's controller. (It'll keep your device charged while you use it for flying, too.) Then, with the controller and drone turned on, you just open the DJI Go app and tap to get the camera view.
The controller's device mount can handle phones and tablets big and small, however the app is optimized for use with the iPhone 5S, 6 and 6 Plus. Android device support is thin, with just the Samsung Galaxy S5 and Note 3, Sony Xperia Z3, Google Nexus 7 II, Google Nexus 9, Xiaomi Mi 3 and ZTE Nubia Z7 Mini listed. I tested with both a 6 Plus and a Galaxy S5 and the app performance was clearly stronger on the iOS device with the S5 occasionally freezing up forcing me midflight to restart the app.
In addition to a first-person view from the camera, you get complete camera controls, meters for signal strengths, GPS and battery life and access to settings for the whole system. It will also notify you if a firmware update is necessary (which occur with some regularity) and, eventually, you'll be able to do the updates through the app; currently they're done by downloading a file to a microSD card and popping the card into the drone's camera.
The app can also be used for automated take-offs and landings, if you don't want to handle them with stick commands, and triggering the Return-to-Home safety function. Another new safety feature of sorts is the Beginner Mode. This sets up virtual barriers called a geofence with a maximum altitude and flight distance of 30 meters (98 feet), giving you a safe way to limit where the drone can travel. It's pretty amazing to see in action as you send the Phantom full throttle toward its limit and the drone stops as if it's been snagged in an invisible net.
As for the camera settings, video recording options include full HD (1,920x1,080-pixel) and HD (1,280x720-pixel) resolutions at 24, 25, 30, 48, 50, 60 frames per second and you can choose between MOV or MP4 formats. Thanks to the Lightbridge technology, you can even use it to live-stream video straight to YouTube and uses your mobile device's mic for capturing audio.
Joshua Goldman/CNET
For photos, you can capture in JPEG, DNG raw format or both simultaneously. Shooting modes include single shots or bursts of three, five or seven; HDR and auto exposure bracketing (0.7EV bias) of three or five pictures; and time-lapse continuous shooting at 5-, 7-, 10-, 20- and 30-second intervals. You can also control ISO, exposure compensation and white balance.
At the time of this review the Phantom 3 Advanced (and Professional) didn't have DJI's Intelligent Flight features including waypoint navigation, point of interest (POI) flight planning or Follow Me function, but these are now available.
Waypoint navigation lets you set up a multipoint path for the drone to follow while you control the camera, while POI flight planning allows you to autonomously fly a circle around a subject, keeping it centered. Follow Me sets the drone to track your movement based on your orientation. Support for SDK apps already created by third-party DJI developers is available as well, giving the Advanced more features and future potential.
Joshua Goldman/CNET
Flying
If you're reading this review, you probably already know that DJI's Phantom quadcopters have a reputation of being extremely easy to fly (and fly away, but it's something I've never experienced). With the Phantom 3 the experience has only improved.
DJI has added a flight simulator to the mobile app (iOS only) that you can use to learn your way around the app and controls. I found it to be a little frustrating because the actual drone performs so much better in real life. Regardless of safety features and how stable the Phantom 3 is, I highly recommend taking your first flights out in an open area where there are no people or distractions.
Again, if you don't want to use stick commands, you can takeoff and land with a tap and a swipe on your screen. With GPS, the drone will just sit and hover wherever you leave it. Start flying a bit too close to a tree and you can just let go of the sticks and it will stop while you regroup and steer away. You can fly without GPS, but if you release the sticks the Phantom won't stop but instead continues to drift in the direction it was last headed. It's a gut-wrenching experience watching $1,000 float away seemingly uncontrollably, so it's best to fly with GPS until you fully understand the controls.
Joshua Goldman/CNET
The app is well laid out and at a glance you can see all the information you need. There's even a battery timeline meter giving you estimates on everything from remaining flight time to the power required to return home or land.
Speaking of battery life, DJI says you'll be able to get up to 23 minutes of flight time. I was able to get to just under 21 minutes of flying -- nothing too aggressive, mostly hovering in place and in light wind -- before it took over and landed itself. That flight time is very good when you factor in all that it's doing to stay in the air while recording video. It does feel short, though, especially if you're trying to get out some distance for a picture and still make it back. And extras are pricey at around $149, £125 or AU$205 each.
Video and photo quality
Closely examining the 4K video of the Phantom 3 Professional or DJI's higher-end Inspire 1 straight from the camera against the 1080p clips from the Advanced, there are noticeable differences, mainly in the level of fine detail and sharpness of subjects. There is better detail from the 4K and it's especially visible if you're viewing on a large TV or monitor. So, if it's necessary for you to capture the highest quality video without ponying up a ton more cash, the Phantom 3 Professional is the better choice.
Frankly, though, the full-HD clips from the Advanced look pretty great as do its photos, and they're more than suitable for sharing online and/or viewing on a phone, tablet or laptop. It's also a huge jump in quality from the Phantom 2 Vision+. For those considering an upgrade from that model to the Professional, your needs might be met with the less expensive Advanced.
Joshua Goldman/CNET
The live-streaming quality to YouTube is just OK. You have to have a pretty strong wireless connection to keep the video moving smoothly and even then the results were a bit glitchy and compressed. Still, it's sort of amazing it can do it at all and could be helpful for professional uses.
Lastly, whenever you record a video, a compressed 720p version is stored to your mobile device. To help make the most of these clips, DJI built in a basic video editor to the Go app. You can use it to cut up your clips, gather them up and then combine them into one movie. DJI also included some style templates with music you can apply before you save. Then you can just share away.
Joshua Goldman/CNET
Conclusion
The DJI Phantom 3 Advanced is a great little aerial photo and video machine, however it's the whole system -- the drone, the controller and the app -- that make it so easy to pick up and just start flying. It's not inexpensive, but compared with the $900 Parrot Bebop with its Skycontroller , you won't regret spending the extra money. And if you don't need the Professional's 4K video, you can put your money toward a spare battery or two so the good times don't come to an end after 20 minutes.
Dji phantom 3 advanced review the sweet spot for those big dji phantom 3 advanced review thesaurus dji phantom 3 advanced review the lincoln dji phantom 3 advanced review the midnight dji phantom 3 advanced review the ordinary dji phantom 3 advanced review the batman dji phantom 3 advanced drone review dji phantom 3 advanced downloads dji phantom 3 advanced quadcopter drone dji phantom 3 professional dji phantom 3 standard manual pdf dji phantom 2
DJI Phantom 3 Advanced review: The sweet spot for features, performance and price
DJI Phantom 3 Advanced review: The sweet spot for features, performance and price
DJI currently has three versions of its Phantom 3 drone: the Standard , Advanced and Professional . While there are several important differences between the entry-level Phantom 3 Standard ($799, £649 or AU$1,299) and its two linemates, the feature gap between the Professional and Advanced amounts to two things.
The Phantom 3 Professional shoots video in 4K (3,820x2,160-pixel) resolution and has a 100-watt battery charger. It retails for $1,259, £1,159 or AU$1,950. The Advanced captures video in 1080p (1,920x1,080) and has a slower 57-watt charger, but costs $999, £899 or AU$1,550. That's it.
The 4K video from the Professional is a step up from the Advanced's full-HD results. But it's not a big step up, and unless you want or need the extra resolution and have a computer powerful enough to play and edit 4K video, the Advanced's 1080p video doesn't disappoint. And since the drones' features and controllers are the same, the Phantom 3 Advanced is as easy to recommended as it is to fly. Which is to say it's really easy.
Joshua Goldman/CNET
Design and features
The quadcopter itself is, for the most part, unchanged from its predecessor, the Phantom 2 Vision+. You'll find all the same convenience features like color-coded, self-tightening propellers for easy installation and replacement, and a slot-loading battery pack, though it's a newly designed battery making the Phantom 2's batteries incompatible with the 3.
The three-axis gimbal on its belly stabilizes the camera in roll, pitch and yaw directions keeping the video looking smooth even with sudden stick movements or wind gusts. Plus, the camera can do a 90-degree tilt, letting you shoot straight down, straight ahead and anywhere in between. The camera is permanently attached to the gimbal, so if you irreparably damage one or the other, you'll have to replace the entire gimbal-and-camera assembly. It also means you don't have the option of using the camera for anything else, unlike models that use GoPro or other small cameras such as 3D Robotic's Solo or EHang's Ghost.
The Advanced's camera features a Sony-made 12-megapixel 1/2.3-inch CMOS sensor behind a new f2.8 20mm lens (35mm equivalent), which gives you a 94-degree field of view. That's much narrower than the Vision+ camera's 140-degree field of view resulting in far less distortion.
Joshua Goldman/CNET
Sitting to the back of the gimbal is the new Vision Positioning System, a set of sensors to help the Phantom 3 hover while indoors when GPS isn't available. There are many caveats for it to work properly, however, such as not flying over sound-absorbing materials, water or highly reflective surfaces. It's also only effective up to about 10 feet (3 meters). If you're thinking of getting the Advanced to fly above crowds in an arena or auditorium, you better up your piloting skills first.
When you're outside, GPS is used to help the drone determine its position and yours and is what makes it possible for the drone to stop and hover in place when you release the controller's sticks as well as delivering accurate location data for safety features like automatically returning to a home position. The more satellites it can lock onto, the better off you are, so DJI added the Russian navigational system, GLONASS, which lets it tap into more satellites than GPS alone.
Satellite acquisition speeds are noticeably faster compared to the Phantom 2 Vision+, so you can lock on and start flying more quickly. Also, with the Vision+ there were times I would struggle to get a solid lock on six satellites (the minimum for GPS-assisted flight). The Advanced never had a problem grabbing onto 10 satellites or more in a matter of seconds and regularly had upward of 15 in my testing. This makes a huge difference when it comes to putting the drone in the exact position you want for photos and video.
Joshua Goldman/CNET
The controller and DJI Go mobile app (formerly called Pilot) are important, too, of course. The Advanced and its controller have DJI's Lightbridge technology for better image transmission between the sky and ground. Lightbridge allows for a continuous connection back and forth between the two and increases flight range over the wireless range extender used for the Phantom 2 and the entry-level Phantom 3 Standard. This does mean you'll need your iOS or Android device's charging cable to use it, but the performance improvement is well worth it.
On each of the top corners you'll find discrete camera controls for starting and stopping recordings, taking pictures, reviewing your shots and two wheels, one for adjusting exposure compensation, ISO and shutter speed and the other for the gimbal's tilt. Two customizable buttons are on the bottom as well that can be used for a handful of gimbal or camera functions. Overall it's a great setup, but more than a few times I accidentally switched to playback mode while trying to snap a photo.
DJI also included a Return-to-Home button for those times when panic starts to set in and you just want to bring it on back. The controller's battery is built in and will last through several flights before you'll need to recharge it. DJI simplified charging, too, using one power supply with two cables attached: one for the controller's battery and one for the drone's.
Andrew Hoyle/CNET
Connecting your iOS or Android smartphone or tablet is as simple as plugging in your device's charging cable into the USB port on the Advanced's controller. (It'll keep your device charged while you use it for flying, too.) Then, with the controller and drone turned on, you just open the DJI Go app and tap to get the camera view.
The controller's device mount can handle phones and tablets big and small, however the app is optimized for use with the iPhone 5S, 6 and 6 Plus. Android device support is thin, with just the Samsung Galaxy S5 and Note 3, Sony Xperia Z3, Google Nexus 7 II, Google Nexus 9, Xiaomi Mi 3 and ZTE Nubia Z7 Mini listed. I tested with both a 6 Plus and a Galaxy S5 and the app performance was clearly stronger on the iOS device with the S5 occasionally freezing up forcing me midflight to restart the app.
In addition to a first-person view from the camera, you get complete camera controls, meters for signal strengths, GPS and battery life and access to settings for the whole system. It will also notify you if a firmware update is necessary (which occur with some regularity) and, eventually, you'll be able to do the updates through the app; currently they're done by downloading a file to a microSD card and popping the card into the drone's camera.
The app can also be used for automated take-offs and landings, if you don't want to handle them with stick commands, and triggering the Return-to-Home safety function. Another new safety feature of sorts is the Beginner Mode. This sets up virtual barriers called a geofence with a maximum altitude and flight distance of 30 meters (98 feet), giving you a safe way to limit where the drone can travel. It's pretty amazing to see in action as you send the Phantom full throttle toward its limit and the drone stops as if it's been snagged in an invisible net.
As for the camera settings, video recording options include full HD (1,920x1,080-pixel) and HD (1,280x720-pixel) resolutions at 24, 25, 30, 48, 50, 60 frames per second and you can choose between MOV or MP4 formats. Thanks to the Lightbridge technology, you can even use it to live-stream video straight to YouTube and uses your mobile device's mic for capturing audio.
Joshua Goldman/CNET
For photos, you can capture in JPEG, DNG raw format or both simultaneously. Shooting modes include single shots or bursts of three, five or seven; HDR and auto exposure bracketing (0.7EV bias) of three or five pictures; and time-lapse continuous shooting at 5-, 7-, 10-, 20- and 30-second intervals. You can also control ISO, exposure compensation and white balance.
At the time of this review the Phantom 3 Advanced (and Professional) didn't have DJI's Intelligent Flight features including waypoint navigation, point of interest (POI) flight planning or Follow Me function, but these are now available.
Waypoint navigation lets you set up a multipoint path for the drone to follow while you control the camera, while POI flight planning allows you to autonomously fly a circle around a subject, keeping it centered. Follow Me sets the drone to track your movement based on your orientation. Support for SDK apps already created by third-party DJI developers is available as well, giving the Advanced more features and future potential.
Joshua Goldman/CNET
Flying
If you're reading this review, you probably already know that DJI's Phantom quadcopters have a reputation of being extremely easy to fly (and fly away, but it's something I've never experienced). With the Phantom 3 the experience has only improved.
DJI has added a flight simulator to the mobile app (iOS only) that you can use to learn your way around the app and controls. I found it to be a little frustrating because the actual drone performs so much better in real life. Regardless of safety features and how stable the Phantom 3 is, I highly recommend taking your first flights out in an open area where there are no people or distractions.
Again, if you don't want to use stick commands, you can takeoff and land with a tap and a swipe on your screen. With GPS, the drone will just sit and hover wherever you leave it. Start flying a bit too close to a tree and you can just let go of the sticks and it will stop while you regroup and steer away. You can fly without GPS, but if you release the sticks the Phantom won't stop but instead continues to drift in the direction it was last headed. It's a gut-wrenching experience watching $1,000 float away seemingly uncontrollably, so it's best to fly with GPS until you fully understand the controls.
Joshua Goldman/CNET
The app is well laid out and at a glance you can see all the information you need. There's even a battery timeline meter giving you estimates on everything from remaining flight time to the power required to return home or land.
Speaking of battery life, DJI says you'll be able to get up to 23 minutes of flight time. I was able to get to just under 21 minutes of flying -- nothing too aggressive, mostly hovering in place and in light wind -- before it took over and landed itself. That flight time is very good when you factor in all that it's doing to stay in the air while recording video. It does feel short, though, especially if you're trying to get out some distance for a picture and still make it back. And extras are pricey at around $149, £125 or AU$205 each.
Video and photo quality
Closely examining the 4K video of the Phantom 3 Professional or DJI's higher-end Inspire 1 straight from the camera against the 1080p clips from the Advanced, there are noticeable differences, mainly in the level of fine detail and sharpness of subjects. There is better detail from the 4K and it's especially visible if you're viewing on a large TV or monitor. So, if it's necessary for you to capture the highest quality video without ponying up a ton more cash, the Phantom 3 Professional is the better choice.
Frankly, though, the full-HD clips from the Advanced look pretty great as do its photos, and they're more than suitable for sharing online and/or viewing on a phone, tablet or laptop. It's also a huge jump in quality from the Phantom 2 Vision+. For those considering an upgrade from that model to the Professional, your needs might be met with the less expensive Advanced.
Joshua Goldman/CNET
The live-streaming quality to YouTube is just OK. You have to have a pretty strong wireless connection to keep the video moving smoothly and even then the results were a bit glitchy and compressed. Still, it's sort of amazing it can do it at all and could be helpful for professional uses.
Lastly, whenever you record a video, a compressed 720p version is stored to your mobile device. To help make the most of these clips, DJI built in a basic video editor to the Go app. You can use it to cut up your clips, gather them up and then combine them into one movie. DJI also included some style templates with music you can apply before you save. Then you can just share away.
Joshua Goldman/CNET
Conclusion
The DJI Phantom 3 Advanced is a great little aerial photo and video machine, however it's the whole system -- the drone, the controller and the app -- that make it so easy to pick up and just start flying. It's not inexpensive, but compared with the $900 Parrot Bebop with its Skycontroller , you won't regret spending the extra money. And if you don't need the Professional's 4K video, you can put your money toward a spare battery or two so the good times don't come to an end after 20 minutes.