Step into a world where the focus is keenly set on How To Upgrade Your Ipad. Within the confines of this article, a tapestry of references to How To Upgrade Your Ipad awaits your exploration. If your pursuit involves unraveling the depths of How To Upgrade Your Ipad, you've arrived at the perfect destination.
Our narrative unfolds with a wealth of insights surrounding How To Upgrade Your Ipad. This is not just a standard article; it's a curated journey into the facets and intricacies of How To Upgrade Your Ipad. Whether you're thirsting for comprehensive knowledge or just a glimpse into the universe of How To Upgrade Your Ipad, this promises to be an enriching experience.
The spotlight is firmly on How To Upgrade Your Ipad, and as you navigate through the text on these digital pages, you'll discover an extensive array of information centered around How To Upgrade Your Ipad. This is more than mere information; it's an invitation to immerse yourself in the enthralling world of How To Upgrade Your Ipad.
So, if you're eager to satisfy your curiosity about How To Upgrade Your Ipad, your journey commences here. Let's embark together on a captivating odyssey through the myriad dimensions of How To Upgrade Your Ipad.
Upgrade Your iPad Experience With $30 Off Apple Pencil 2
Upgrade Your iPad Experience With $30 Off Apple Pencil 2
Since its introduction, Apple's iPad has been an awesome and portable tool for creative types but its potential was unlocked when the Apple Pencil came along. The first-party Apple stylus pairs perfectly with the device and is great if you want to draw and sketch or just want an easy way to take some handwritten notes. Right now, you can even snag all-time low pricing on the Apple Pencil 2 at both Amazon and Best Buy. This deal brings the price down to just $99, a savings of $30 compared to what Apple sells it for.
The second-gen device works with a variety of modern iPad models, including iPad Pro, iPad Air and even the latest iPad mini. With precise tilt and pressure sensitivity plus a lag-free experience, you'll be able to paint, doodle, and write across a bunch of apps.
When it's not in use, the Apple Pencil 2 attaches magnetically to the side of your iPad so it's always with you. Better yet, this is how it pairs and charges, so you never have to fiddle around with Bluetooth settings or worry about keeping it charged up. This is one of the best Apple Pencil deals we've seen to date, so now's the time to take the plunge if you've been holding out for a discount.
iOS 14 and iPadOS 14 upgrade checklist: Here's how to get your iPhone and iPad ready
iOS 14 and iPadOS 14 upgrade checklist: Here's how to get your iPhone and iPad ready
Apple's iOS 14 and iPadOS 14 updates for the iPhone ($500 at Best Buy) and iPad ($176 at Amazon) are brimming with important and useful new features, from a new app library and widgets on your home screen to tighter privacy features and iMessage improvements. But before you install iOS 14 and iPad 14, there's a bit of basic housekeeping you should do to make the update to your iPhone and iPad go as smoothly as possible. We lay out everything you need to know, including a checklist of how to get your phone or tablet ready.
Which devices will support iOS 14 and iPadOS?
If you have a compatible device, you should be able to see you have an update available by going to Settings > General > Software Update. But, don't tap Install Now quite yet.
Devices that will support iOS 14, iPadOS 14
Phone 11
iPad Pro 12.9-inch (4th generation)
iPhone 11 Pro
iPad Pro 11-inch (2nd generation)
iPhone 11 Pro Max
iPad Pro 12.9-inch (3rd generation)
iPhone XS
iPad Pro 11-inch (1st generation)
iPhone XS Max
iPad Pro 12.9-inch (2nd generation)
iPhone XR
iPad Pro 12.9-inch (1st generation)
iPhone X
iPad Pro 10.5-inch
iPhone 8
iPad Pro 9.7-inch
iPhone 8 Plus
iPad (7th generation)
iPhone 7
iPad (6th generation)
iPhone 7 Plus
iPad (5th generation)
iPhone 6s
iPad Mini (5th generation)
iPhone 6s Plus
iPad Mini 4
iPhone SE (1st generation)
iPad Air (3rd generation)
iPhone SE (2nd generation)
iPad Air 2
iPod Touch (7th generation)
Don't skip this step: Clear out the clutter
When it comes time to update software or upgrade your phone, take a few minutes to go through and delete what photos and apps you don't want or need from your camera roll and installed apps.
Our phones are a digital junk drawer of sorts, collecting random screenshots, photos, videos and single-use apps. Taking a few minutes to clear it out helps free up storage, shortens the amount of time you'll spend waiting for it to backup, and even saves you some cash if you're paying for extra iCloud storage just to keep it backed up.
Delete those apps you know you'll never use again.
Jason Cipriani/CNET
Create a fresh backup, it's important
If you can help it, you should never update your iPhone or iPad without a current backup. Updates aren't a perfect process, and sometimes things go wrong. The last thing you want to happen is an update to fail, then you're left setting up your phone as brand new. Nobody wants that.
It's best to do this step right before you start the update process, that way the information stored in your backup is as current as possible.
You can backup your devices using iCloud, using Finder on Mac, or iTunes on a PC. iCloud is by far the easiest method, simply because it's built into your device and only requires a Wi-Fi connection. That said, if you're out of iCloud storage space or prefer to have more control over your device backup, then you can use your computer.
iCloud backup is the easiest method.
Screenshots by Jason Cipriani/CNET
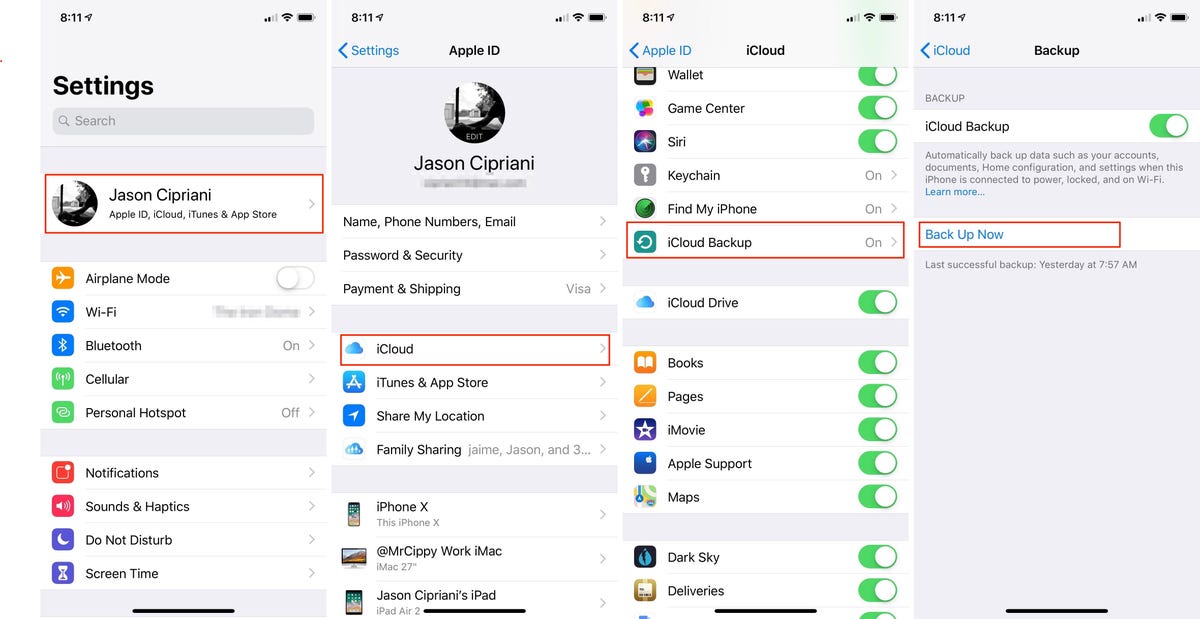
Option 1: Use iCloud backup
If you have iCloud backup turned on, your device should be backing up each night while it's charging and connected to Wi-Fi. However, you can force a backup at any time by going to Settings > tap on your name > iCloud > iCloud Backup > Back up now.
Speed up the process by plugging your phone or tablet in to a charger and connecting it to a Wi-Fi network to prevent mobile data use and killing your battery in the process.
Finder looks just like iTunes when your iOS device is connected.
Screenshot by Jason Cipriani/CNET
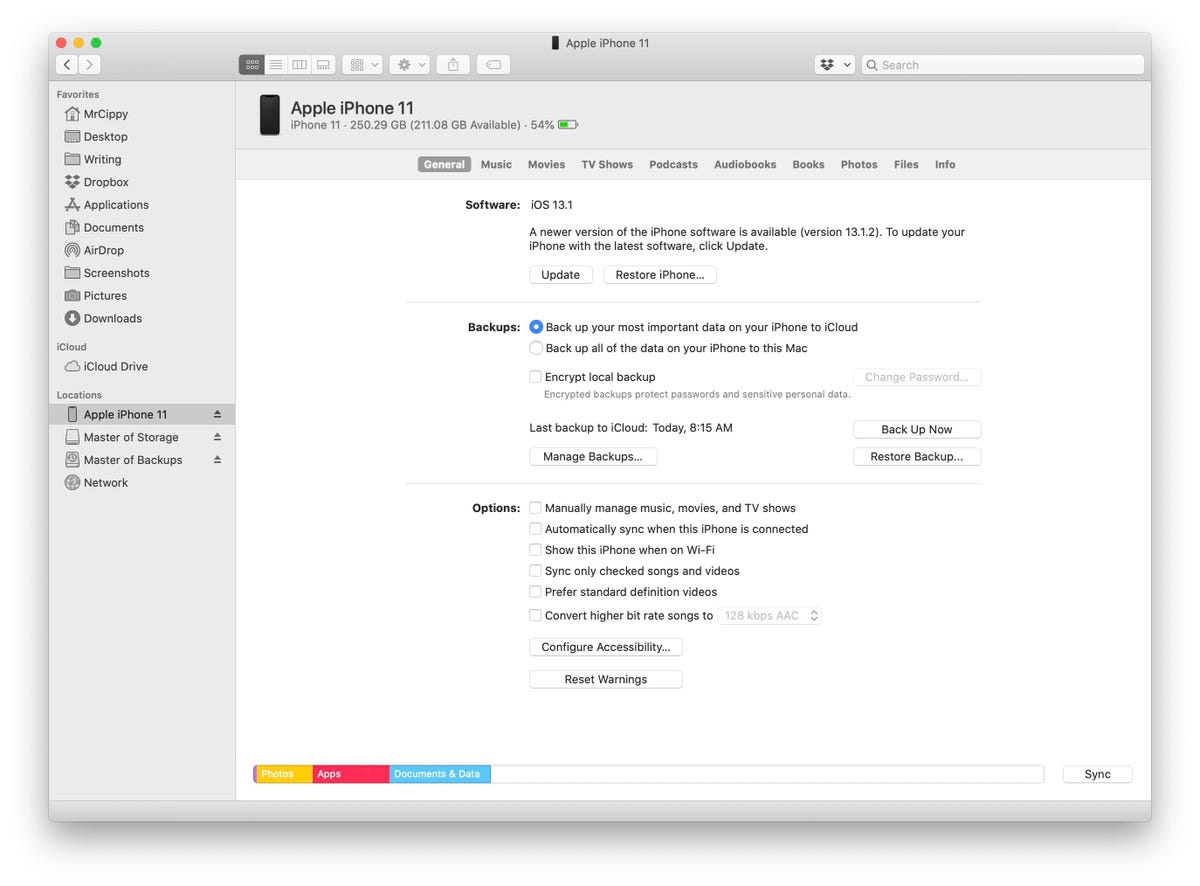
Option 2: Backup on a Mac
If it's been awhile since you've backed up your device using a Mac, the process has changed. With the death of iTunes last year, you'll now have to use Finder to create a backup.
I have a guide detailing the entire process, which truly isn't all that different than the old iTunes-based method.
It distills down to connecting your device to your Mac, opening it in Finder and then clicking a couple of boxes to start a backup.
Make sure to encrypt the backup to make the restoration process so much easier.
Screenshot by Jason Cipriani/CNET
Option 3: Backup on a PC
Use Windows? You can still use iTunes, just like you always have, to back up your mobile Apple devices.
Before you start, make sure you have the latest version of iTunes installed. The easiest way to do that is just to open it, and if you see a prompt to update it, then do follow the steps.
With that done, connect your device to iTunes using a Lightning or USB-C cable. The rest of the process consists of selecting your device in the iTunes interface and starting a backup. We have outlined all of the steps in this post, but let me make one more recommendation: Click the box that says you want to Encrypt your local backup. Doing so will backup all of your email accounts and app passwords, saving you from having to enter those whenever you have to restore your phone.
Now that you have your phone backed up and all of the random junk and clutter removed, install iOS 14 or iPadOS 14. Once it's installed, check out some of our favorite features, including the new homescreen that includes widgets -- that you can customize.
Tricks to unlock iphone how to unlock any iphone how to unlock iphone that is locked how to unlock hidden photos on iphone how to unlock an iphone i found unlock this pc unlock this device unlock this phone free unlock this testcase for 5 hackos
Unlock this hidden iPhone feature to quickly ID songs
Unlock this hidden iPhone feature to quickly ID songs
You come upon a song, one that you've never heard before, and you're really feeling it, so of course you're curious to know the song title and artist. Maybe you ask someone nearby if they know it or you search the lyrics, but if that's not possible -- you've always got Shazam on your iPhone.
Although music identification apps are great for discovering new music, they're not really necessary to help you ID a song. In fact, your iPhone has a built-in feature known as Music Recognition, which is powered by Shazam, and allows you to quickly recognize songs directly from the Control Center, without having to download anything.
In this guide, we'll show you how to set up the feature, use it to identify music and find all the songs you recognize, which for some reason end up hidden on your iPhone.
Add the Music Recognition feature to the Control Center
Nelson Aguilar/CNET
Set up your iPhone's music recognition feature
Before you can use the Music Recognition feature, you must first enable it. On your iPhone, go to Settings > Control Center and scroll down to the bottom of the page. Under More Controls, you should see Music Recognition. Tap the green plus sign next to it and that will add the button to your Control Center.
Quickly recognize songs on your iPhone
To use Shazam's built-in Music Recognition on your iPhone (it works with the iPad, too), simply swipe down from the top right of your iPhone to access your Control Center -- or swipe up from the bottom of the screen on devices with a home button -- and tap on Music Recognition.
Tap on the Music Recognition button in the Control Center to ID a song
Nelson Aguilar/CNET
The Music Recognition button will turn white and you'll see a notification at the top of the screen that says Shazam Music Recognition: On, which means that Shazam is listening for music (you might also see an orange led light on newer iPhone models, indicating that your microphone is turned on).
After a few seconds, the feature should tell you the song name and artist if it recognizes a song (you won't see anything if it doesn't). You'll see more information in a small notification that only appears for a few seconds at the top of the screen. If you tap on it, you'll be redirected to the Shazam App Clip, which is a bite-size version of the full app, so that you don't have to download anything from the App Store.
Unfortunately, unlike the Shazam app, the App Clip version does not store your songs recognized by the built-in Music Recognition feature. Instead, if you go back to the App Clip or even the full Shazam application, you won't find any information.
So where are all your songs recognized by the built-in Music Recognition feature?
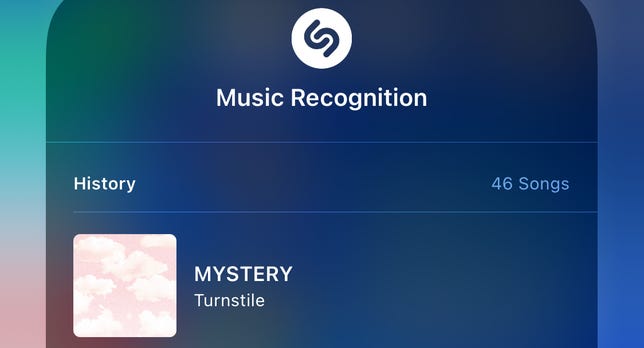
How to find the hidden songs IDedd by your iPhone
Press down on the Music Recognition button to find all your already IDed songs
Nelson Aguilar/CNET
Just like you would when using Music Recognition, swipe down from the top-right corner of your screen to access the Control Center, but instead of tapping on the Shazam button, hold and press for a long second or so.
A window for the Music Recognition feature will appear, showing your entire hidden history of songs recognized by Shazam through the built-in music ID feature. The number of songs will appear in the top right, and you can scroll down your list to view all your songs, with the most recently recognized songs at the top.
If you tap on a song, it will open in the Shazam App Clip. Here you'll have the option to play a preview of the song, open it in the music player of your choice, and view other top songs from the artist, the featured album, similar songs and more.
Pretty easy, right? If you're looking for other lesser-known features on your iPhone, check out our iOS 15 hidden features you didn't know you needed. You can also read our iOS 15 review, in case you haven't yet updated. And if you're looking to upgrade your iPhone, learn more about which model might be best for you.
How to install macos monterey on mac how to download mac os monterey macos monterey download for pc macos monterey on pc how to get mac monterey macos monterey for pc how to install macos monterey on pc how to install macos monterey on windows mac os monterey anforderungen macos monterey enable apache macos monterey download macos monterey 12 5 1
MacOS Monterey: An easy way to download Apple's latest Mac update
MacOS Monterey: An easy way to download Apple's latest Mac update
MacOS Monterey arrived last year alongside upgrades to Apple's MacBook line, but if you haven't updated your own Mac computer yet, don't worry. Installing the latest version of Apple's Mac operating system is a fairly simple process that takes just a few steps. While you're sprucing up your devices for the new year, you may want to consider updating your iPhone or iPad to iOS 15.3, the most recent version of Apple's mobile operating system, too.
Monterey, also known as MacOS 12, adds several of the new features found in iOS 15, like spatial audio in FaceTime and Apple's Focus feature, although we're still waiting for Universal Control. You'll find some of our favorite Monterey features here. And in case you missed Apple's October event, you can read about the new 14-inch MacBook Pro and 16-inch MacBook Pro, plus the M1 chips that are pushing Intel out of Apple computers.
Read more: Best MacBooks for 2022
How to download and install MacOS Monterey
1. Make sure your Mac is compatible with MacOS Monterey.
2. Back up your Mac, just to be safe. You don't want to risk losing everything when you upgrade.
3. On your Mac, go to System Preferences > Software Update and find MacOS Big Monterey. Click Upgrade Now. The download will start immediately, but may take while.
Once you download and install the update and restart your computer, you'll be running on MacOS Monterey.
How to download and install future MacOS public betas
With MacOS Monterey's Universal Control feature, you'll be able to move seamlessly between different screens.
Apple/Screenshot by Sarah Tew/CNET
You no longer need to follow these steps to run MacOS Monterey. But if you like having hands-on previews, here's how to get future MacOS public beta versions on your machine. Note: You should never download a beta version on your primary device, as they're often buggy -- we recommend only doing so if you have a separate tester device available.
Brett Pearce/CNET
1. Back up your Mac, just to be safe.
2.On your Mac, go to beta.apple.com.
3. Sign in with your Apple ID and select MacOS from the list of programs.
4. In the Getting Started section, click Enroll yourMac.
5. On the next page, click on the blue button with the beta version you're looking for.
6. Open the downloaded file and follow the prompts.
7. After the utility is installed, check for a software update using the update tool in System Preferences and then follow the prompts to download and install it.
Once you restart your computer, you'll be running on the latest beta.
For more, check out the biggest announcements from Apple's October event. We've also got instructions for how to download iOS 15 and iPadOS 15.
How to make my laptop last longer how long will my laptop last do laptops or desktops last longer do laptops or desktops last longer how many years a laptop should last how many years can a laptop last how long laptop last is my laptop old hold old is my laptop who takes old laptops how to see how old your laptop is
Your Old Laptop Could Last Longer if You Try These Tips
Your Old Laptop Could Last Longer if You Try These Tips
Before you splurge on a shiny, new laptop, you may want to consider giving your current system some TLC. There's a lot you can do to take better care of that old laptop and stretch its lifespan as long as possible.
Brett Pearce/CNET
The longevity horizon of a laptop is analogous to the longevity of a human: It partly comes down to responsible behavior, partly genetics and partly just dumb luck. There's no guarantee that anything you do can save it from dying young or failing to keep up with increasingly demanding tasks.
And there's no guarantee that if you treat it like crap it won't last far longer than expected -- in 10 years you might find yourself cursing it. "Fail already you slow POS so I can justify buying a replacement!" That's the argument I had daily with my 7-year-old iPad. (Which I still use for some things despite having finally bought a new iPad Pro.)
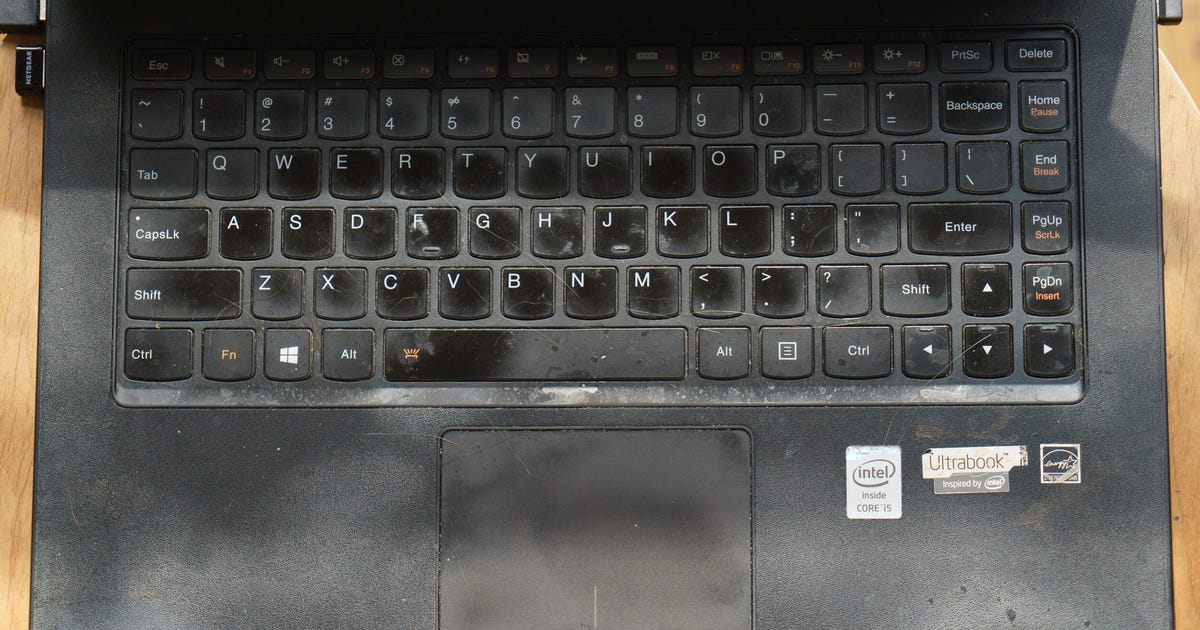
It baffled me, for instance, when I learned that my friend's 7-plus-year-old Lenovo Yoga 2 13 still functions, and actually functions well. It's filthy, it's been knocked off precarious perches by flying cats, it sits baking in hot sunlight, endures summers with 90% humidity indoors, and its operating system hasn't been updated in... I don't think ever. She still hasn't filled up the 128GB drive. Recently she asked if she should upgrade to Windows 11 (from Windows 8.1). After picking my chin up off the floor, I pointed out that she probably couldn't; even if it meets the requirements, it would likely be even slower than it is now.
But I have to report that it has finally gone to that great e-waste bin in the sky. Only because she dropped it one time too many. Time to recycle it.
I kept on using it, thinking the trackpad was just going bad, until it popped out completely and I realized the battery beneath it had swollen. Ah, the joys of the early ultrathin models! (This is a 2013 Samsung ATIV Book 9.)
Lori Grunin/CNET
Yet, in the interim, I've gone through at least two laptops, one with a battery that swelled and another with a wiring and broken plastic issue that rendered the display unusable. They exited this world in close to pristine aesthetic condition. And she had to return a Microsoft Surface Laptop 4 13-inch after a year of working from home thanks to connectivity failures, though it already looked pretty beaten up.
Bottom line: It's a crapshoot.
Read more: Do I Really Have to Upgrade to Windows 11 From Windows 10? What to Know
Hope for the best, prepare for the worst
Data backup is on my long, long list of "do as I say, not as I do" advice. But the longer you hold onto a laptop, the more irreplaceable files and information you'll accumulate on it. And the greater the chance it'll crumble into e-waste. So before you touch your laptop to address any issues -- including cleaning -- you should back it up.
The unwritten rule is this: If you don't back up your laptop, it will experience a catastrophic failure. But if you do, then nothing will happen. Because that's the way the universe works.
No. Just no.
Lori Grunin/CNET
Coddle it
I don't mean sing it a lullaby before you put it to sleep every night, or even treat it gingerly. Just use some common sense when it comes to handling and storage. For example, don't think, "Awww, cute. Instagram it!" when your cat curls up on your laptop keyboard seeking attention or warmth. Think, "That cat is going to annihilate my MacBook's butterfly keyboard."
Other simple practices include:
Don't leave it sitting in hot sunlight.
Keep animals and kids away. If you have to leave it unattended for a minute, shove it somewhere a little less accessible, or at least tilt the lid down partially so that the screen and keyboard are protected.
Don't leave it hanging off the edge of a desk, couch, chair, ottoman and so on. This is a good policy for any object, frankly.
Don't eat around it (she says, flicking pistachio shell pieces off the keyboard and digging flakes out from gaps).
Wash or sanitize your hands before using it to minimize dirt and oils transferring. These can build up over the years.
If you only use it sporadically, keep it in the most dust-free location available.
When it's on or in sleep mode, don't cover it with fabric or leave it in any other environment where there's no airflow. (This goes triple for Windows 10 laptops, since Microsoft's default is to wake them to force updates, but not to make sure it goes back to sleep afterwards. Twice I've had laptops come close to overheating in bed with me because having current virus definitions is obviously more important than not setting me on fire.)
Don't leave it charging 24/7. Note that depending upon the vintage or model of your system, leaving it plugged in may not cause any problems, but using it off-power periodically lets you spot-check incipient battery or electrical system issues. You can also use a utility to check how worn your Windows laptop battery is.
Don't smoke around it. Nothing gunks up electronics faster.
You should also check the adapter cable periodically, especially if you've got pets. Run your fingers along it feeling for teeth marks. A chewed-through cable won't ruin your laptop -- they're designed to stop working if the insulation is punctured -- but it can get expensive replacing them. My cat, Iris the Destroyer, earned her name by chewing through two Dell AC adapters at $70 a pop (among other reasons). If you catch it early, you can reroute them for safety. Plus, it's not good for the animals.
If your cat likes to curl up on the keyboard, get a tilting laptop stand -- Felix will likely find an alternative space on your desk that's even less convenient -- or create a space near your desk where your cat can still supervise you and that mimics the radiating warmth of the keyboard.
Clean it
It's easy to ignore basic maintenance, especially if you use your laptop every day. You just stop noticing the crud after a while. But periodically taking a minute to examine entry points around keycaps, the keyboard surface, touchpad surface, speaker grilles, hinge, ports, vents and screen may save you some heartache (and money) in the long run. A filthy touchscreen can make it less responsive as well.
But even if none of it poses a long-term health issue for your system, you don't want to wait until detritus builds up so much that it's almost impossible to get out or off. Keeping the fan vents clear and dust-free is especially important.
Streamline it
Every now and then, take a pass through applications and files, as well as programs and services that run at startup, and jettison anything you don't need. Will doing that extend the life of the system? Probably not, except perhaps by reducing a fractional amount of heat generated by unnecessary processor activity.
But at the very least, periodically weeding it can make it feel faster, just like cleaning out a room can make it feel bigger. And at best you will experience some real performance improvements, including improved battery life. It may also turn out that you don't need the memory or storage upgrades that you thought you did. And if you never bothered to uninstall the bloatware that came with your Windows system, try uninstalling it. A clutter-free Start Menu may improve performance a little.
The best way to make it feel like new is to freshen the operating system, which essentially reinstalls it while leaving your data and files intact, rather than wiping the drive and starting anew. In Mac OS you use Recovery Mode. Windows has a couple options: Refresh to reinstall the operating system while preserving your files; and Fresh Start, which refreshes the operating system but without all the bloatware that might have come with it initially.
At some point, you'll probably feel like the incremental approach isn't working for you anymore. Then it's time to consider wiping it off and starting from scratch: You'll need to reinstall the same version of the operating system and applications. This can be trickier, since it may require repurchasing old programs, recustomizing every aspect of the operating system or application behavior, debugging system glitches again and more. Plus, you run the risk of breaking something that was working fine before.
That's software. What about hardware? Aside from upgrades, a laptop's hardware remains pretty static. There's no magic wand to wave that will make your trackpad feel five years younger. One exception is battery life: Changing your software settings can make a big difference to the battery's longevity.
Here are some more suggestions:
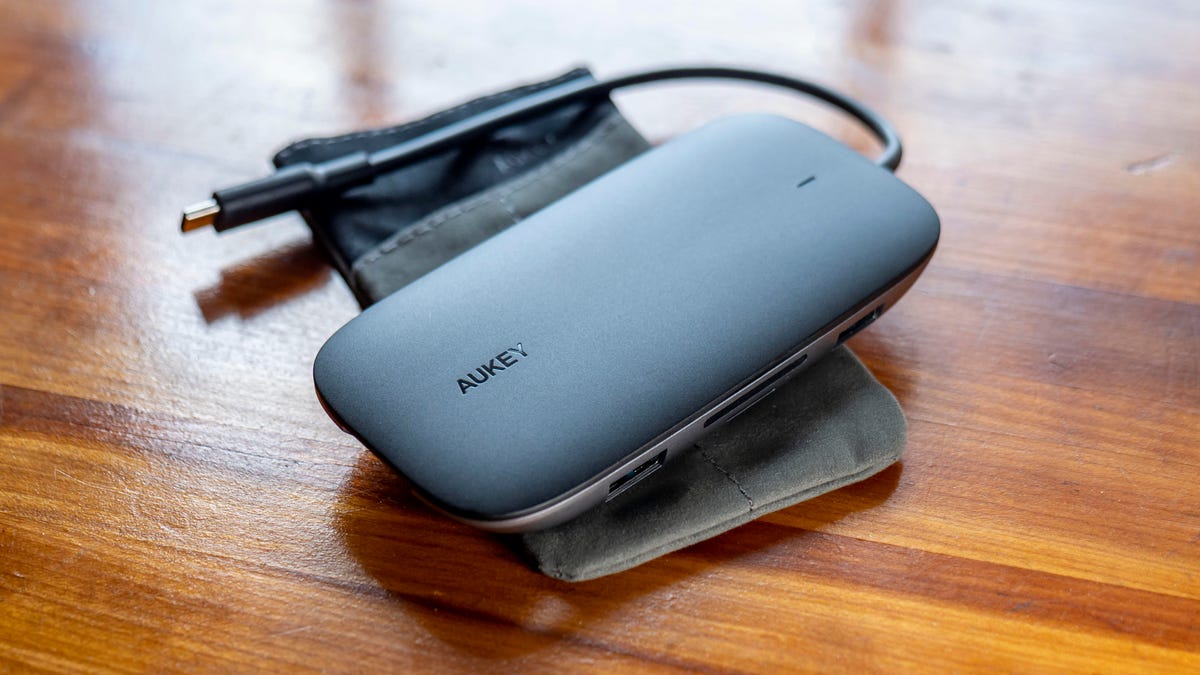
An external hub can greatly expand the usability of an older system as well as reduce wear and tear on the connections.
Lori Grunin/CNET
Accessorize it
Using accessories such as an external keyboard, mouse or monitor -- even cheap ones -- may help save wear and tear on the built-in components and hinge. More important, once those components of a laptop start to get wonky, the system itself will still be usable if you can find external replacements for the devices.
If you're constantly moving between desktop locations, it's worth getting a dock or hub for those external devices. This will save wear and tear on the connections from constant plugging and unplugging. It also adds extra ports, which is another perk that will extend the useful life of your laptop. Here are some more suggestions:
Upgrade it
Because real upgrades always require some expense, this is probably one of the final steps you'll consider. But small, incremental upgrades can make a big difference. Not as many laptops support internal memory or storage upgrades as they used to -- replaceable batteries even less so -- but if you can, you should definitely take advantage of the option as you start to hit limits. That's one of the advantages of hanging onto an older laptop -- it's more likely to be upgradable.
That's as long as you feel comfortable opening it up to stick things in. Before you start down this path, make sure to find an upgrade or maintenance guide for your particular system to verify that it supports your plan. You should also check that it doesn't require expensive nonstandard components, which will cost more than it's worth.
When I bought this inexpensive Asus UL30 in 2009, it was partly for its upgradability and removable battery. The display failed before I even got a chance to take advantage of that. (It was probably fixable, but wasn't worth it given the price.)
Lori Grunin/CNET
External upgrades can be easier and more practical, though in some cases they don't provide as big a boost. Or they may not make as big a difference as you thought they would. I secretly added a Netgear Wi-Fi 5 (802.11ac) USB dongle to a tech-challenged friend's laptop, which was equipped with pokey Wi-Fi 4 (802.11 b/g/n). Speedtest showed that throughput doubled. Given how much time she spends online, that seemed to make it worth the money.
She didn't notice any difference.
If you're running short on storage, an external drive is an obvious enhancement. Unless you only plan to use it to offload files you don't use often, you may want to avoid going too cheap. A slow external drive can be more annoying than uplifting. You can also potentially improve performance by booting from an external drive, though that depends on the connection and the drive speed.
Another possible performance upgrade -- only if you've got a newer laptop with a Thunderbolt 3 connection, though -- is to add an external graphics processor, aka eGPU, to boost speed in applications or games with heavy GPU usage. This can be a pricey upgrade, though, and the enclosure and the graphics card are frequently sold separately, which can obscure the true cost.
You may want to consider moving to a newer version of the operating system if you're not on it already. If your laptop supports Trusted Platform Module, or TPM -- it probably does if it's not really old or really low-end -- consider upgrading to Windows 11. Windows 11 adds almost nothing notable in my opinion, but it has a refreshed interface and surfaces features you might not have known were there, which can at least make your laptop feel like it's newer.
I don't think an OS upgrade is a no-brainer, though. If your laptop's crumbling to dust, a newer version of the OS may not unequivocally improve things. And you also run the risk of losing the ability to run some applications.
Case in point: In 2019, Mac OS Catalina (10.15)removed support for 32-bit applications. So if a program hasn't been migrated from 32 to 64 bit -- and there are good reasons why it may not have been -- the upgrade would actually be a step backward for you.
Sticking with an outdated version of an operating system is widely considered to be bad hygiene, though, because you don't get the constant barrage of virus, malware and security updates that up-to-date systems receive.
Convert it
And finally, when you're at the end of your rope, you've got nothing to lose by replacing the operating system with something new altogether. If your laptop powers on and at least most of the keys work, there's a good chance it can be converted into a Chromebook, running Google's Chrome OS, to give it at least a little more useful life before it goes to live upstate on a retired laptop farm.
You need to try these new apple watch 7 amazon you need to try these new apple watch 7 charger you need to try these new apple watch update you need to try these new apple watch you need to try these new apple ipad you need to try these exercises you need to try these delicious mashed you need to try these starbucks 40 la restaurants you need to try before you die how long do you need to keep tax records gma3 what you need to know
You need to try these new Apple Watch 7 features
You need to try these new Apple Watch 7 features
After setting up your new Apple Watch Series 7 that you got this holiday season and pairing it with your iPhone, it's time to check out all the new features and tweak a few settings to make the most of your new Watch. The Apple Watch Series 7 comes with a larger screen, faster charging and a more durable design. That might not sound as exciting as the blood oxygen sensor that debuted in last year's Series 6. (Here's how the Apple Watch 7 compares to the Apple Watch 6.) But the Series 7's new features have the potential to add more convenience to a lot of everyday tasks, from checking the time to resp onding to texts and tracking your sleep.
Apple unveiled the $399 Apple Watch Series 7 during its product launch event on Sept. 14 alongside the iPhone 13 family, a refreshed iPad Mini, and a new entry-level iPad. The new Apple Watch is a light update to the Series 6 that's ideal for people looking to replace a watch that's several years old.
Read more:Apple Watch 7 review: A slight upgrade compared to last year's smartwatch
If you're considering the Apple Watch Series 7 or already bought one, here's a breakdown of what's new and why it matters. You can also check out all the Apple Watch Series 8 rumors we've heard so far.
Apple Watch Series 7 has a QWERTY keyboard
The Apple Watch Series 7 should be easier to type on.
Apple
The Apple Watch has a new QWERTY keyboard that takes advantage of its larger screen, which is about 20% bigger than the Series 6, allowing you to type similarly to how you would on a phone.
What's new: A full-size keyboard means that you aren't limited to sending a canned response to a text, scribbling a quick note or dictating a message, as is the case with the Apple Watch Series 6.
How you'll use it: The Apple Watch Series 7's QWERTY keyboard lets you tap each key to type, or use Apple's QuickPath feature to swipe between letters without lifting your finger. You'll still want to use your phone for messages longer than a short sentence, but it still generally makes it easier to text using the watch.
The bottom line: The Series 7's QWERTY keyboard makes it easier to send longer and more complex messages that are uncomfortable to scribble or too private to dictate. It's another example of how the Apple Watch has evolved to become better at working independently of your phone in the years since its launch.
Third-party Apple Watch apps like FlickType already allow you to type on your Apple Watch, but having it as a native option on the watch results in a smoother experience. It also means watch owners won't have to rely on third parties for this potentially vital tool, which is important considering some keyboard apps have been accused of participating in App Store rating scams.
Read more: Apple Watch 7 upgrade: How to trade in your old watch to get the best deals
Larger screen on the Apple Watch Series 7 amps up reading
The Apple Watch Series 7's larger screen can fit more text.
Apple/Screenshot by Sarah Tew/CNET
The Series 7 is Apple's first major redesign since the Series 4 launched in 2018. The new watch comes in 41-millimeter and 45mm sizes for the first time, representing a shift away from the 40mm and 44mm sizes that were available on the Series 4 through Series 6.
What's new: The Apple Watch Series 7's screen is about 20% larger than the Series 6's and more than 50% bigger than the Series 3's. The borders that frame the screen are also 40% smaller than those of the Series 6, allowing Apple to expand the screen size without making the device much larger. But don't worry, older watch bands are still compatible with the Series 7.
How you'll use it: The Series 7's larger screen makes it better at its most important job: showing information that's easy to see at a glance so that you don't have to grab your phone. The larger screen means the Series 7 is capable of displaying 50% more text without having to scroll, making reading text messages, emails and notifications more convenient.
There's more: Apple also updated the user interface in its apps to make better use of that larger screen. Apps like the stopwatch, activity and timer now have larger buttons, meaning it's easier to hit snooze even when you're still half asleep. You also get specific watch faces that are optimized for the Series 7's bigger display, such as a new version of the Modular face that can fit complications with more information. I've been using this new watch face to see my activity progress, the time and weather forecast at a glance.
And don't forget, WatchOS 8 introduces the ability to set Portrait mode photos as your watch face, and the Series 7's larger screen is better able to show them off.
Read more:Apple Watch Series 7 vs. Series 6: The biggest changes coming in Apple's new smartwatch
A brighter screen in always-on mode
Apple/Screenshot by Sarah Tew/CNET
Apple also updated the Apple Watch's display in a different way by making the screen more visible in always-on mode. It's another addition that makes it even faster to get quick bits of information from your watch.
What's new: The Apple Watch Series 7's screen is up to 70% brighter in always-on mode when your wrist is down, according to Apple. However, Apple specifically says this applies to indoor usage.
How you'll use it: The Series 7's improved brightness means it is even easier to see information like the time, your activity rings and your next meeting without having to wake the watch's screen. It feels like a step toward making the Apple Watch's screen appear the same whether it's asleep or in use, and doing so creates a more seamless look that doesn't feel jarring when switching between awake and idle mode.
To use this feature, you'll want to make sure the always-on display setting is turned on in the Apple Watch's settings menu. On your Apple Watch's app screen, press the settings icon, scroll down to Display & Brightness and tap Always On. From there, make sure the switch next to Always On is toggled on.
What about battery life? You could also choose to keep this feature turned off if you want to maximize battery life, and Apple hasn't said whether the brighter always-on screen will affect the watch's power consumption. I've been wearing the Apple Watch Series 7 daily with the always-on display setting turned on, and it typically lasts for about a day and a half. But battery life will always vary depending on your usage, and activities like using GPS connectivity while running will cause it to drain faster.
Read more: Best Apple Watch accessories
Apple Watch Series 7 charges faster than Series 6
The Apple Watch Series 7 should charge 33% faster than the Series 6.
Apple/Screenshot by Sarah Tew/CNET
The Apple Watch Series 7's battery lasts as long as the Series 6, but the amount of time it takes to charge your watch has dipped.
What's new: The Apple Watch Series 7 can charge up to 33% faster than the Apple Watch Series 6, according to Apple. It takes 45 minutes to charge from zero to 80%, and 8 minutes of charging should enable 8 hours of sleep tracking. In CNET's testing of the new Apple Watch, reviewers found this to be true. Charging the Watch for at least 30 minutes made the battery jump from zero to 54%. In comparison, the Series 6 only replenished 37% in the same amount of time.
How you'll use it: We've been asking for more battery life out of the Apple Watch for years, but that's especially relevant now that Apple has added native sleep tracking to its smartwatches. Rather than extending the watch's battery life, Apple makes it easier to quickly charge the watch during short windows throughout the day, presumably so that you don't have to charge it overnight. The idea is that you'll be able to top off the watch's battery whenever you have a few spare minutes.
The bottom line: The Apple Watch Series 7's faster charging speed is another way in which Apple is trying to make its smartwatch a more capable sleep tracker. In addition to making the Series 7 easier to charge in a pinch, Apple also added the ability to measure respiratory rate during sleep with its WatchOS 8 update. Taken together, these improvements could help Apple catch up to Fitbit, which offers multiday battery life on its watches and more in-depth sleep metrics.
Read more:Best Apple Watch bands for 2021
The Apple Watch Series 7 has a brawnier build
The Apple Watch Series 7 comes with tougher crystal and is dust resistant.
Apple/Screenshot by Sarah Tew/CNET
Exercise tracking has become one of Apple's biggest areas of focus for the Apple Watch. The Series 7 is more suitable for outdoor activity since Apple claims it has a more durable build.
What's new: The Apple Watch Series 7 is rated for IP6X dust resistance (a first) and is coated in a crystal cover that Apple says is 50% thicker than that of the Apple Watch Series 6. That means you'll feel at ease wearing it to the beach or during a hike.
How you'll use it: The Series 7's increased durability pairs nicely with the new cycling features in WatchOS 8. The new software brings an updated version of fall detection that Apple says can tell the difference between falling off a bicycle and a different type of accident. Apple also says WatchOS 8 can automatically detect outdoor cycling workouts. (See Lexy Savvides' test of the new Apple Watch cycling features here.)
The bottom line: We put Apple Watch Series 7's durability to the test. Those who want a truly rugged watch have military-grade options from Garmin and Casio to choose from, or could opt for a rugged Apple Watch case. But these updates suggest Apple is trying to push the Apple Watch beyond basic workouts and appeal to those who might need a more durable watch for activities like rock climbing. That's the premise behind the rumored Explorer Edition, which Bloomberg reports will come with greater impact resistance and could launch in 2022.